DSCI 100 Course Project: Set Up

Sky (Kehan) Sheng

๐Ÿ“‹ Your course project

๐Ÿ“‹ Project: what you hand in

  • The project will be self-contained in one Jupyter notebook. Fill in the cells with your code and your text.
  • An individual project: your own work, your own repository.
  • Reproducible: it must run from top to bottom without errors, by itself, with no other files.
  • You are required to use the methods you learned from DSCI 100. If you look something up elsewhere (e.g. how to handle missing data), put a link at the end of your report. A blog post or StackExchange link is fine.

๐Ÿ“‹ Project: checkpoints

Checkpoint Done up to Due (11:59pm)
A Task 0.1: your name, repository link and seed; and upload your repository URL to Canvas Saturday, Oct 10
B Task 3.1 Saturday, Oct 31
C Task 5.1 Saturday, Nov 7
Final The whole report, .ipynb and .html, also uploaded to Canvas Saturday, Dec 5
  • A checkpoint is a draft. You can keep changing your work after it.
  • We will look at what is on your GitHub repository right after 11:59pm. A commit you never pushed does not count.

๐Ÿ“‹ Project: Generative AI

  • You have all the tools you need to write this code yourself.
  • โœ… Use AI as an advanced search engine, e.g. to understand an error.
  • โŒ Donโ€™t use it to write the code or text in your report.
  • Any AI use must be disclosed at the bottom of your report.

Example of a good disclosure: โ€œI tried to fit a model with function X and got error Y. AI helped me see the error came from a missing value.โ€

Important

Not disclosing AI use is academic misconduct. Submissions suspected of inappropriate use of AI will be flagged by the teaching team, and handeled by a case-by-case basis.

Project assignment details are on Canvas
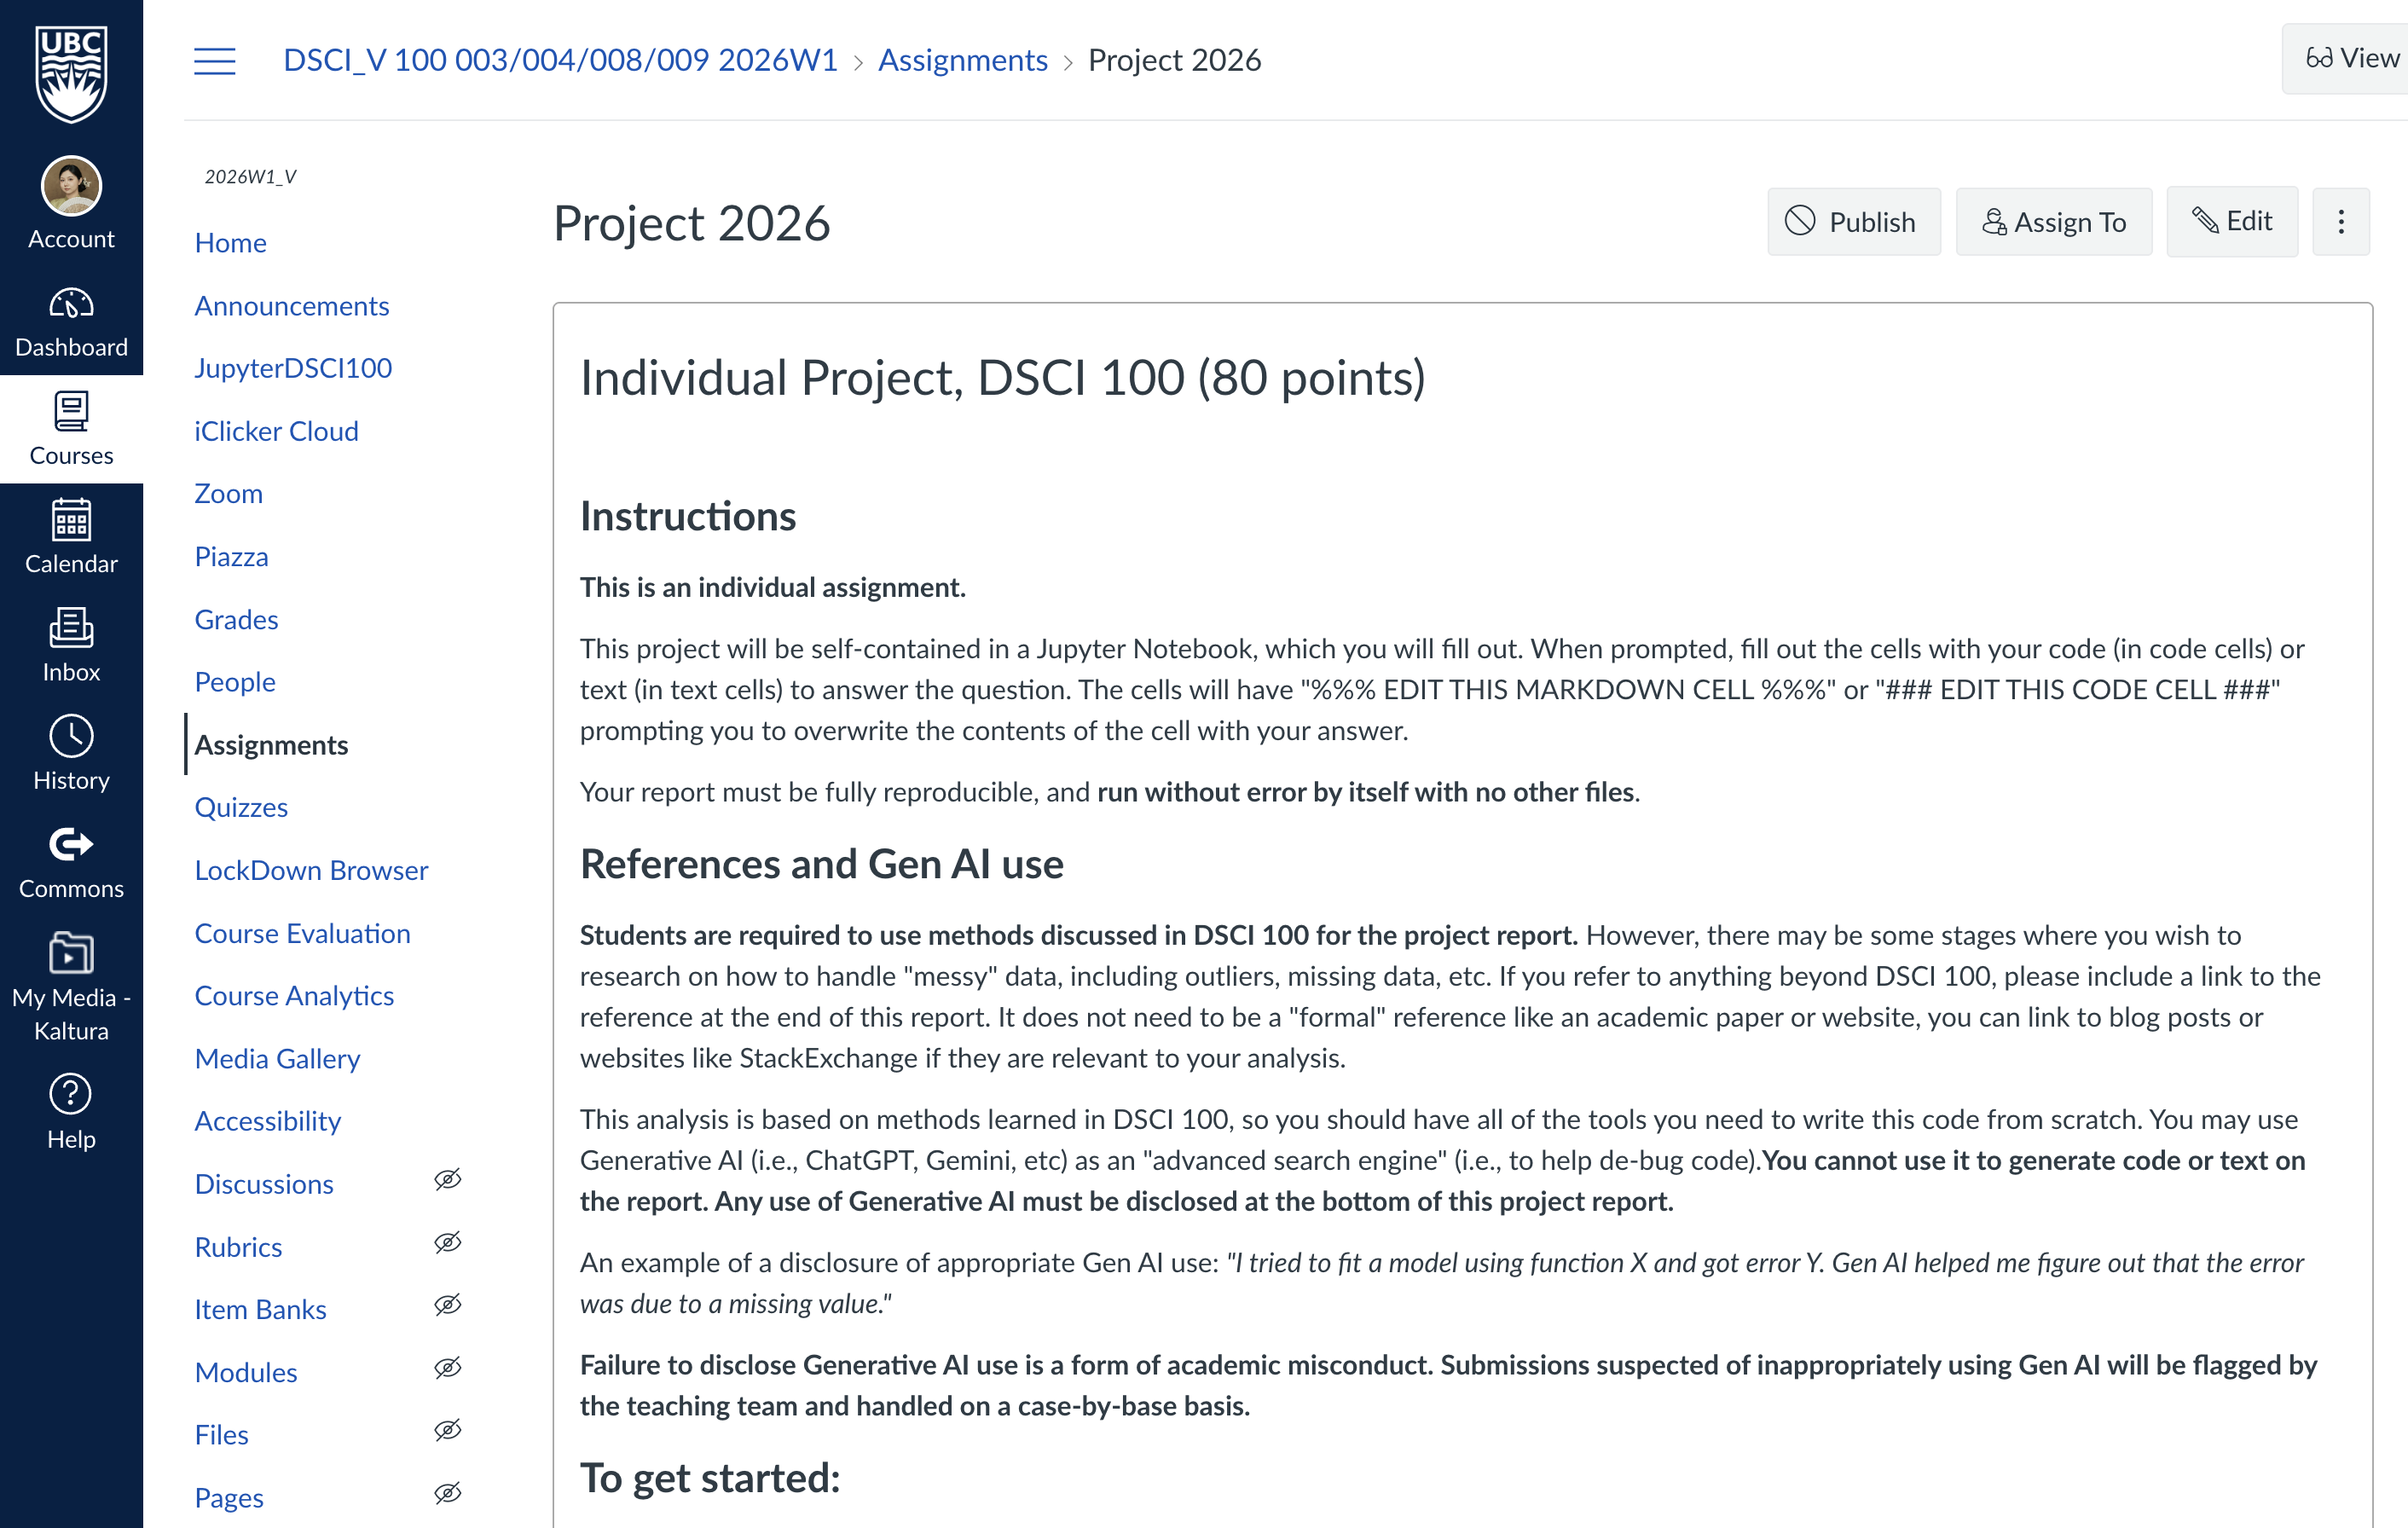
The project assignment details on Canvas.

Set up your project step by step

Tip

If you prefer a video walkthrough, you can watch this video.

๐Ÿ”ฌ Demo: set up your project with me

Follow along on your laptop. Every step stays on this page, so you can come back to it.

Part Where What you do Git word
1 GitHub Make your own copy of the project template
2 JupyterHub Copy your repository into JupyterHub clone
3 JupyterHub Fill in your name, link and seed
4 JupyterHub Take a snapshot add, commit
5 JupyterHub โ†’ GitHub Send the snapshot to GitHub, with a token push
6 GitHub โ†’ JupyterHub Bring a change made on GitHub back pull
7 JupyterHub โ†’ GitHub Add a new file of your own add, commit, push

Part 1: Make your own repository

๐Ÿ“‹ Step 1: Use the template

Open the project template. Click Use this template, then Create a new repository.
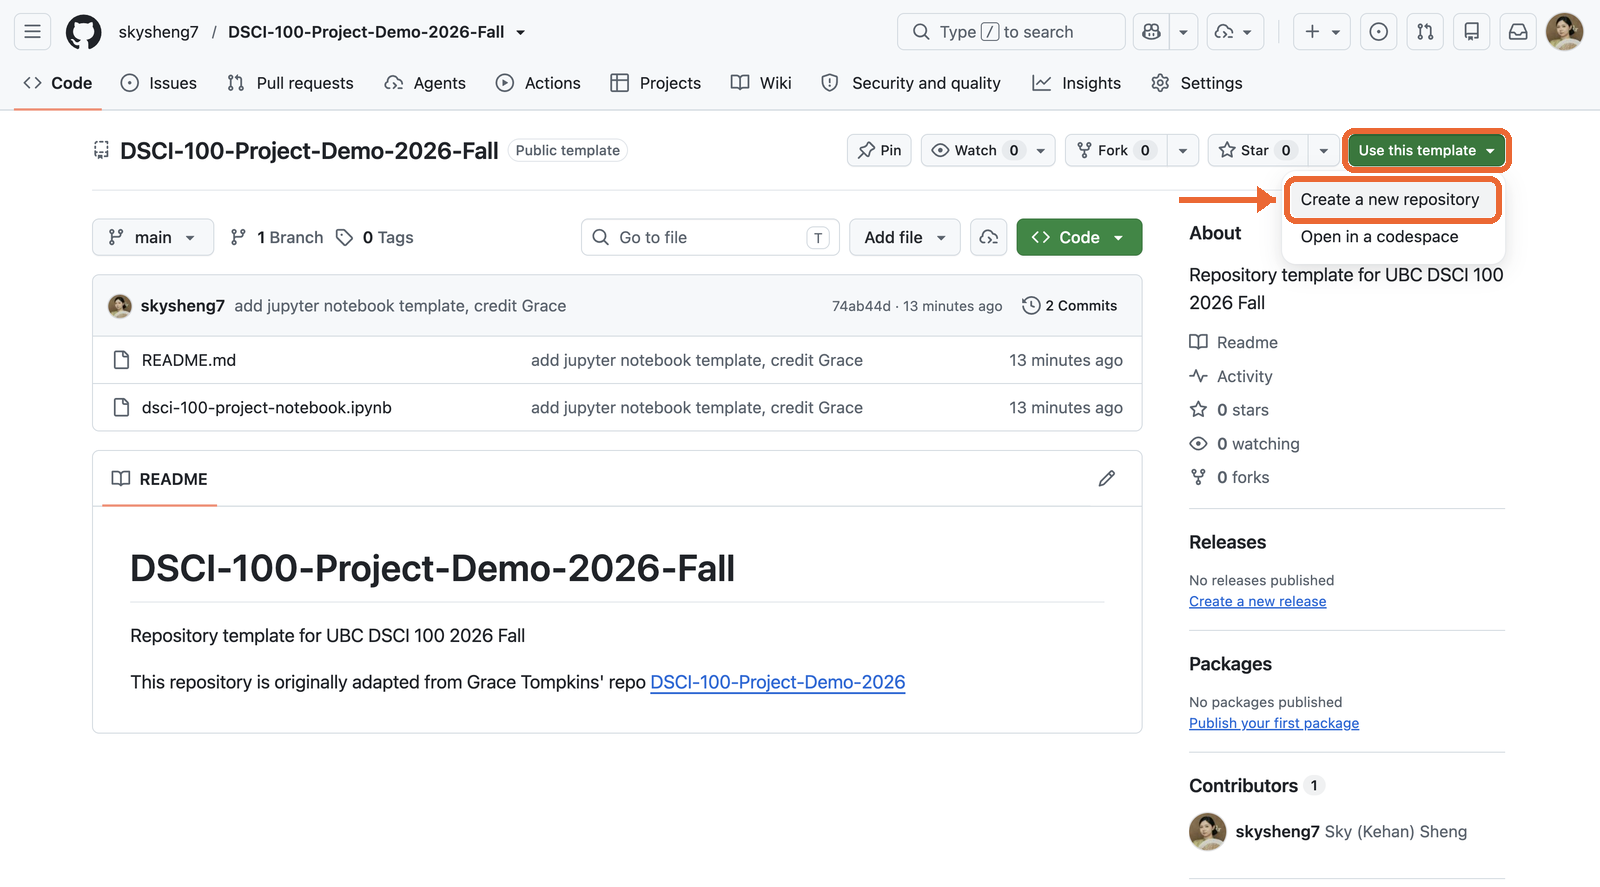
The project template on GitHub, with Use this template and Create a new repository highlighted.

๐Ÿ“‹ Step 2: Name it and keep it public

Name it dsci-100-project- plus your first and last name, e.g. dsci-100-project-sky-sheng. Leave it Public. Click Create repository.
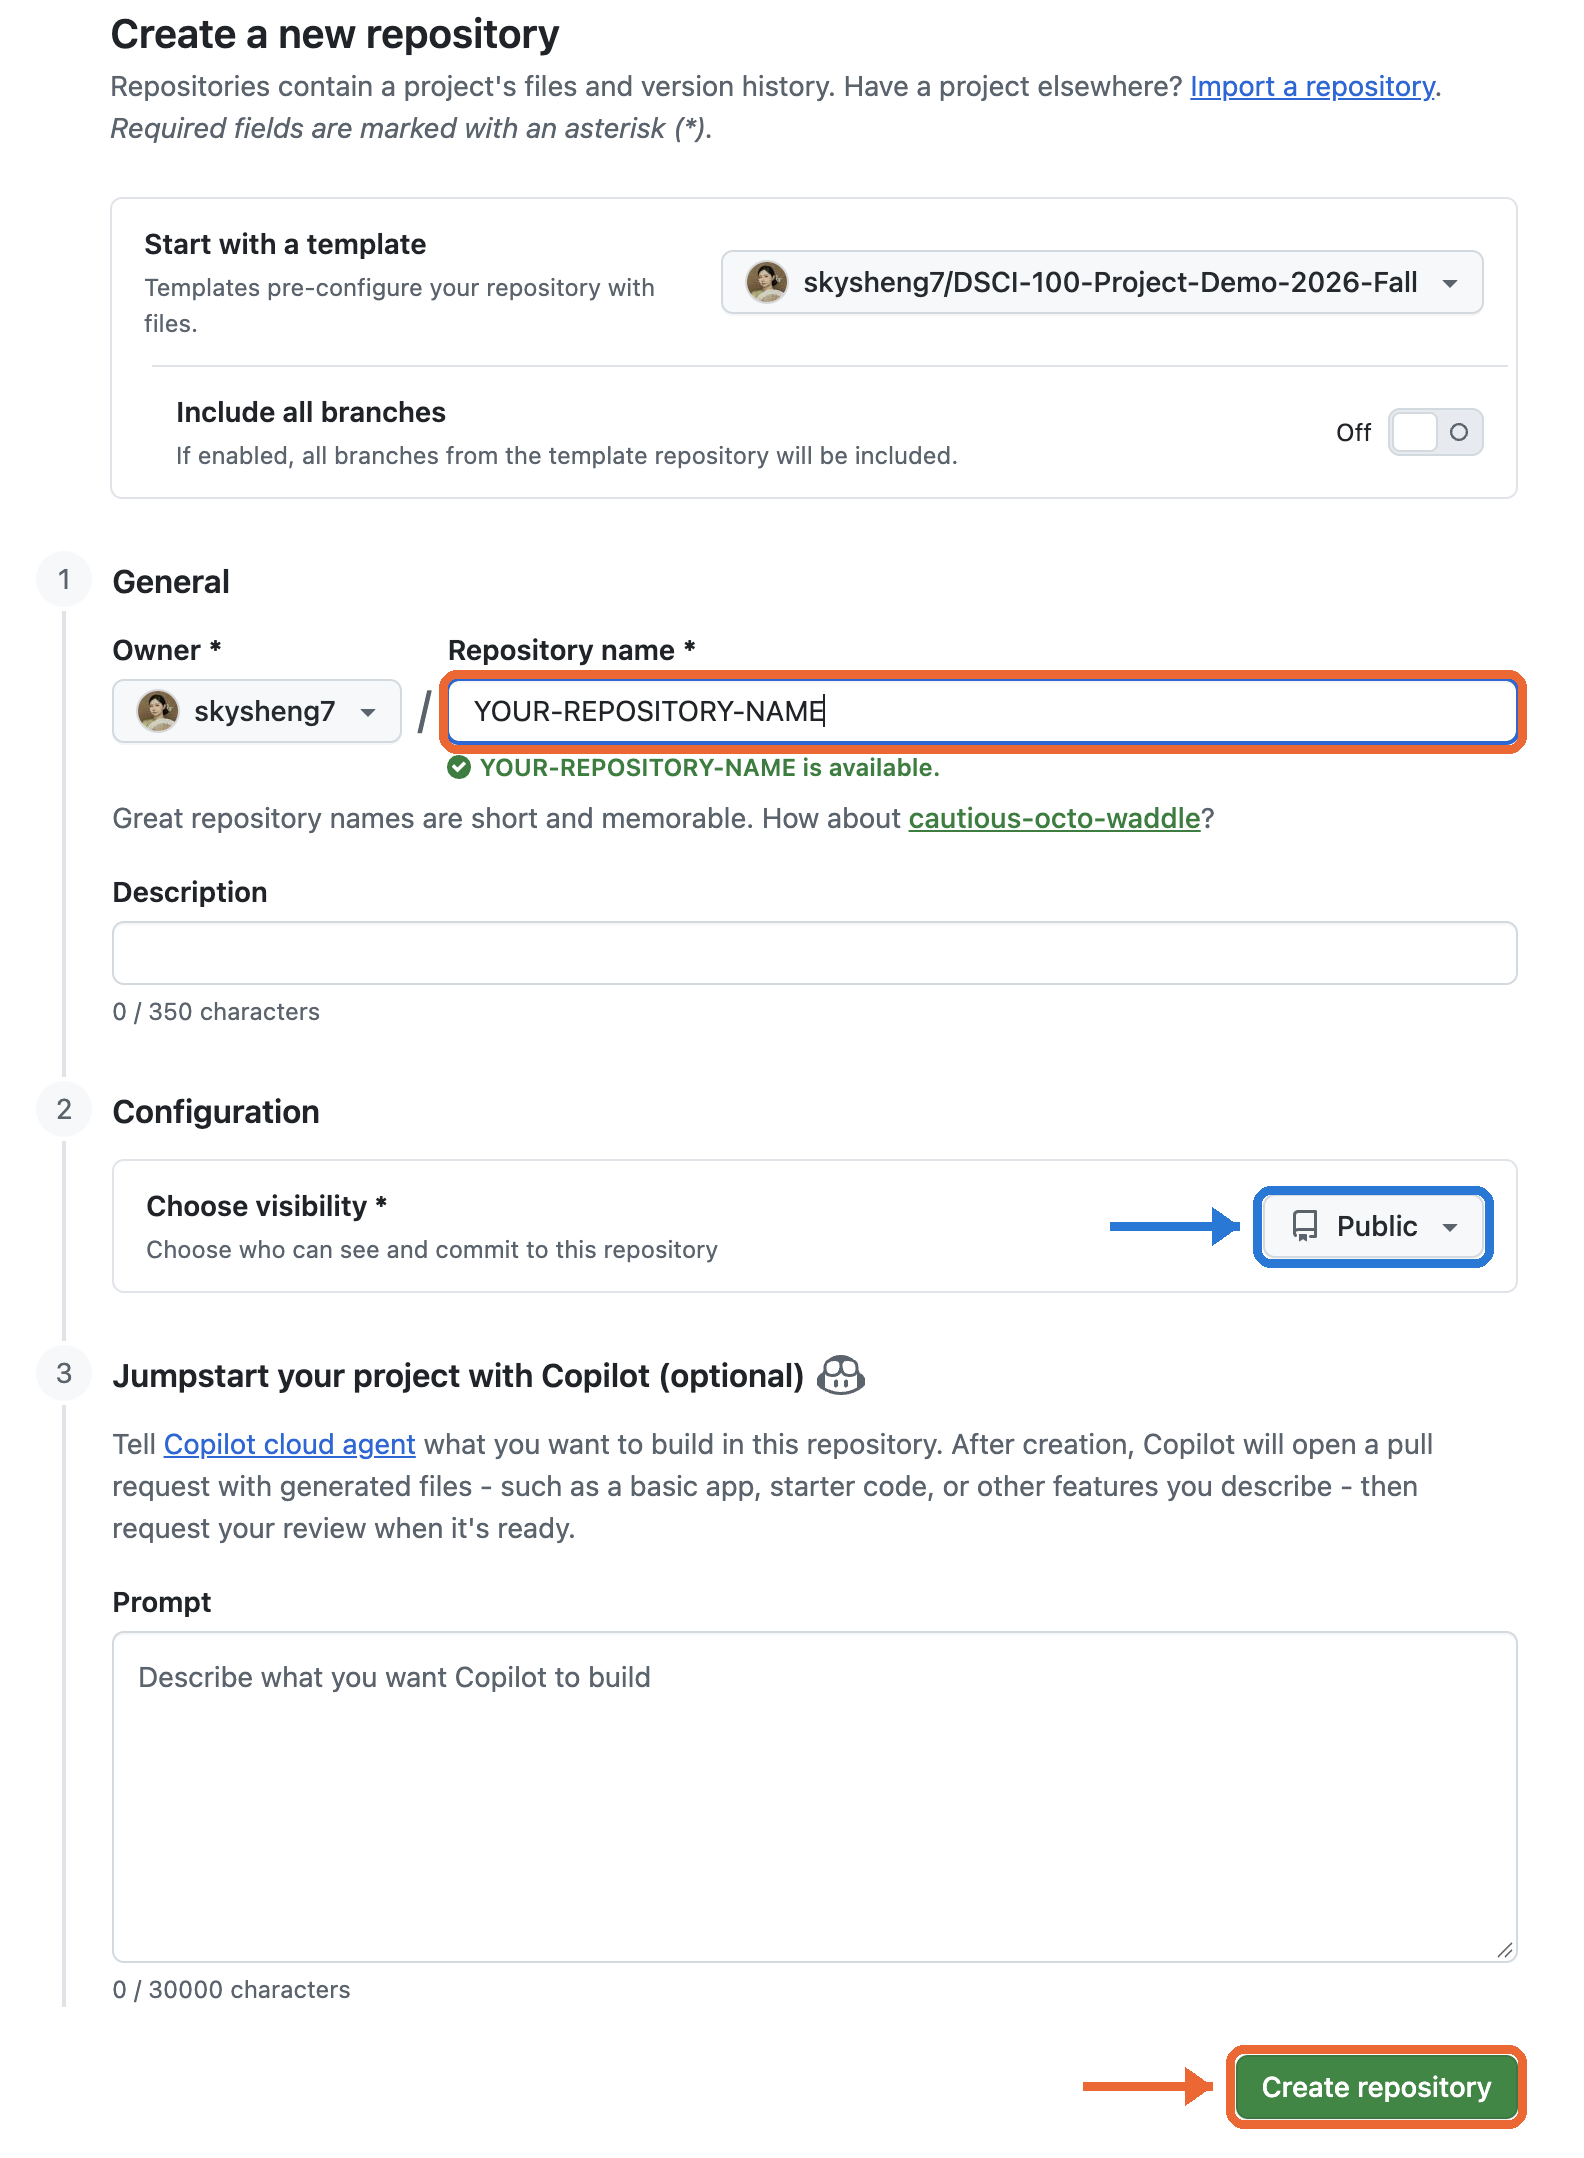
The Create a new repository form, with the name box, the Public setting and the Create repository button highlighted.

๐Ÿ“‹ Step 3: Copy your repositoryโ€™s address

Click the green Code button. Under HTTPS, click the copy icon. You need this address three times: to clone, in your notebook, and on Canvas.
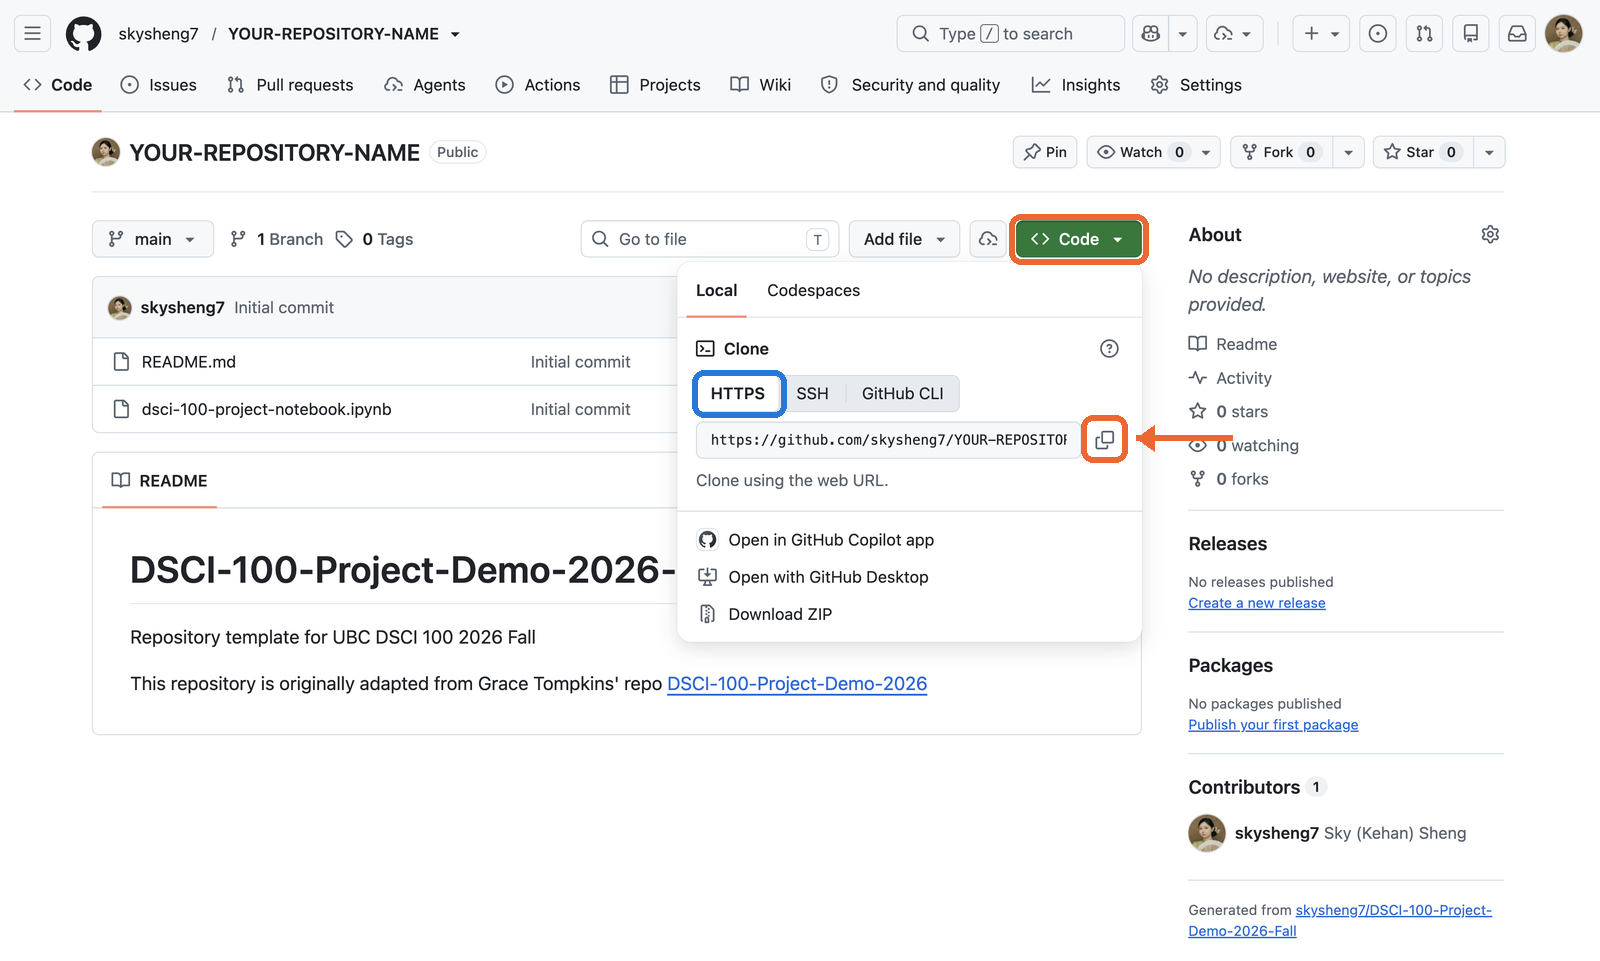
The new repository on GitHub, with the Code button, the HTTPS tab and the copy icon highlighted.

Part 2: Copy your repository into JupyterHub

๐Ÿ“‹ Step 4: Open JupyterHub from Canvas

On Canvas, click JupyterDSCI100 in the menu on the left.
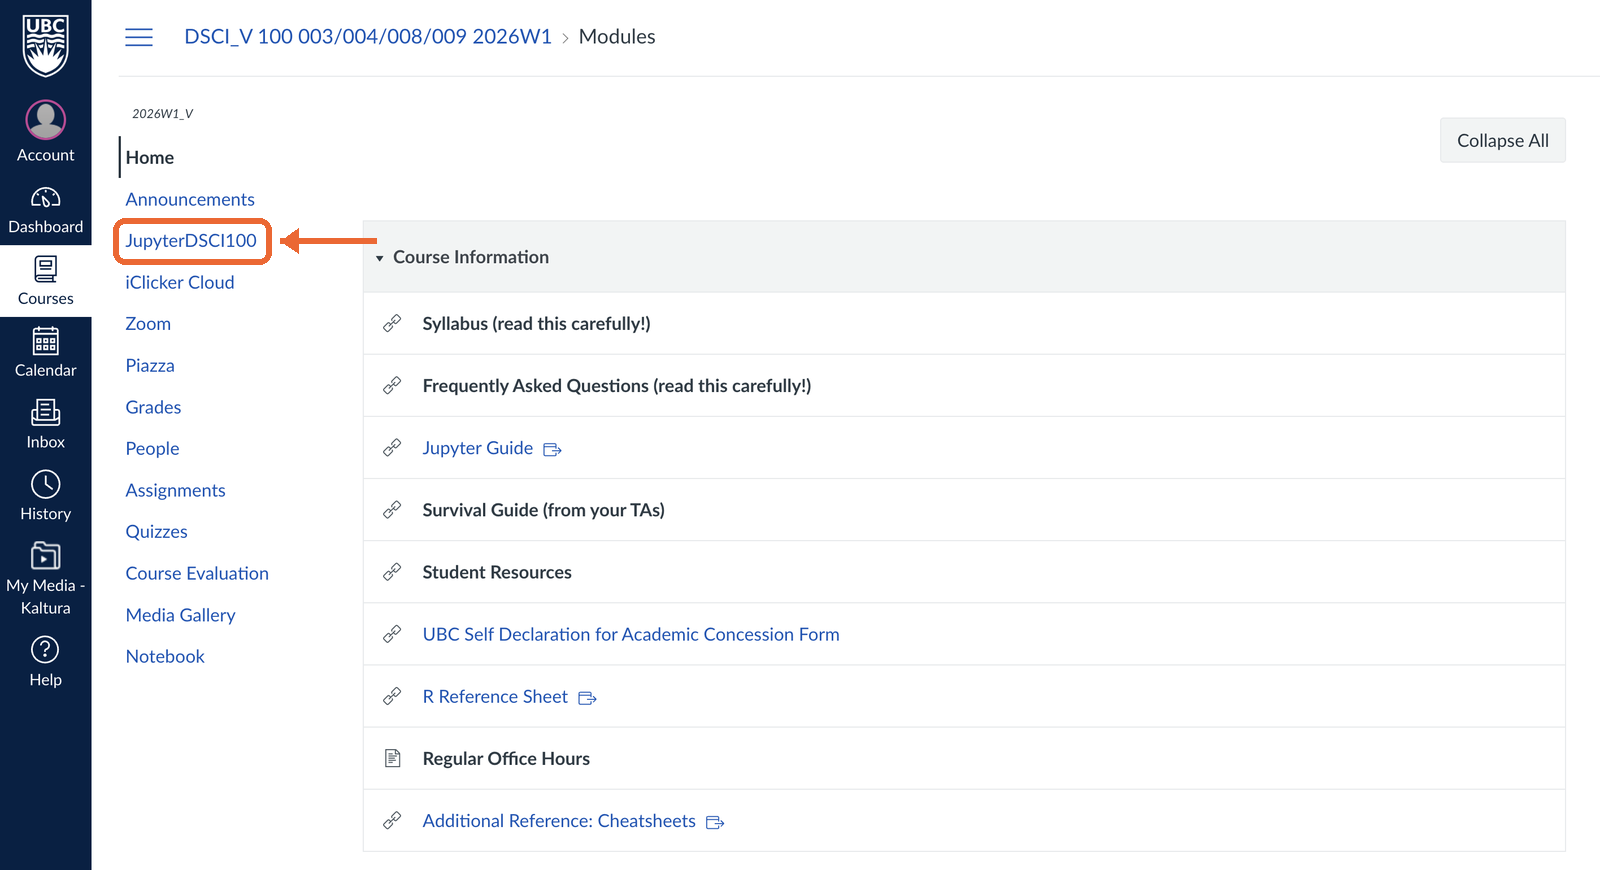
The DSCI 100 Canvas page, with JupyterDSCI100 highlighted in the course menu.

๐Ÿ“‹ Step 5: Start your server

Click Start My Server. It can take a minute.
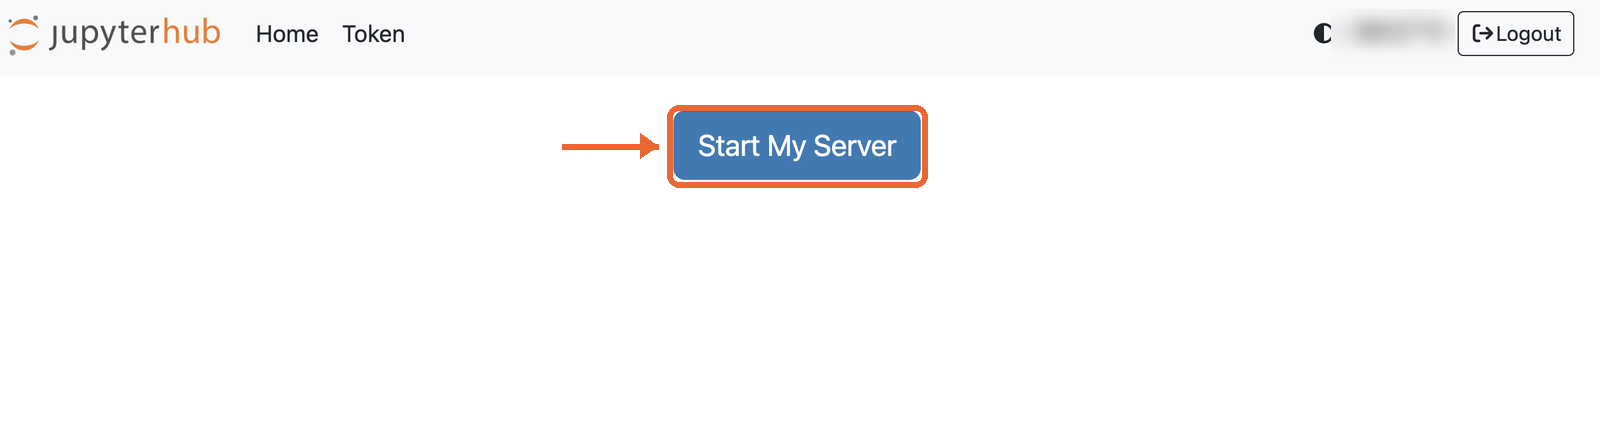
The JupyterHub home page, with the Start My Server button highlighted.

๐Ÿ“‹ Step 6: Stay in the top folder

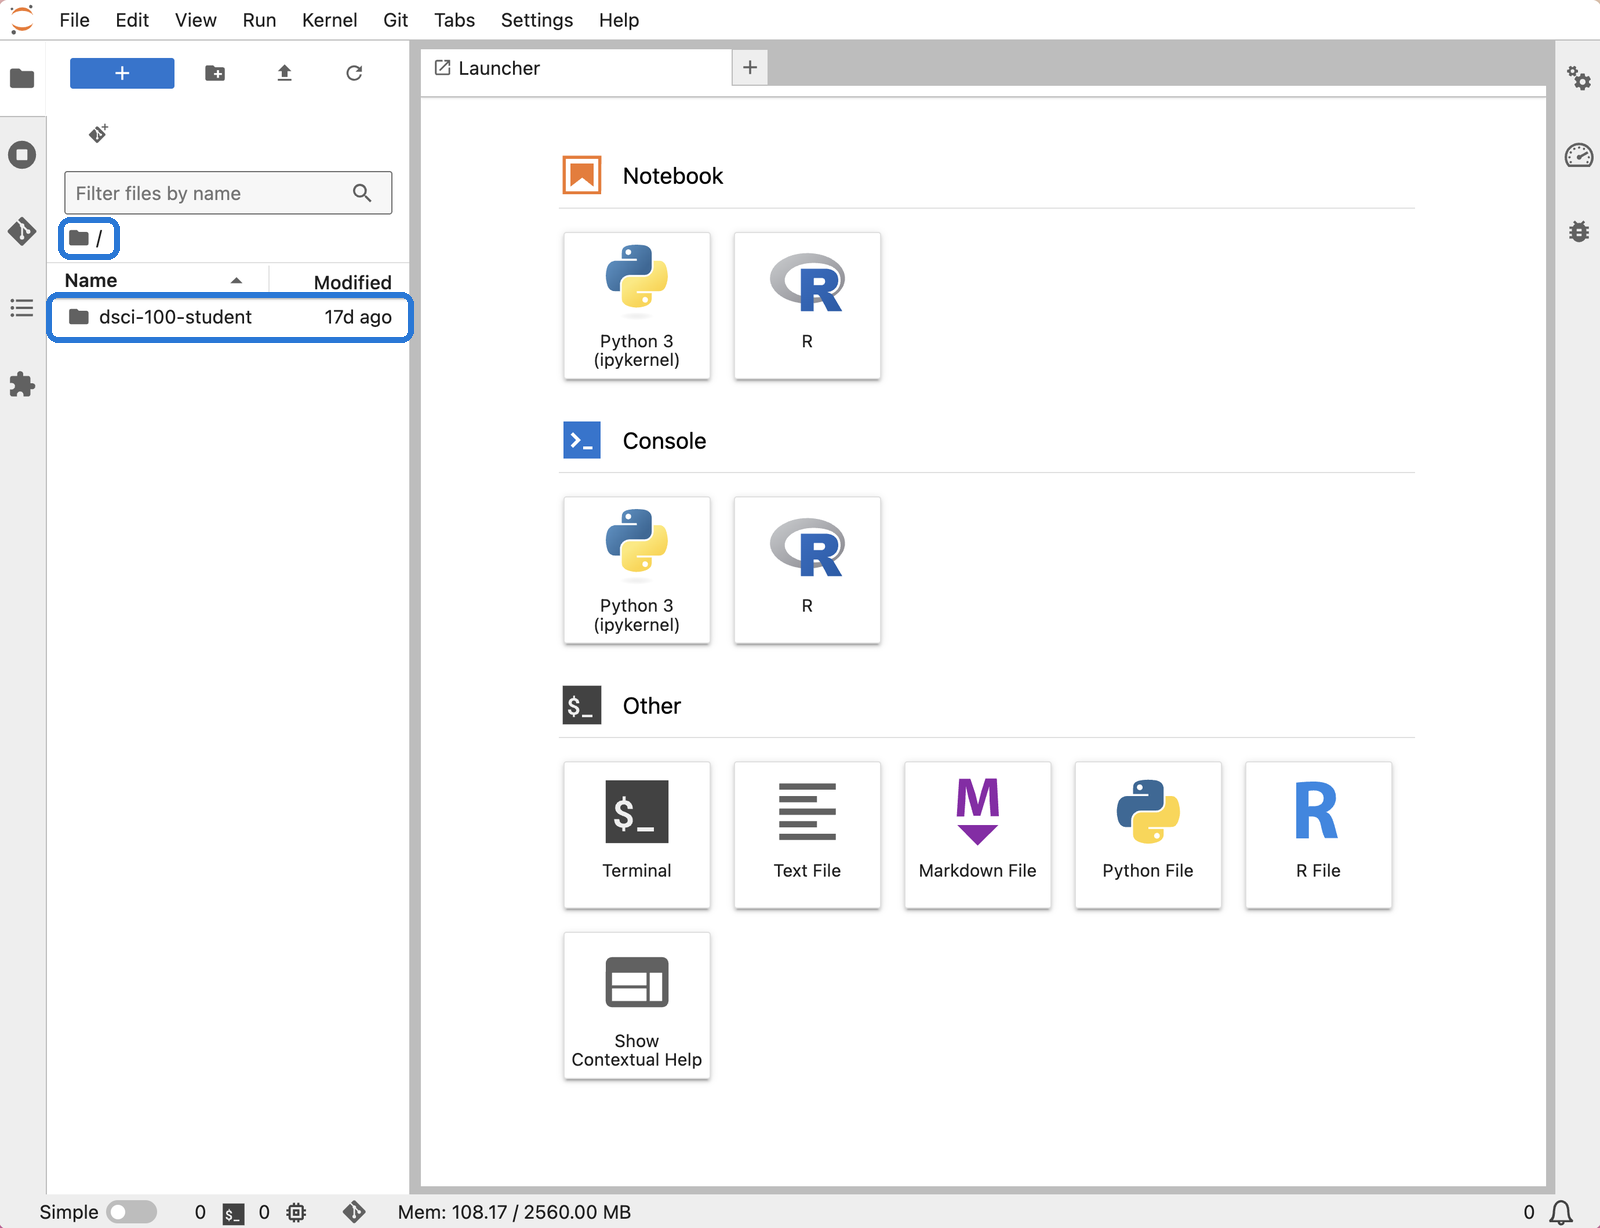
You should see / at the top and the dsci-100-student folder below it. Stay here. Donโ€™t open dsci-100-student.

JupyterHub's file browser at the top folder, showing the dsci-100-student folder.

๐Ÿ“‹ Step 7: Open the Git tab

Click the Git icon (the diamond) on the far left, then Clone a Repository.
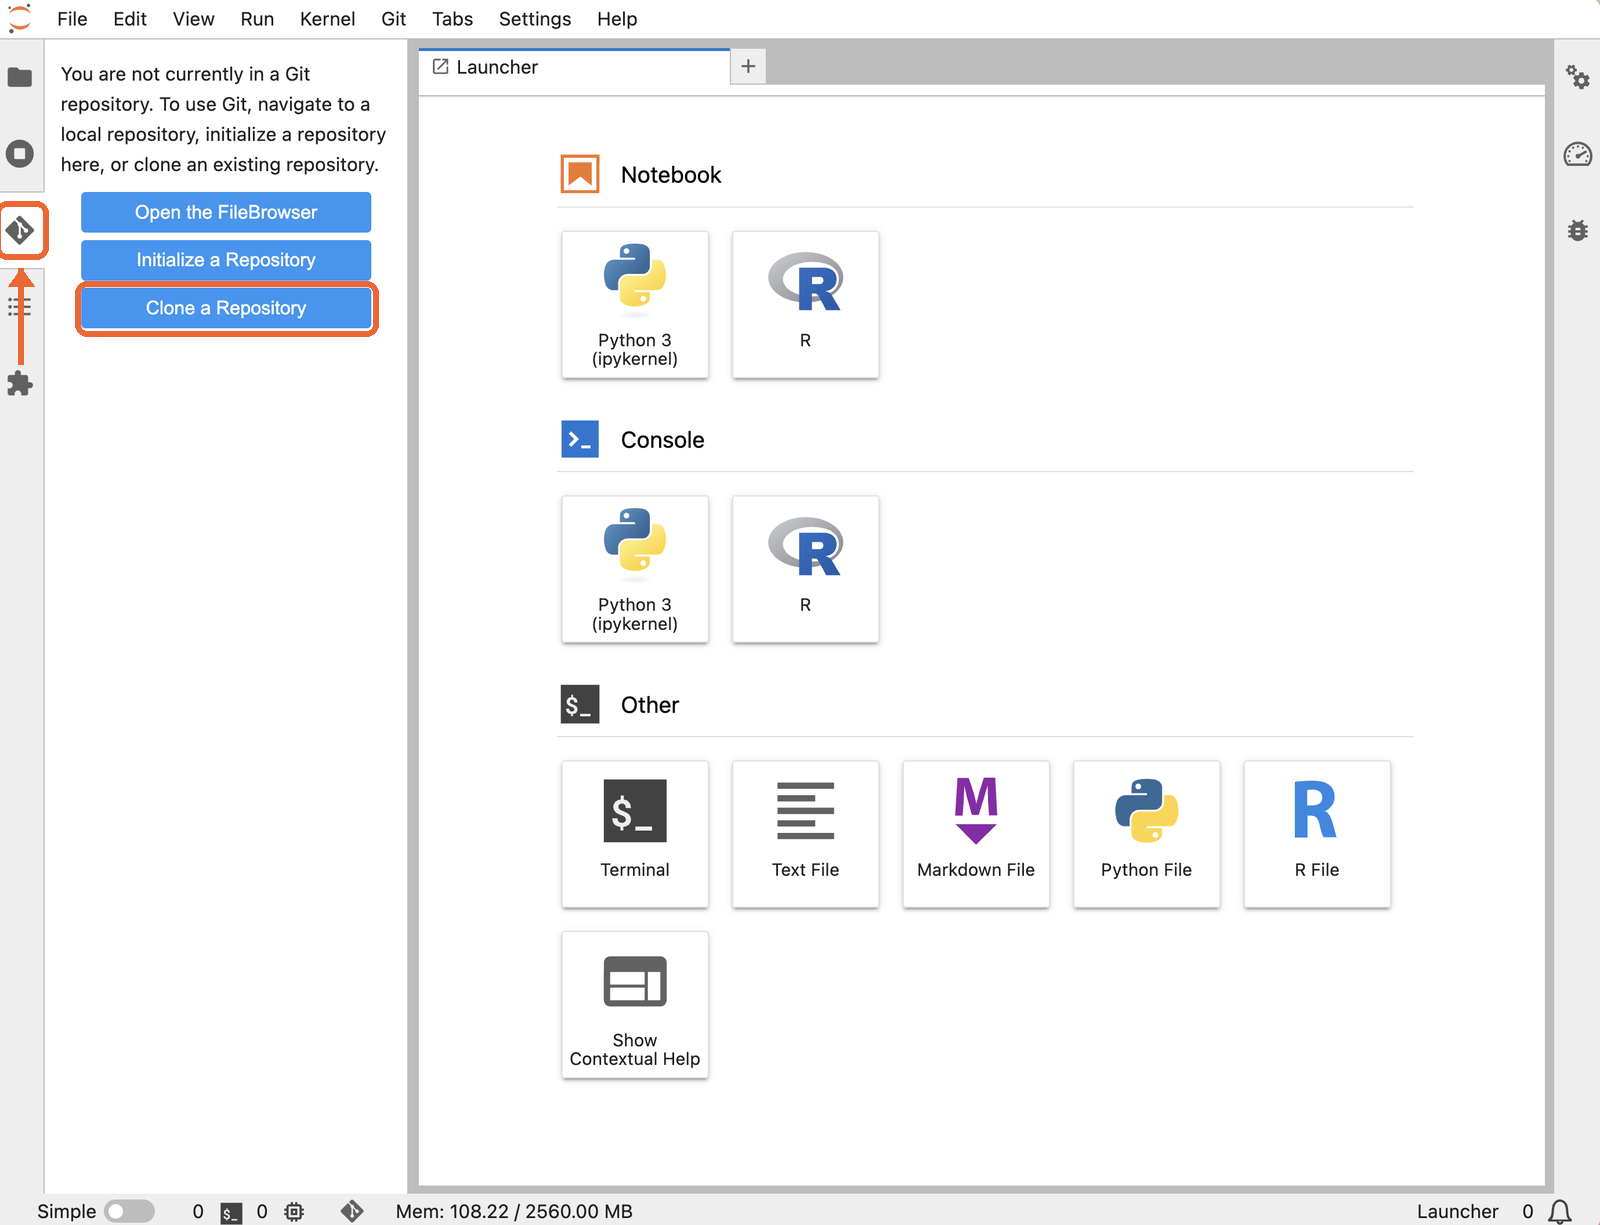
JupyterHub with the Git icon on the left and the Clone a Repository button highlighted.

๐Ÿ“‹ Step 8: Paste your address and clone

Paste the HTTPS address from step 3. Leave both boxes as they are. Click Clone.
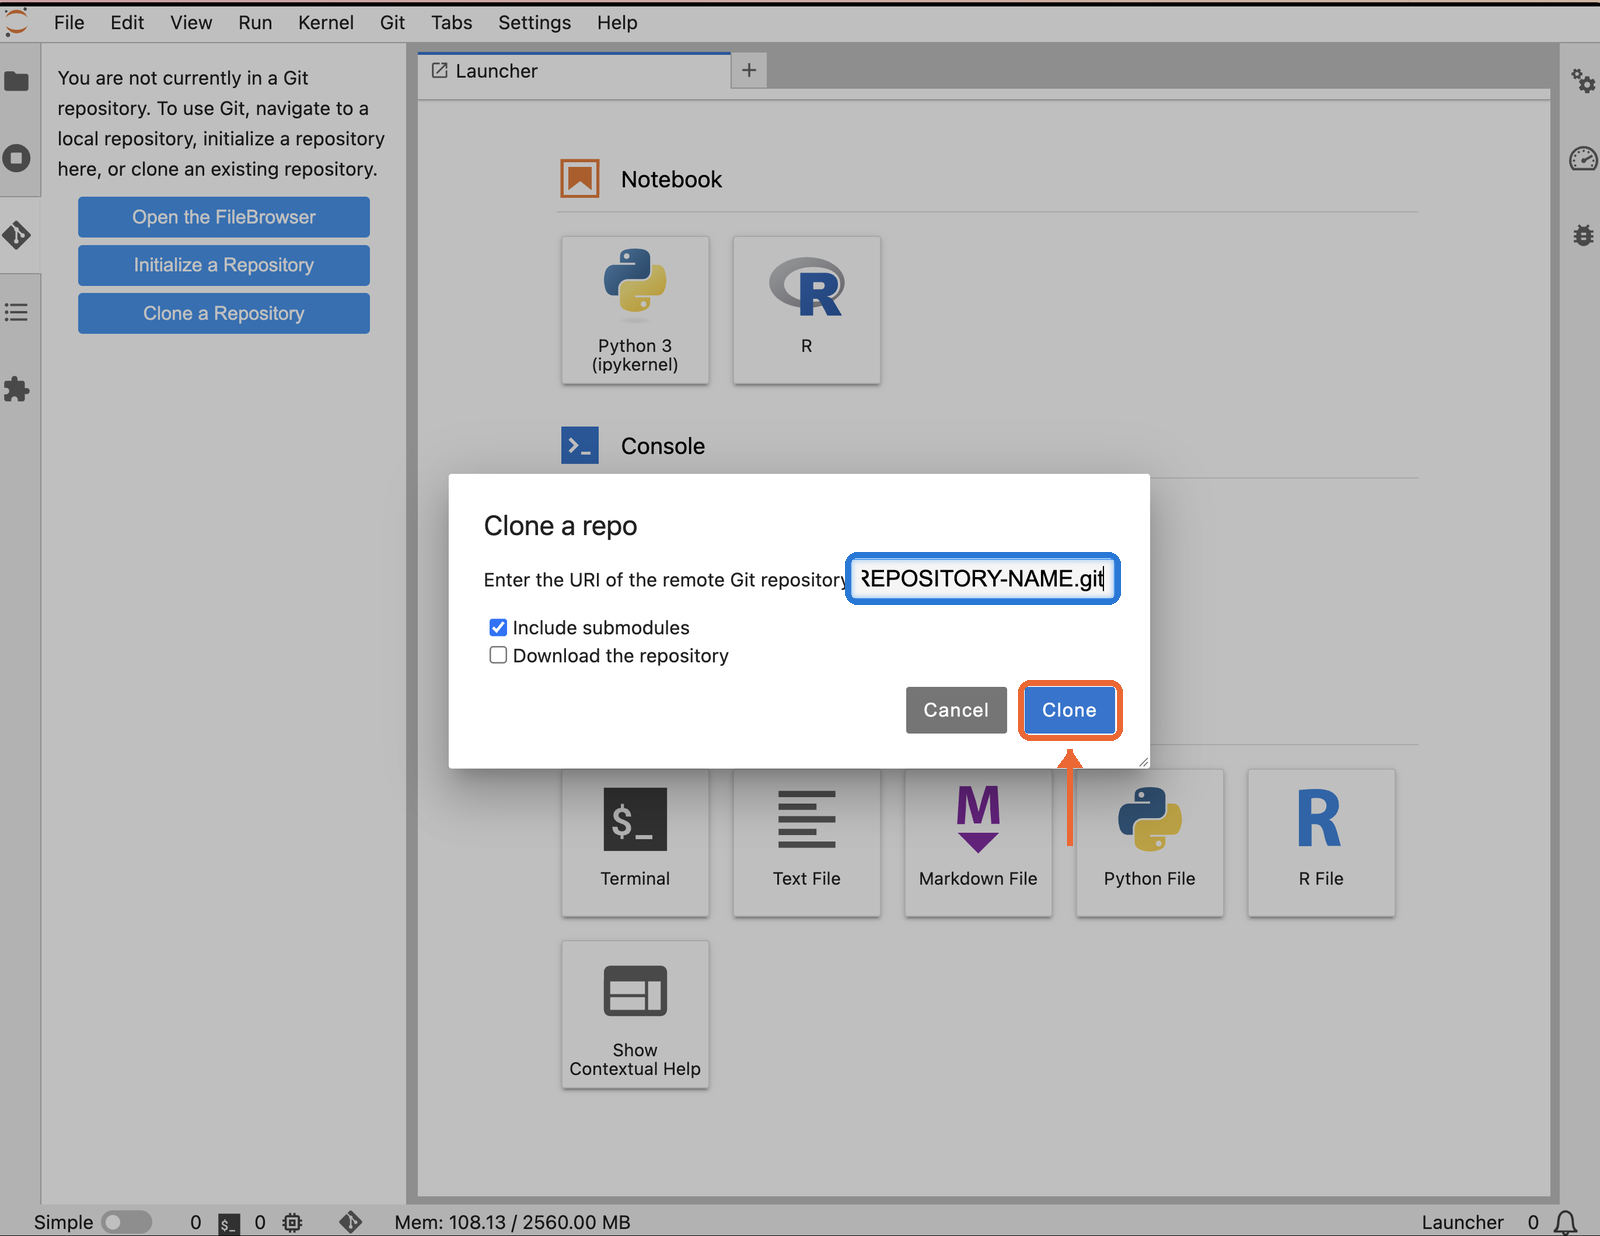
The Clone a repo window, with the address box and the Clone button highlighted.

๐Ÿ“‹ Step 9: Your repository is here

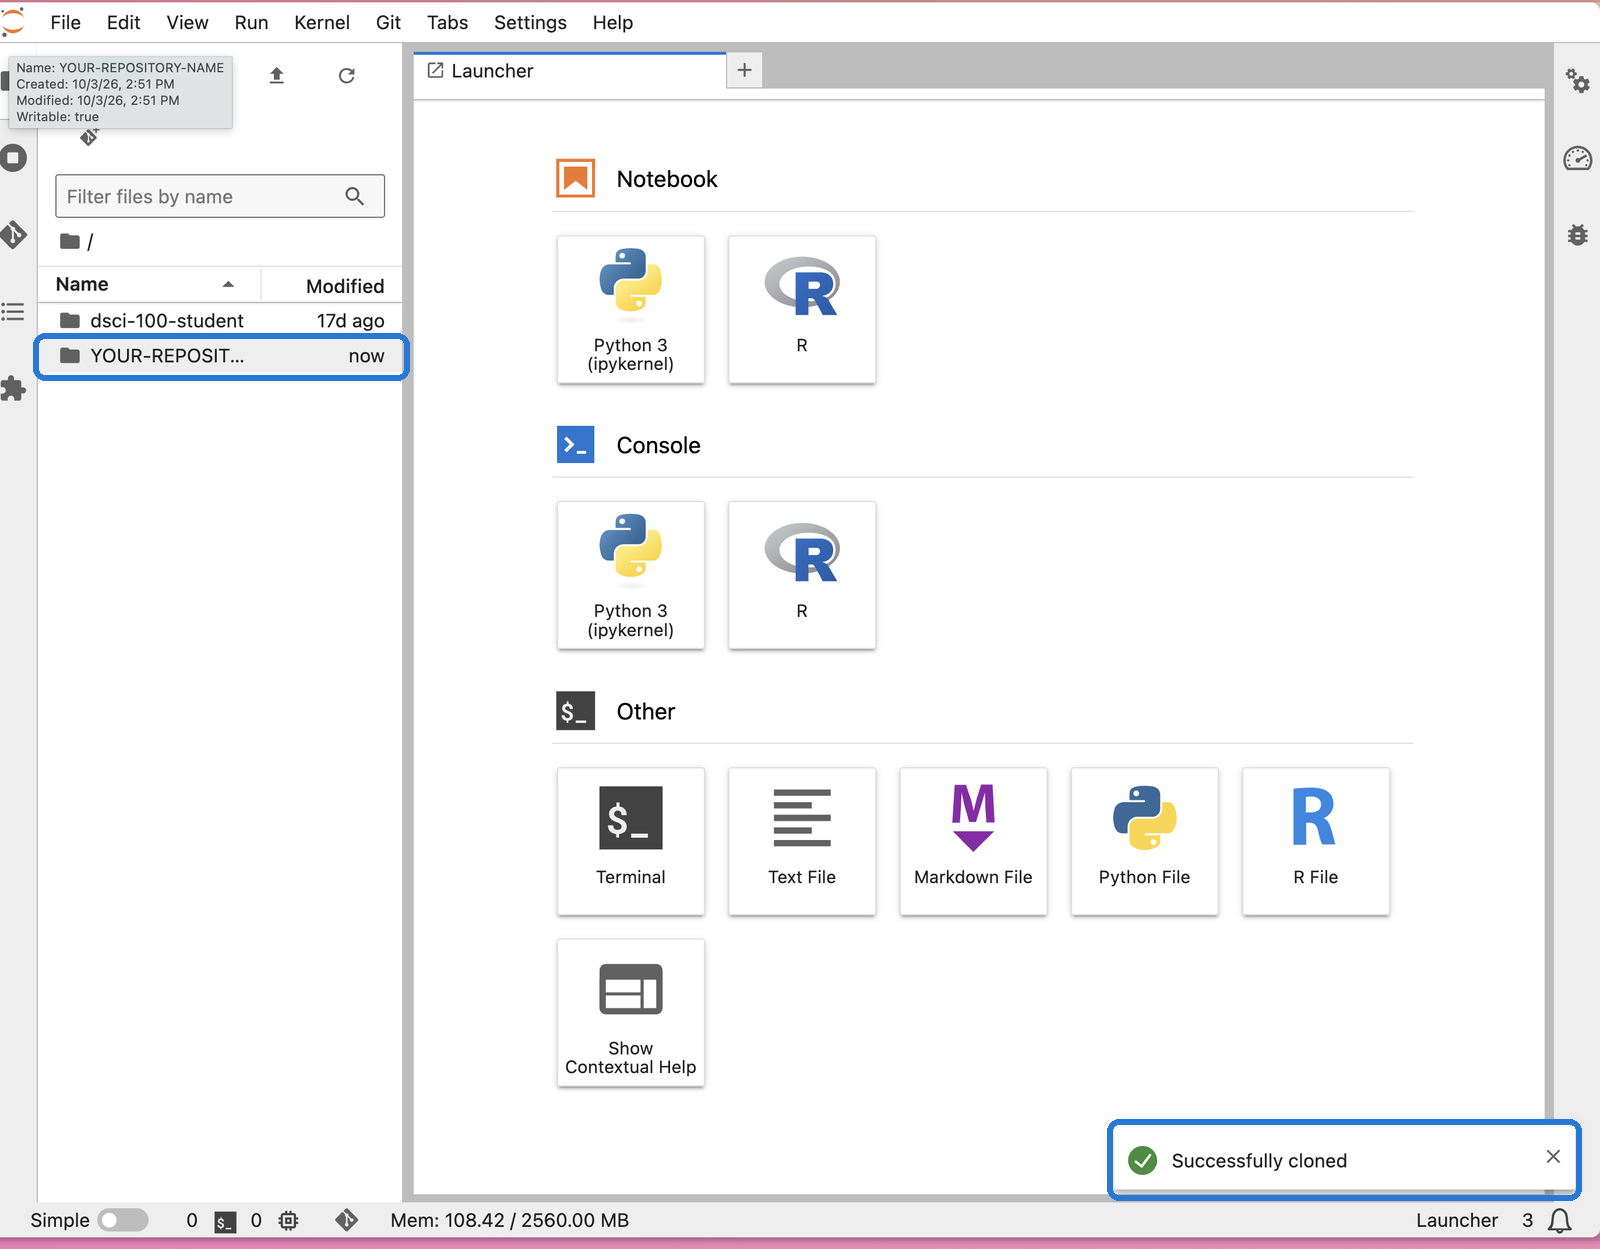
You see Successfully cloned, and a folder with your repositoryโ€™s name appears on the left.

JupyterHub showing a Successfully cloned message and the new repository folder in the file browser.

Part 3: Fill in your details

๐Ÿ“‹ Step 10: Open your notebook

Double click your repositoryโ€™s folder, then double click dsci-100-project-notebook.ipynb.
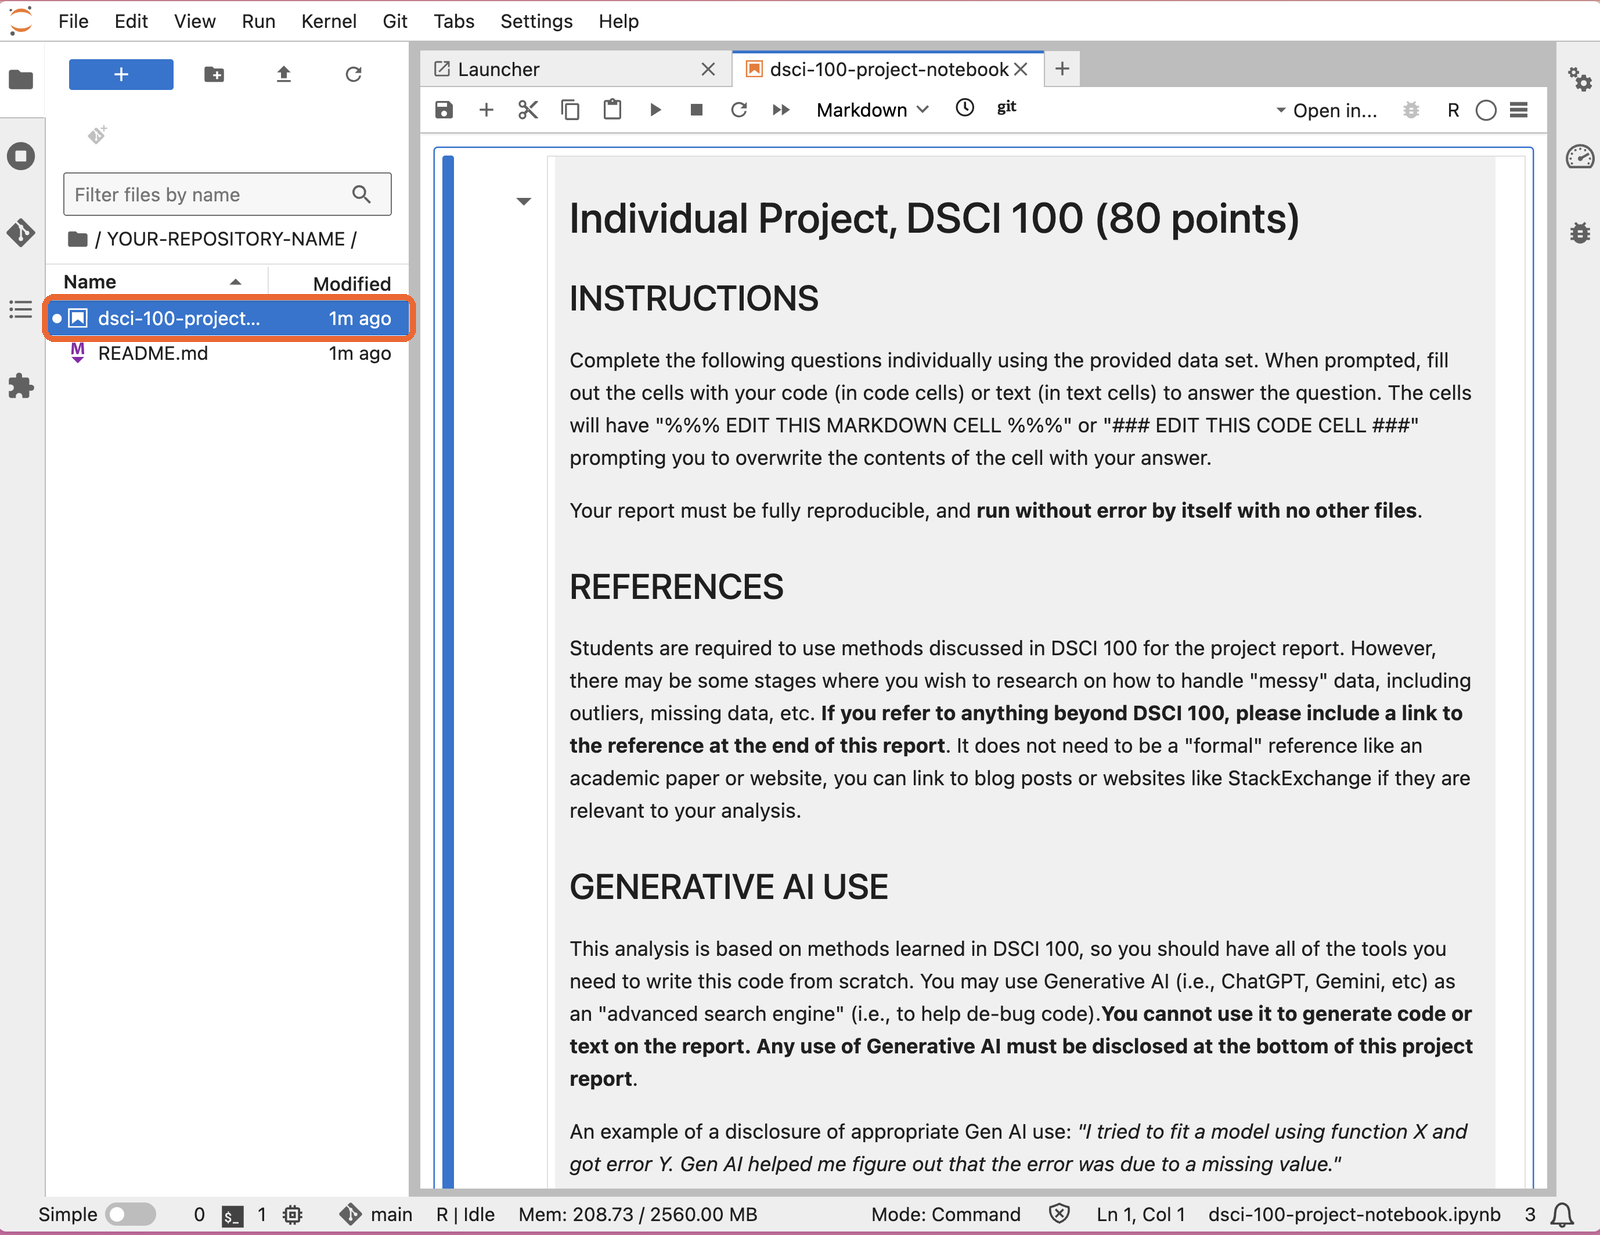
The repository folder open in JupyterHub, with the project notebook highlighted.

๐Ÿ“‹ Step 11: Edit the name cell

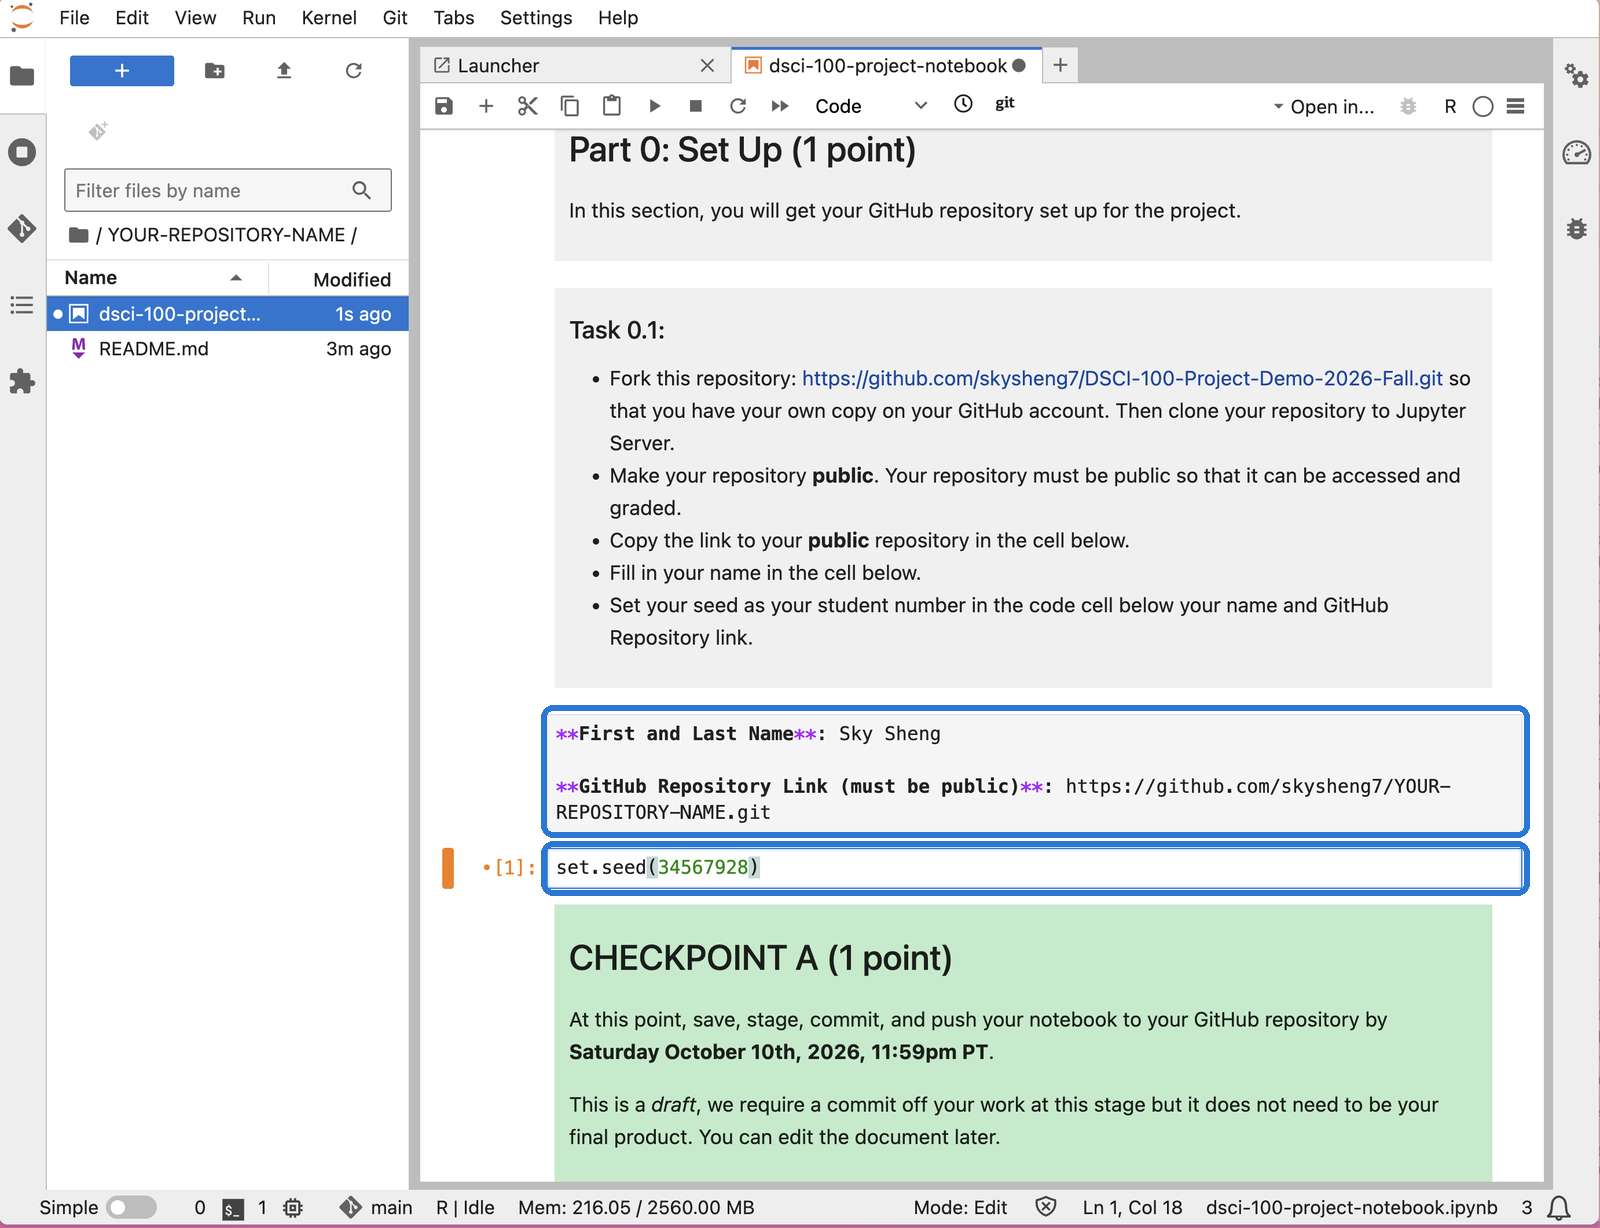
Scroll to Part 0. Double click the cell with First and Last Name to edit it.
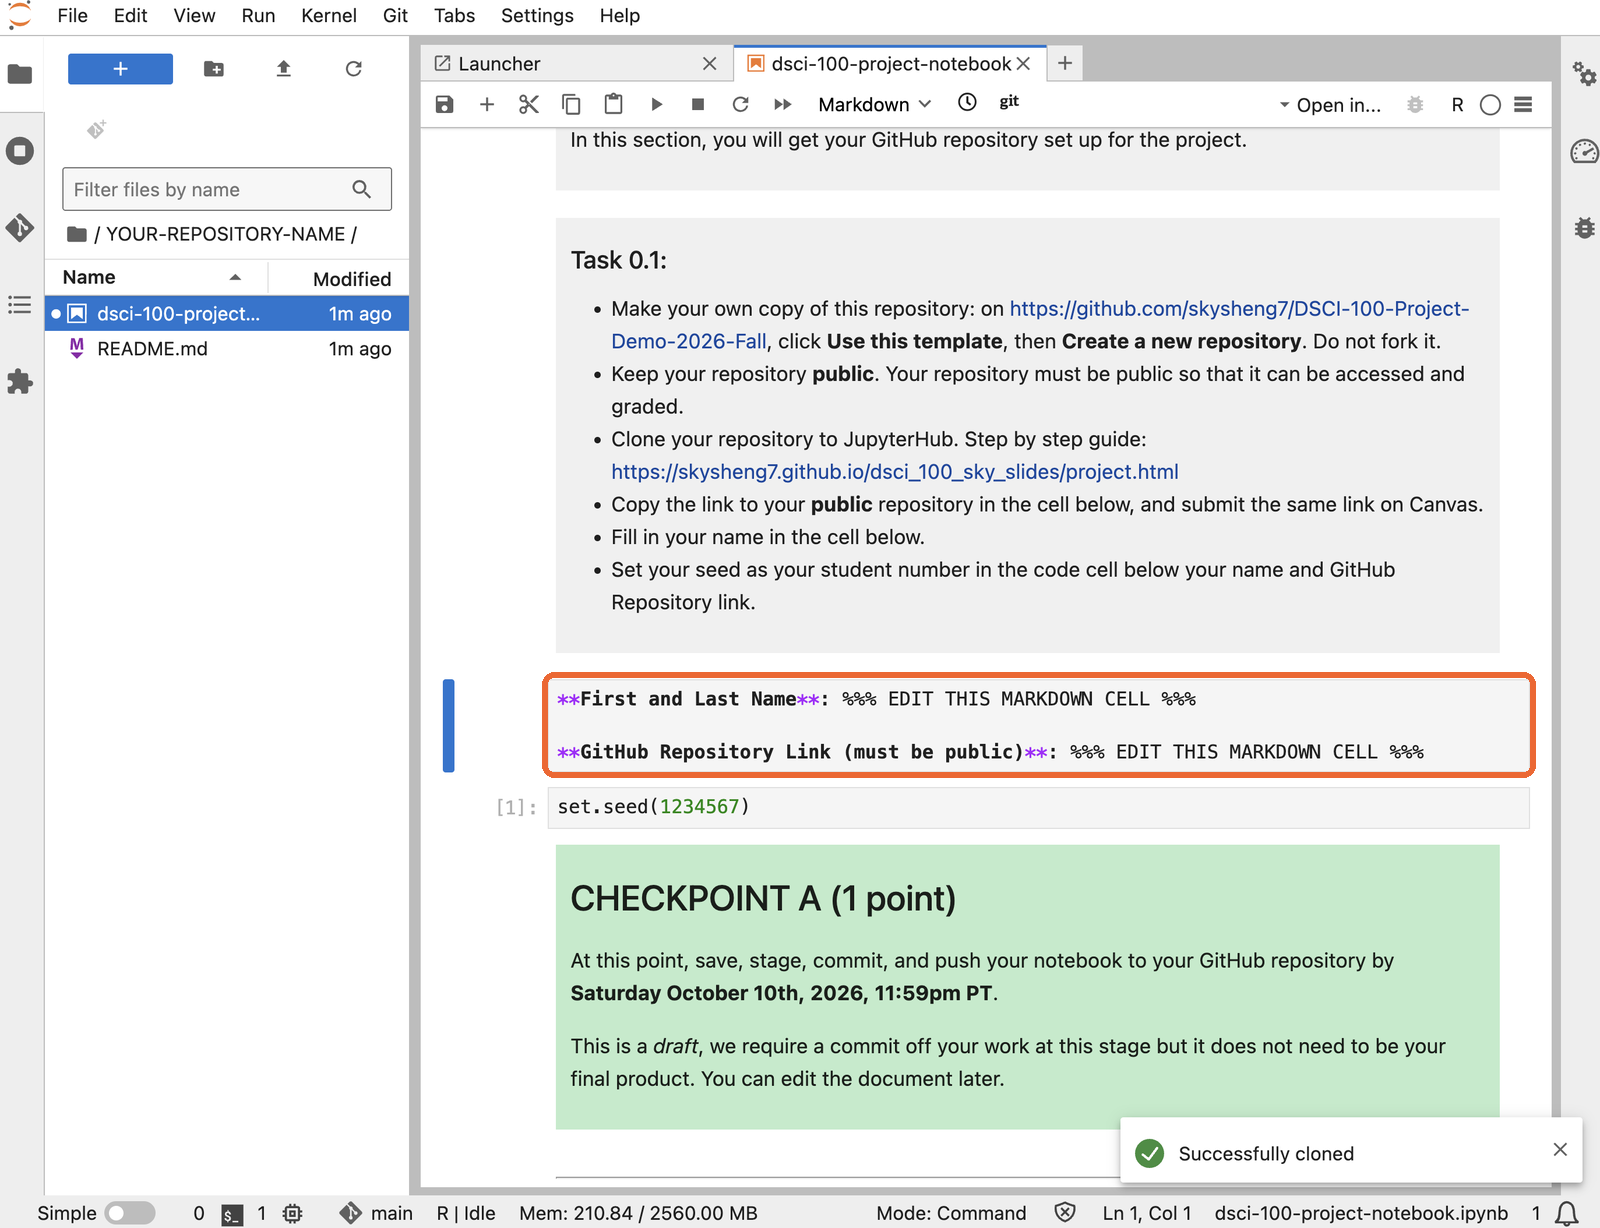
The project notebook at Part 0, with the cell for name and repository link highlighted.

Part 4: Take a snapshot

๐Ÿ“‹ Step 13: Choose what goes in the snapshot

Click the Git icon again. Hover over your notebook under Changed and click its +.
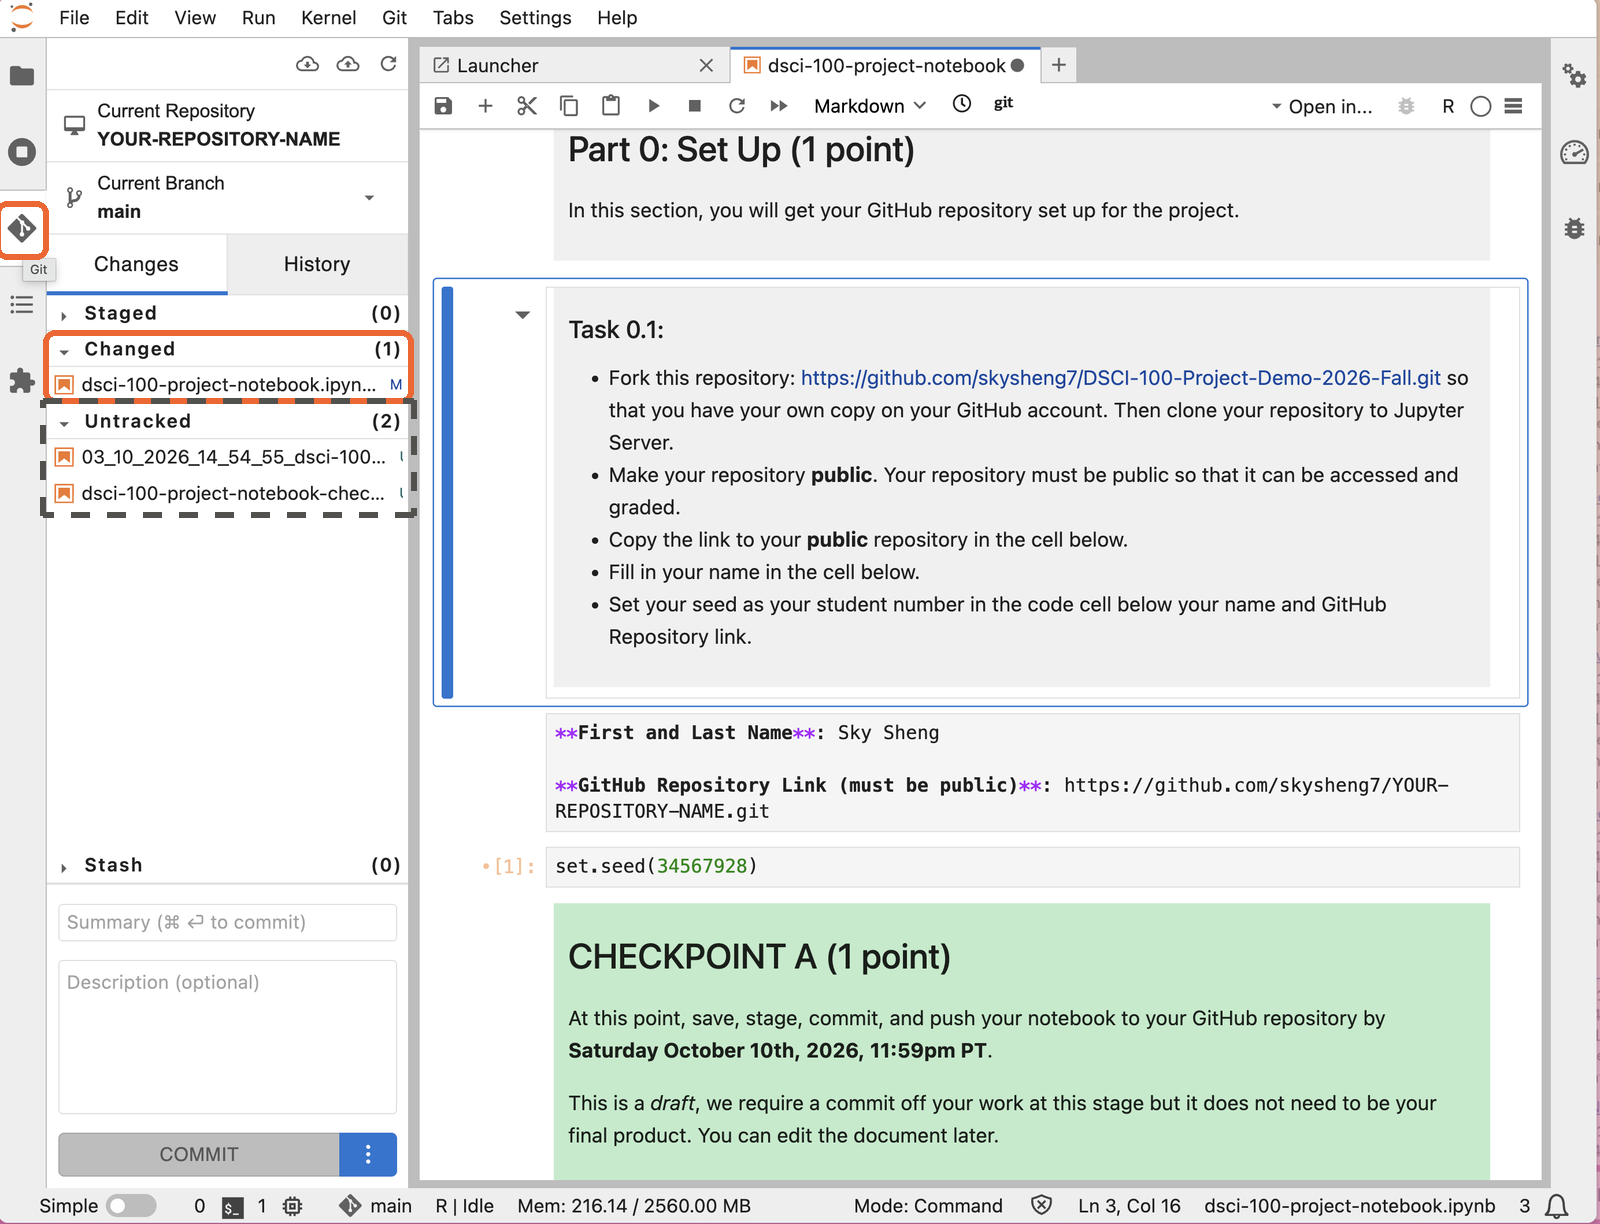
The Git tab in JupyterHub, with the Changed section highlighted and the Untracked section marked as one to ignore.
  • Staged: what goes in your next snapshot.
  • Changed: files Git already knows, that you edited.
  • Untracked: new files Git has never seen. These two are backup copies JupyterHub made. Leave them alone. Youโ€™ll add a file of your own in step 40.

๐Ÿ“‹ Step 14: Write a message and commit

Your notebook is now under Staged. Write a short message about what you did, then click Commit.
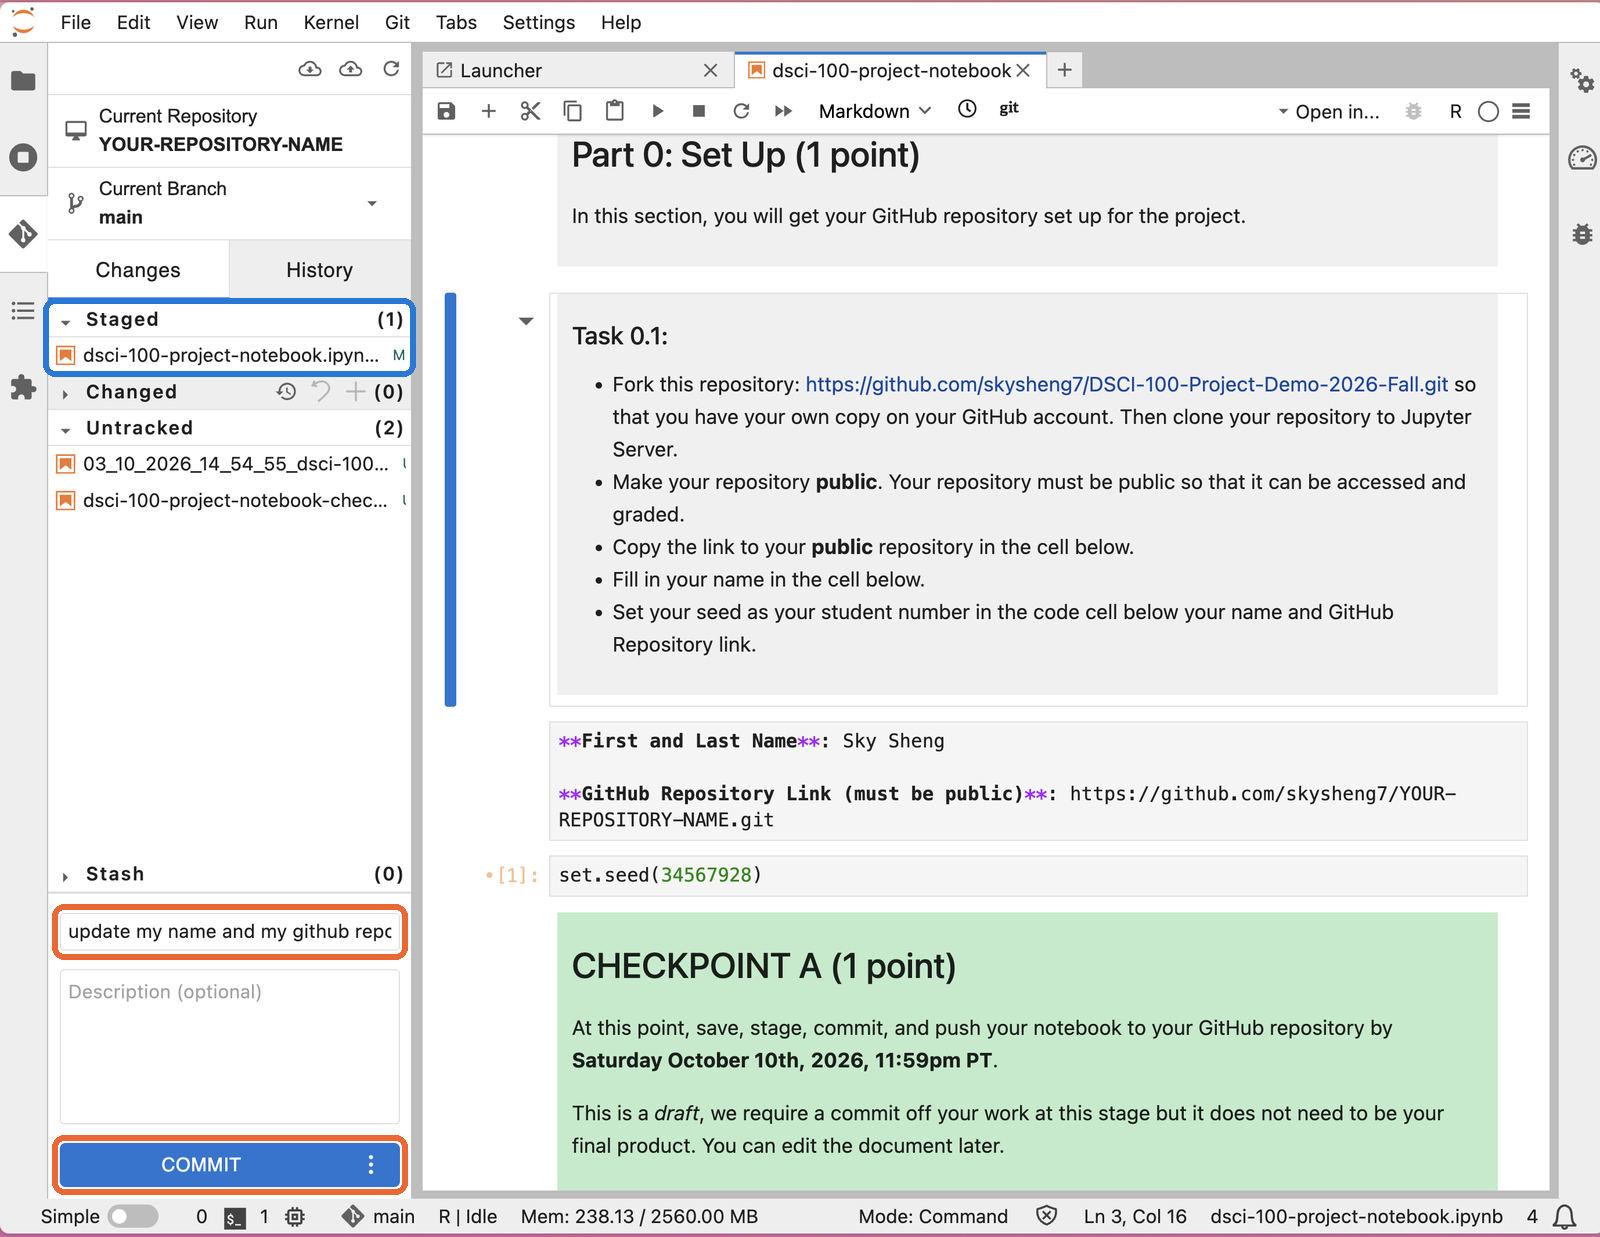
The Git tab with the notebook under Staged, a commit message typed in the summary box, and the Commit button highlighted.

๐Ÿ“‹ Step 15: Tell Git who you are

First time only. Type your name and the email you used to make your GitHub account. Click Ok.
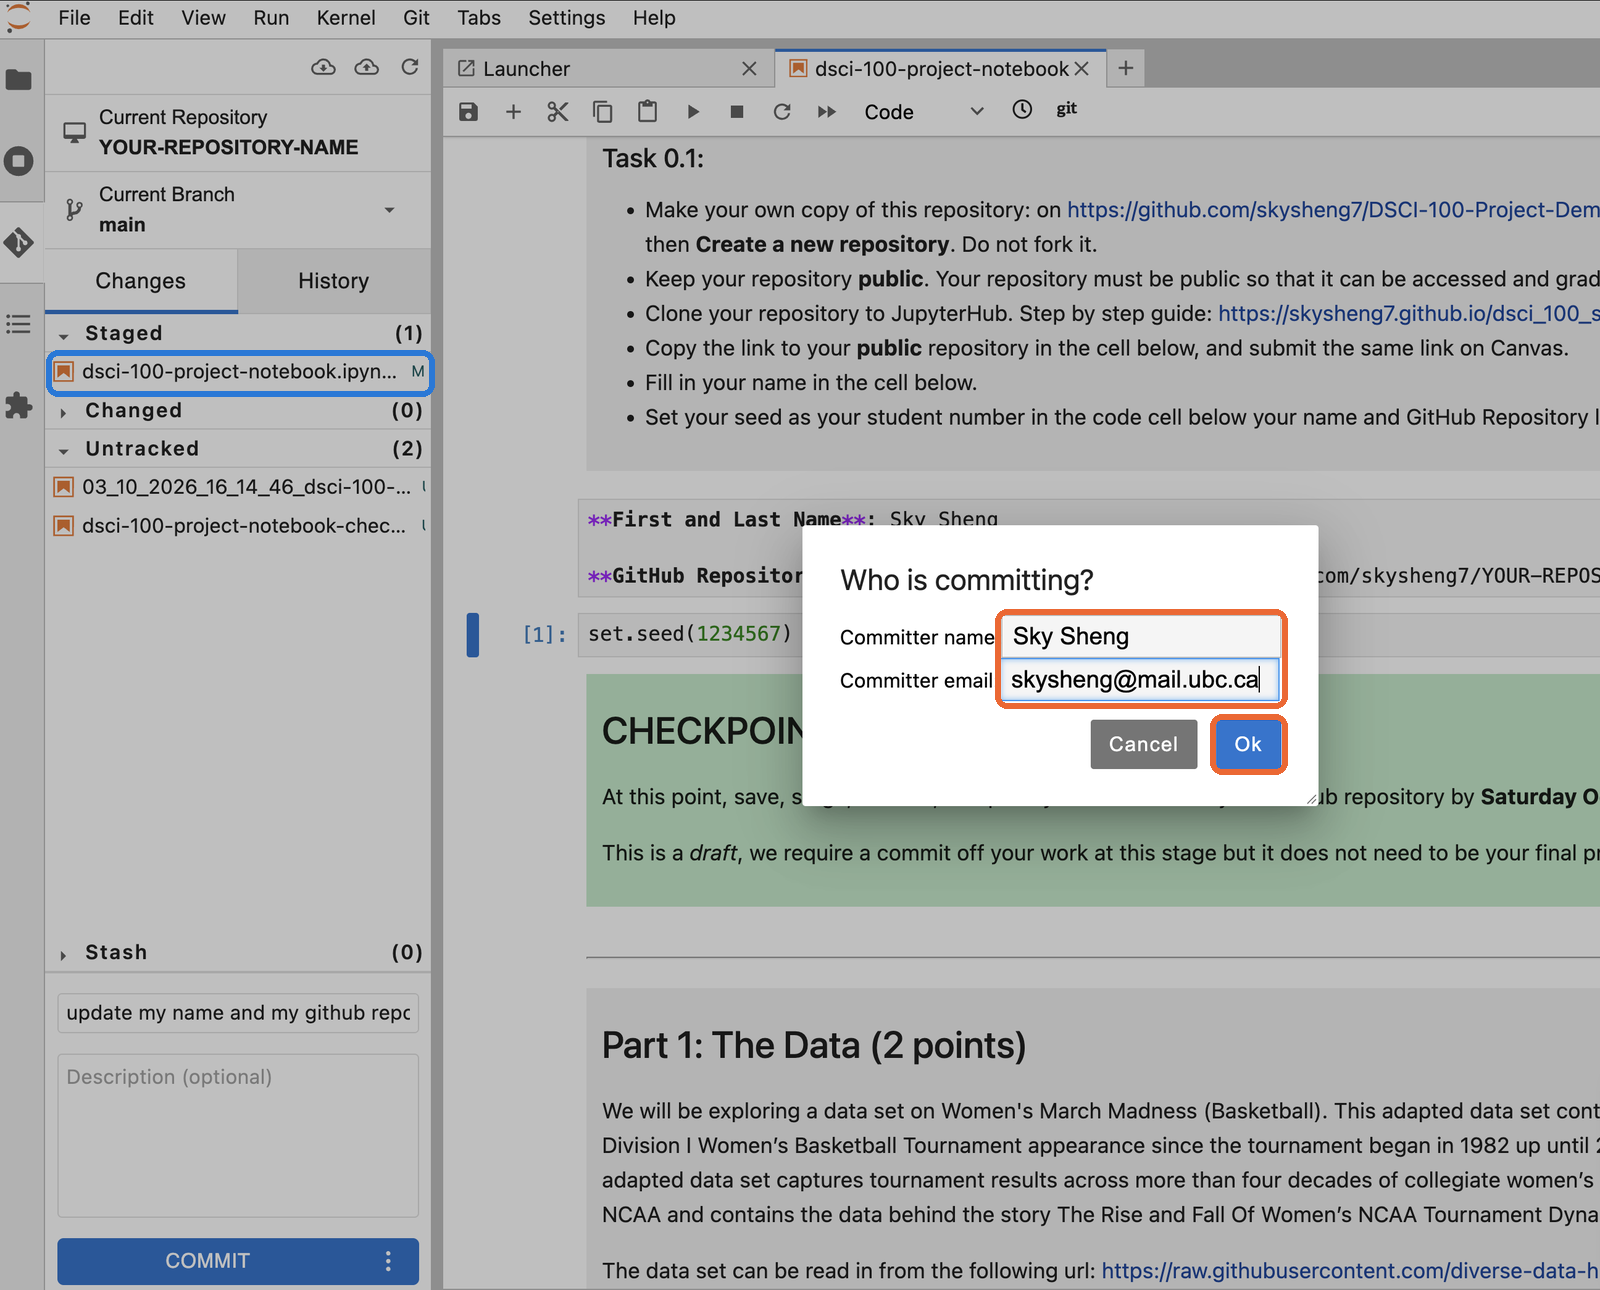
The Who is committing window, with the name and email boxes and the Ok button highlighted.

Git writes your name and email on every snapshot. GitHub uses the email to match the snapshot to your account.

๐Ÿ“‹ Step 16: Check GitHub

Your repository on GitHub still shows 1 Commit. Open the notebook there: your name is not filled in yet.
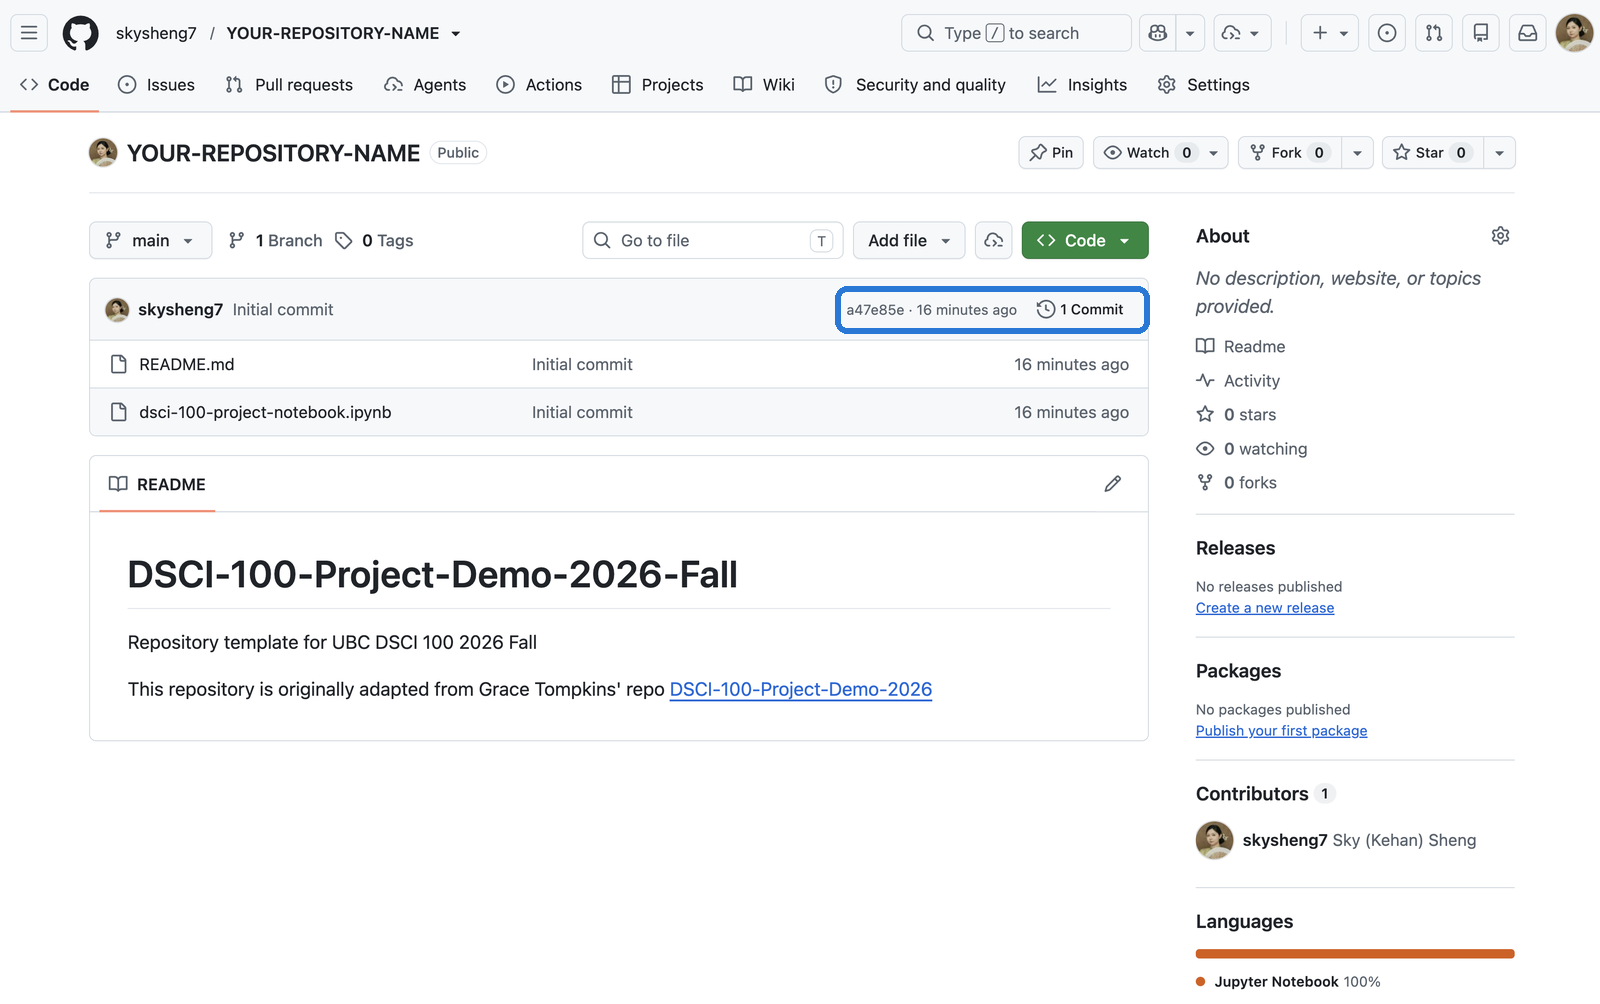
The repository on GitHub still showing one commit, the Initial commit.

Commit saves the snapshot in JupyterHub only. GitHub has not heard about it yet.

Part 5: Send it to GitHub

๐Ÿ“‹ Step 17: Push

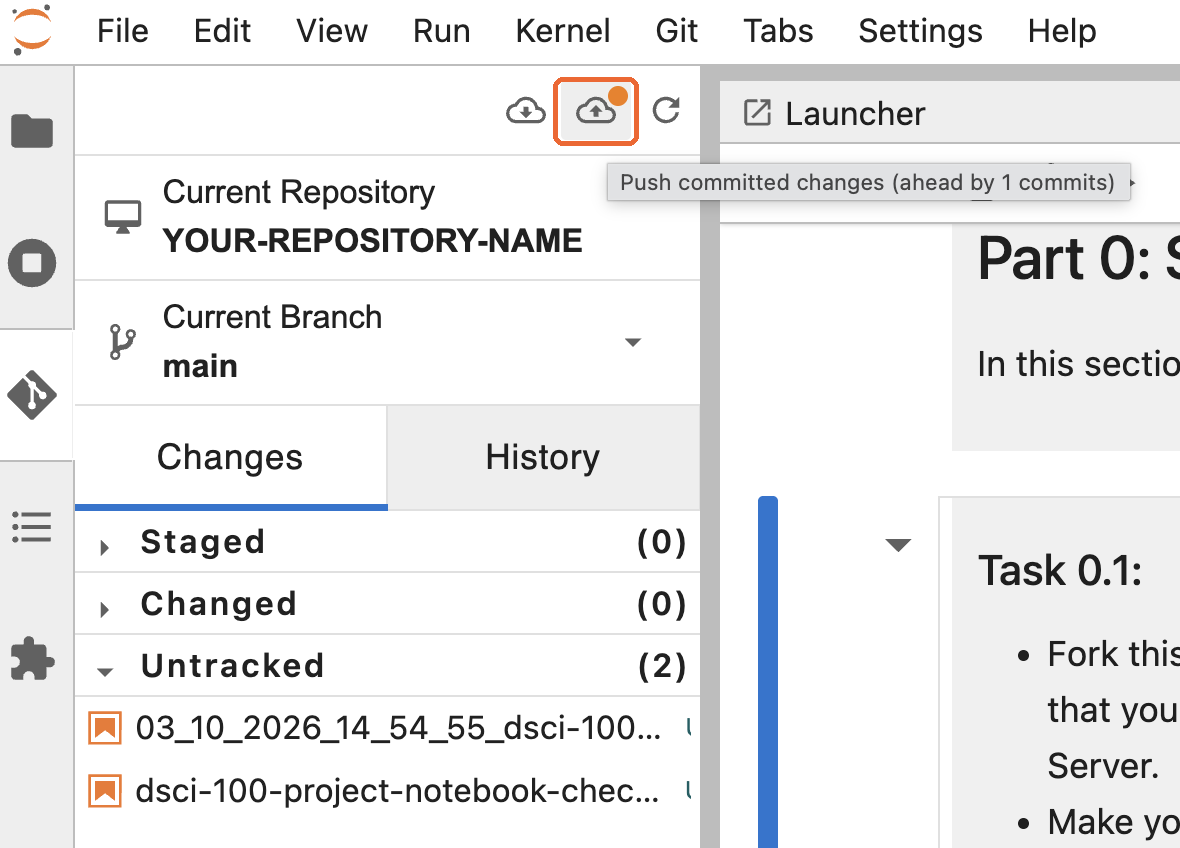
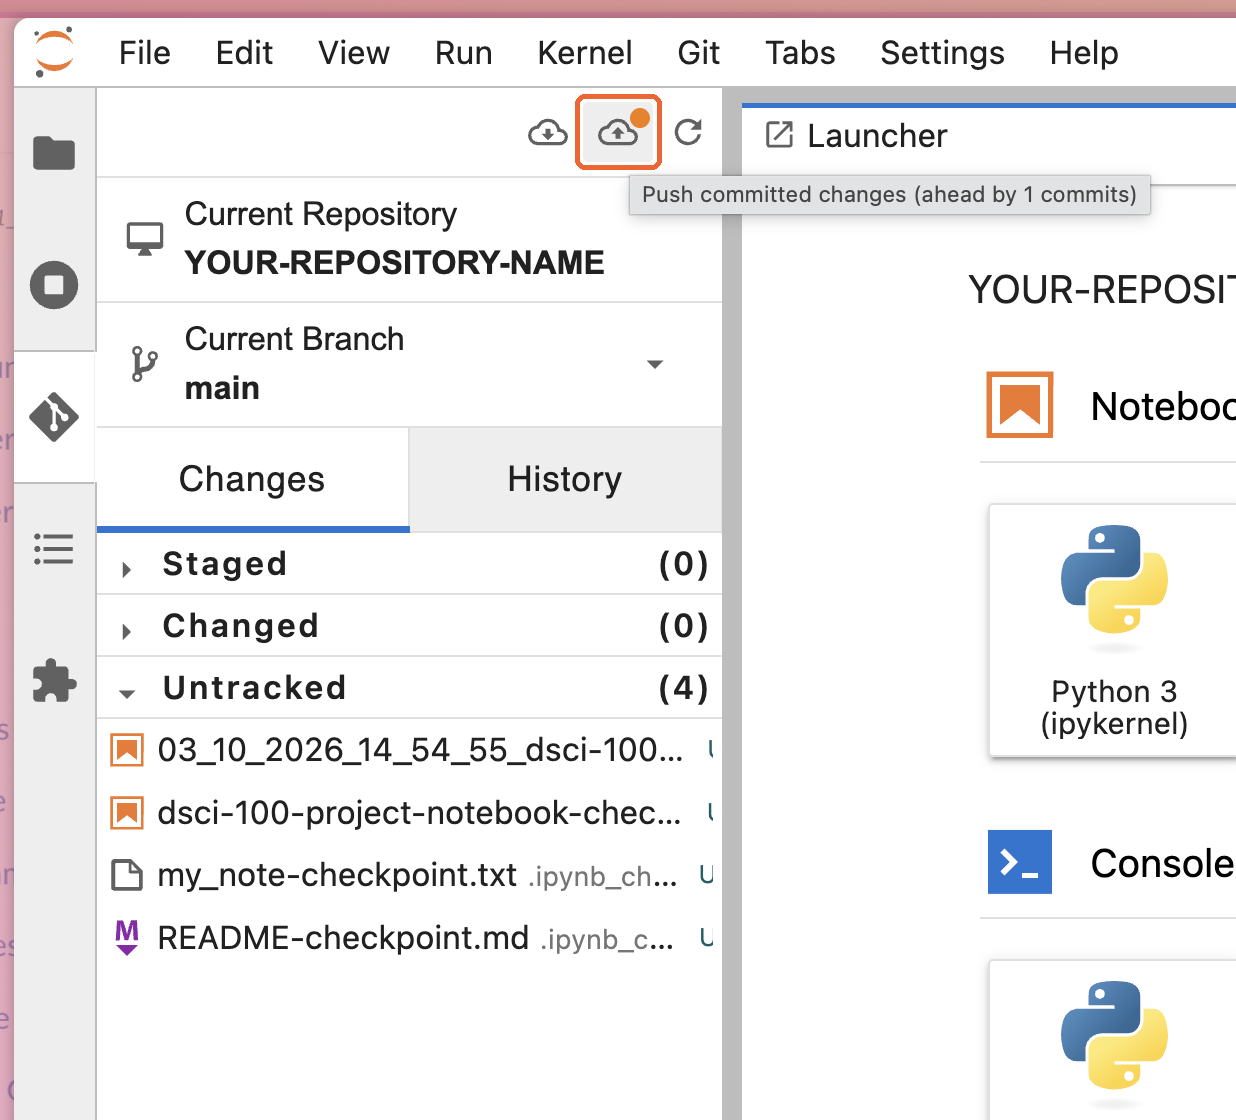
Back in JupyterHub, click the cloud with the up arrow. That is push. The orange dot means you have commits GitHub doesnโ€™t have yet.

The Git tab in JupyterHub, with the push button highlighted and a tooltip saying Push committed changes, ahead by 1 commits.

๐Ÿ“‹ Step 18: GitHub asks who you are

A window asks for two things.
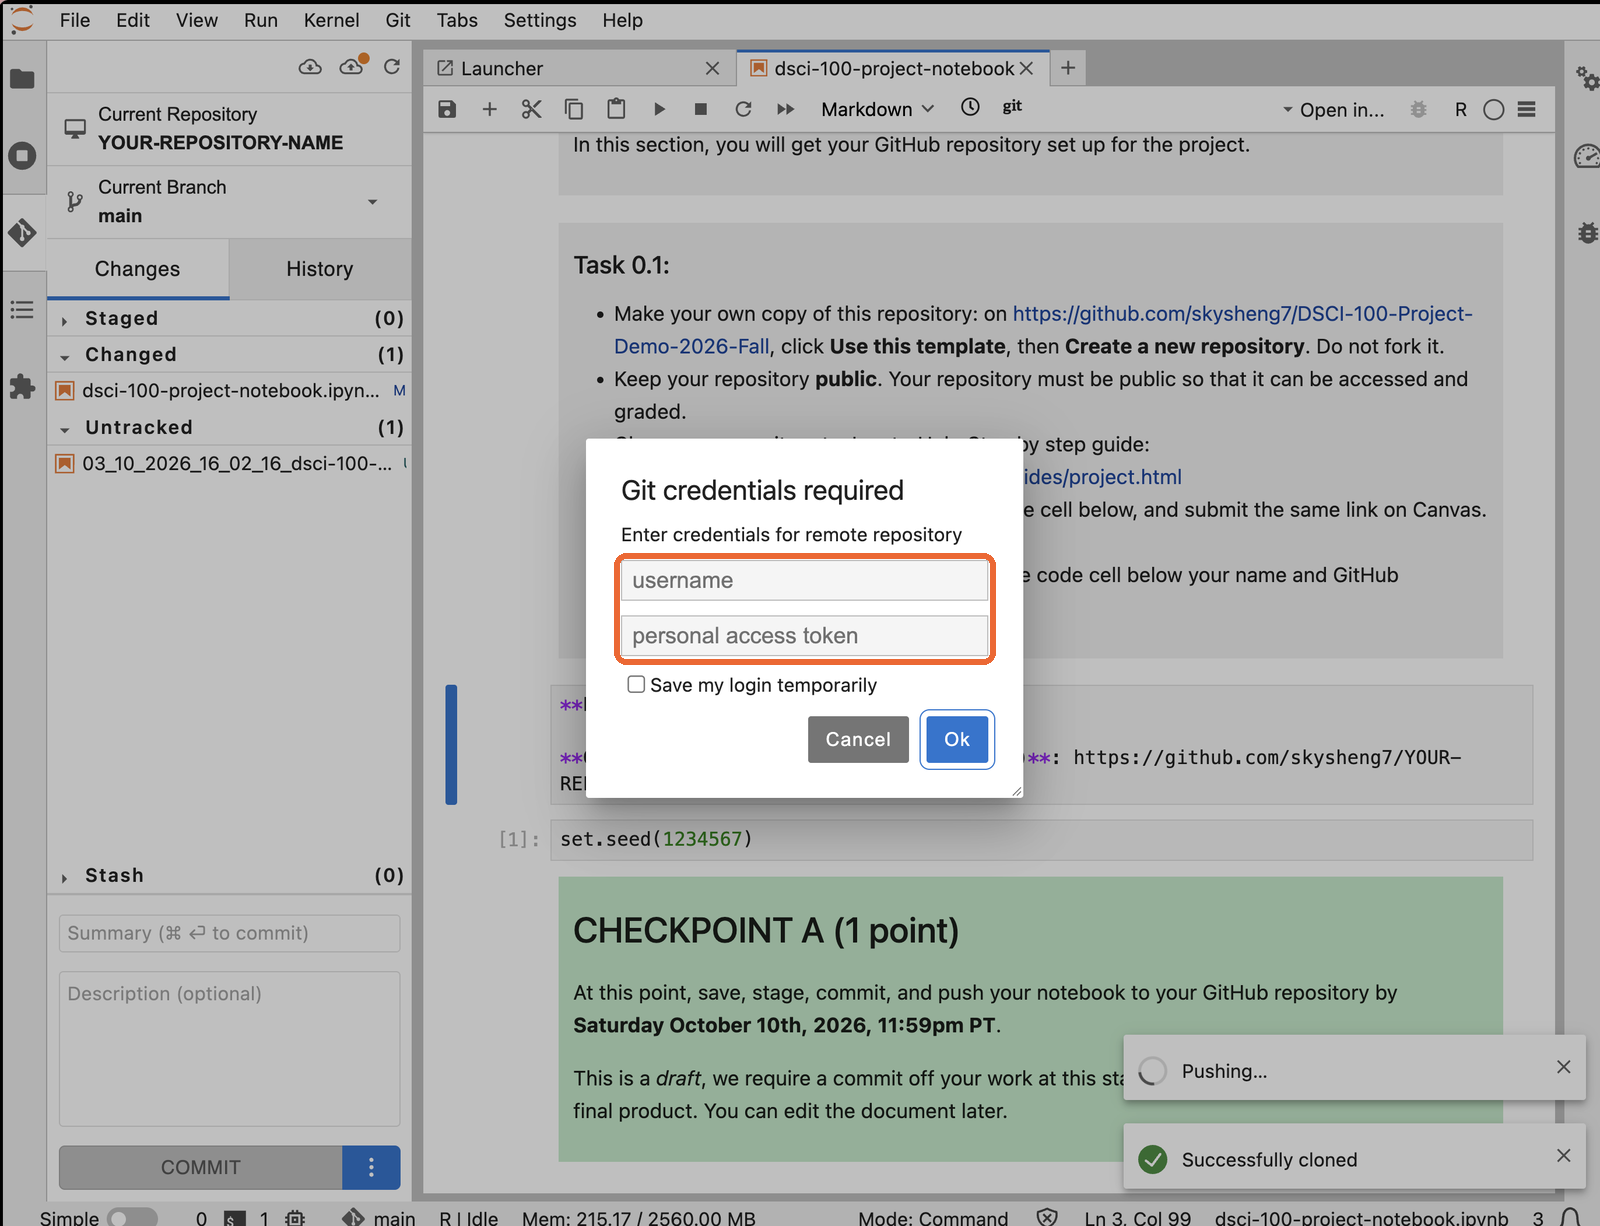
The Git credentials required window, asking for a username and a personal access token.

Important

  • username: your GitHub username, e.g. skysheng7. Not your real name.
  • personal access token: not your GitHub password. You donโ€™t have one yet, so click Cancel and make one next.

Part 6: Make a personal access token

๐Ÿ”‘ GitHub wants a token, not your password

  • A personal access token is like a hotel key card: it opens only the doors you allow, it expires, and you can cancel it at any time.
  • Your password is the master key to your whole account. GitHub wonโ€™t take it from other apps like JupyterHub.
  • You make the token once, and use it every time you push.

๐Ÿ”‘ Step 19: Open your settings

On GitHub, click your profile picture in the top right, then Settings.
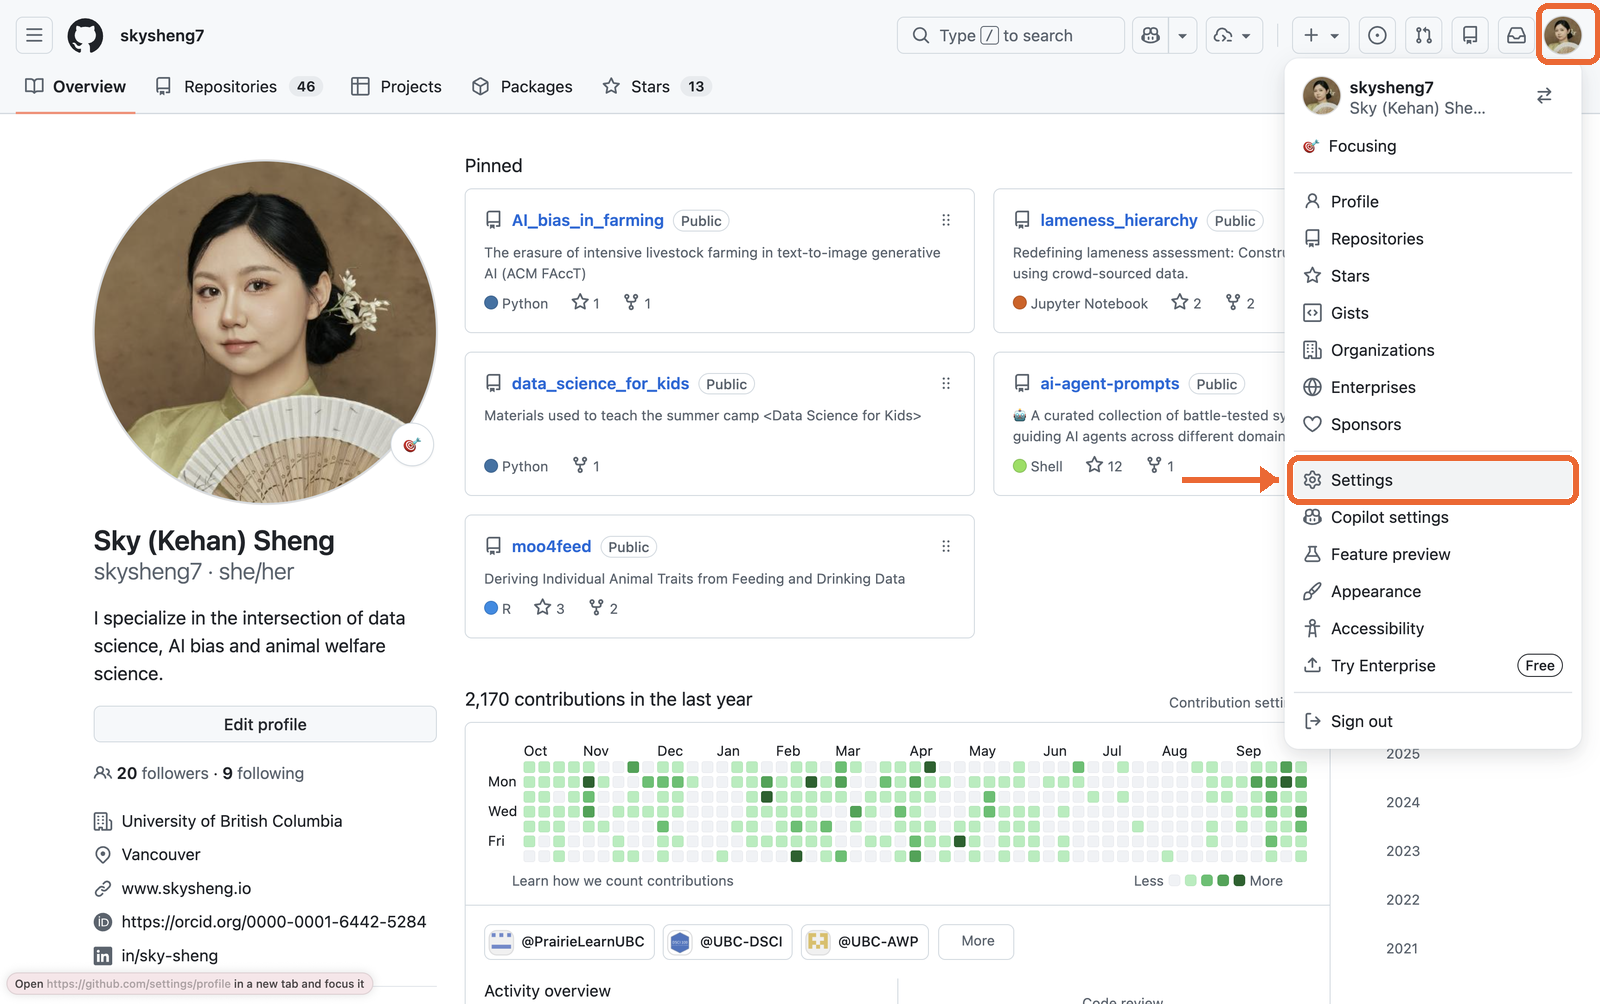
A GitHub profile page with the profile picture menu open and Settings highlighted.

๐Ÿ”‘ Step 20: Developer settings

Scroll to the bottom of the menu on the left. Click Developer settings.
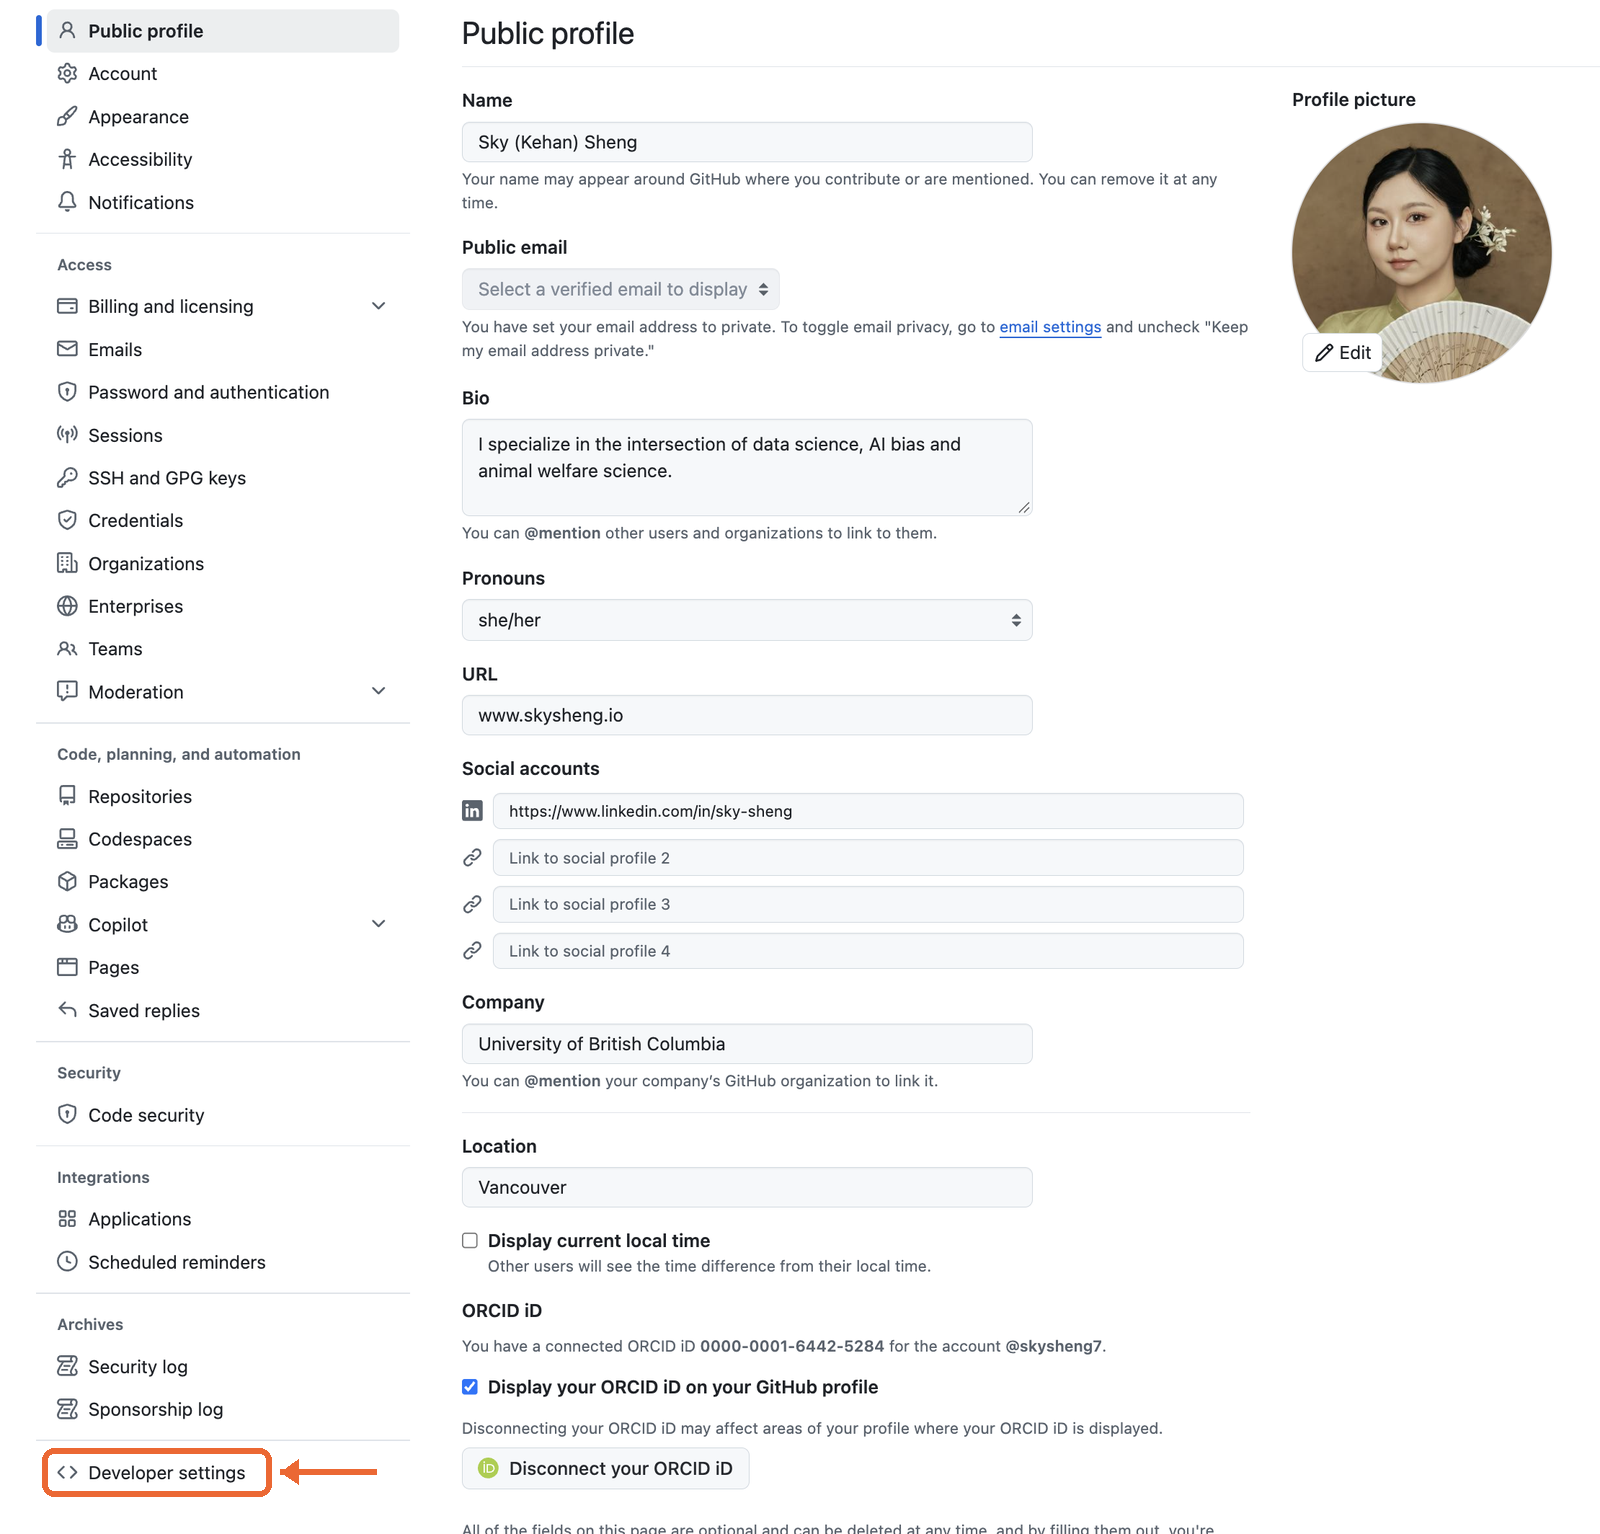
GitHub's settings page, with Developer settings highlighted at the bottom of the left menu.

๐Ÿ”‘ Step 21: Generate a classic token

Click Personal access tokens, then Tokens (classic). Click Generate new token, then Generate new token (classic).
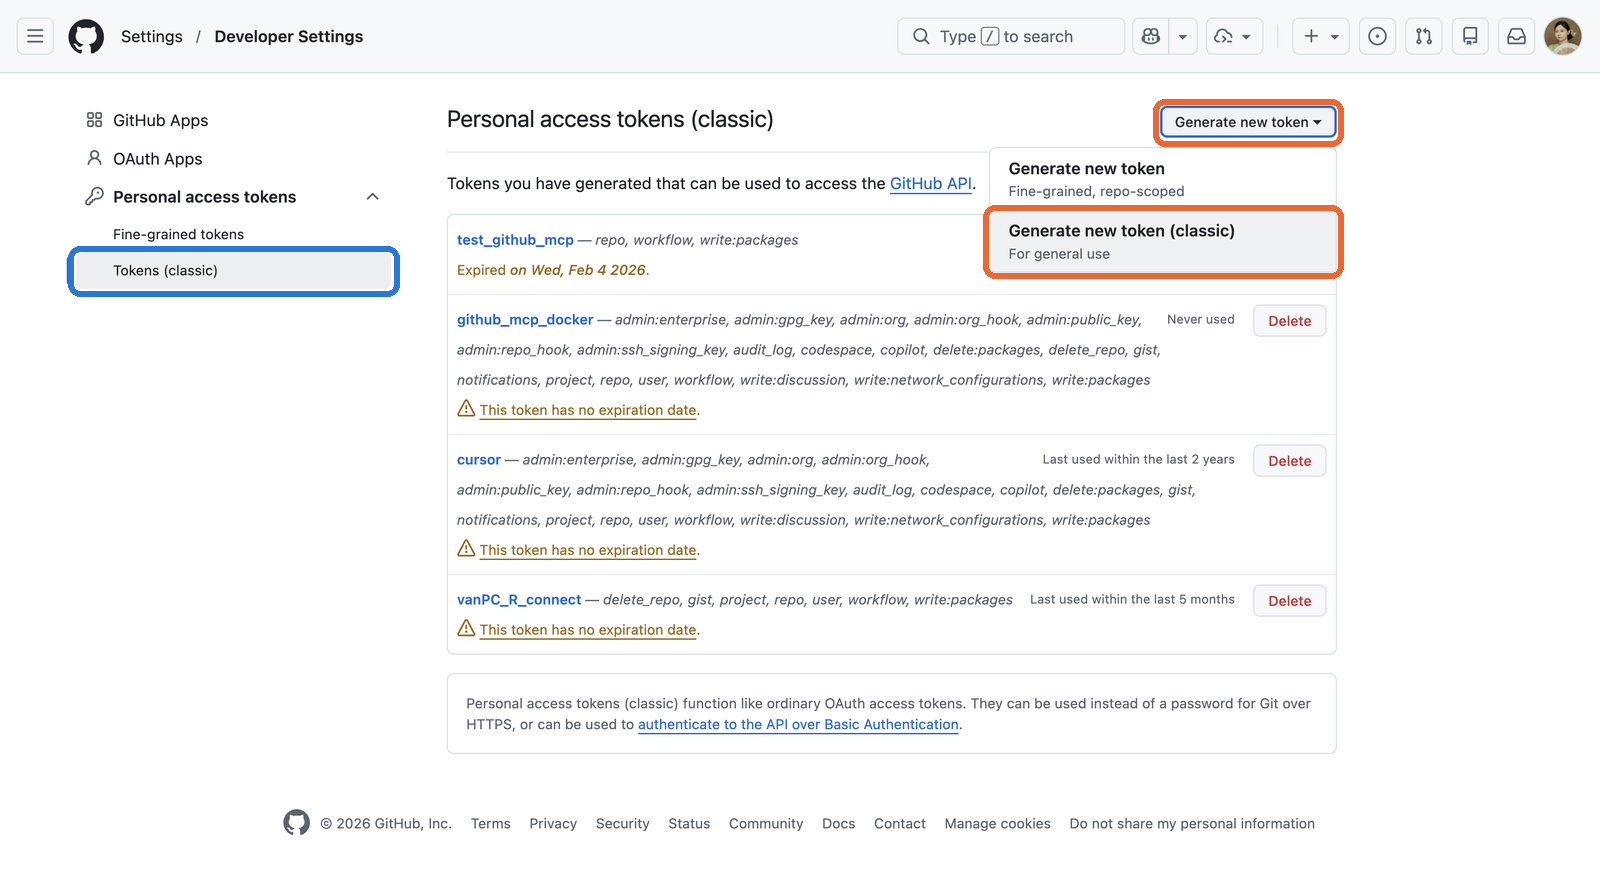
The Personal access tokens page, with Tokens classic, Generate new token and Generate new token classic highlighted.
Curious: classic or fine-grained? A fine-grained token is newer and can be limited to one repository. That is safer, but you have to pick the repository every time, and a new repository needs a new token. A classic token works for all your repositories, which is simpler for this course.

๐Ÿ”‘ Step 22: Name it and set an expiry

Under Note, give it a name you will recognize, e.g. DSCI 100. Set Expiration to 90 days, so it lasts past the final deadline.
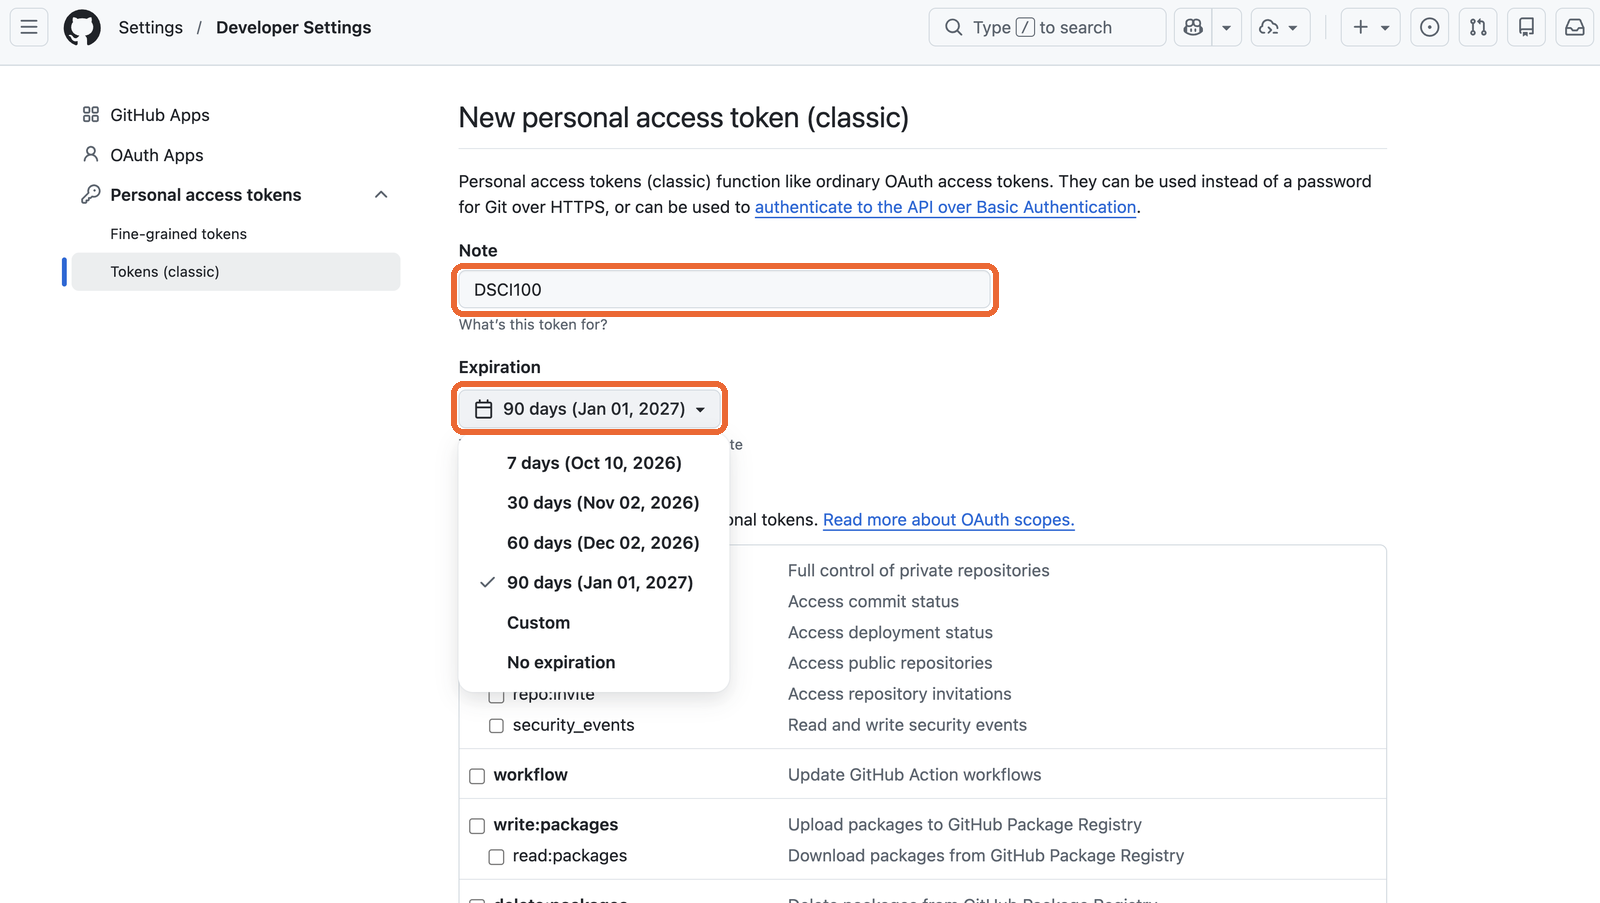
The New personal access token form, with the Note box and the Expiration menu set to 90 days highlighted.

๐Ÿ”‘ Step 23: Tick repo only

Tick the box next to repo. Its sub-boxes tick themselves. Leave every other box empty.
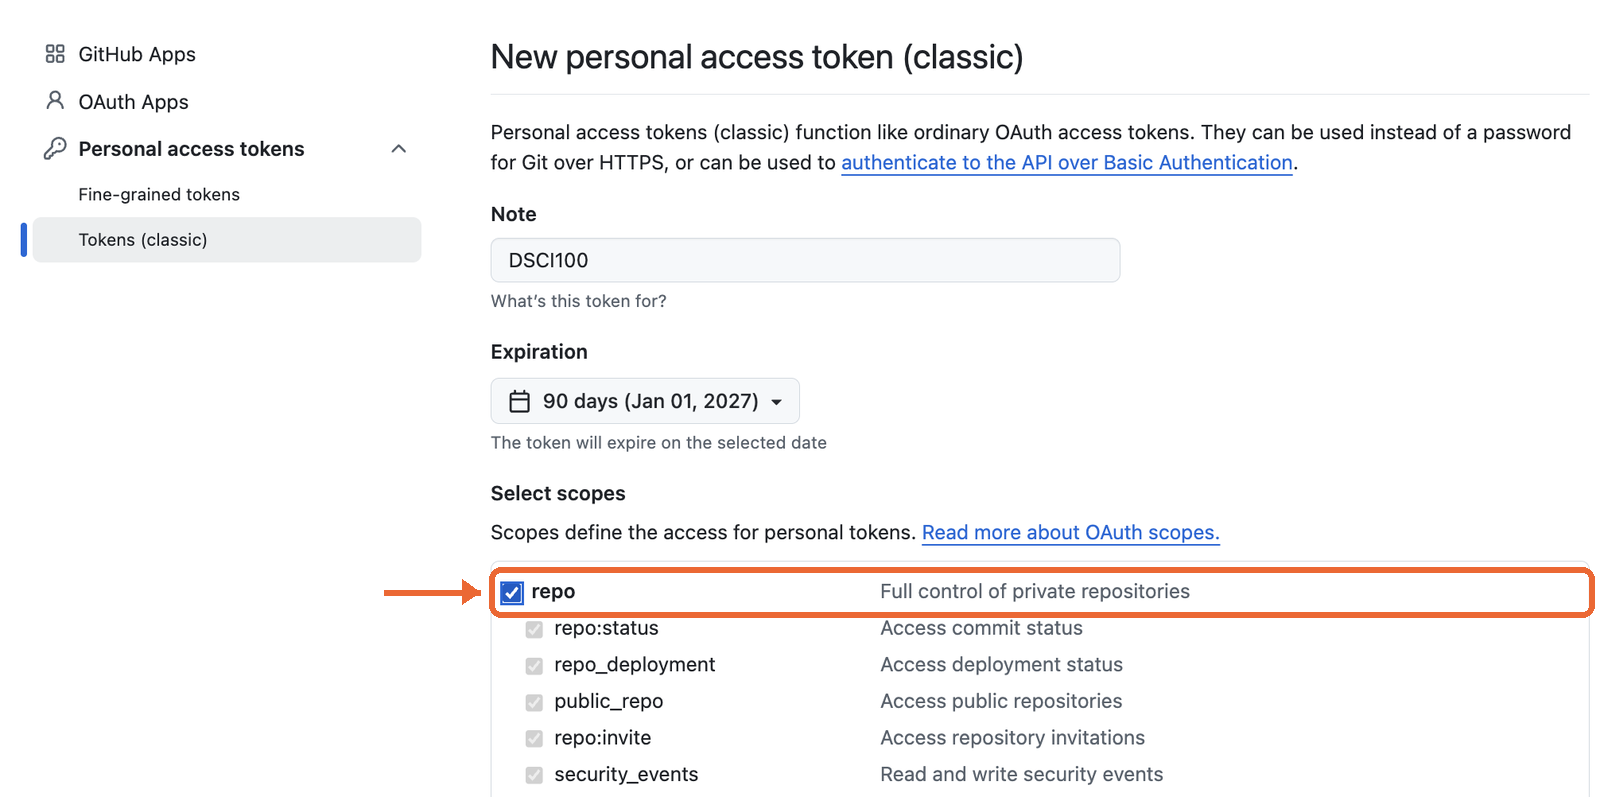
The list of token scopes, with the repo box highlighted.
Why only repo? Each box is one more door the key card opens. Pushing to your repository only needs repo. The other boxes are for things like running automated workflows, managing organizations, or deleting repositories, which this course never uses. If a token with every box ticked ever leaks, someone could delete all your repositories with it.

๐Ÿ”‘ Step 24: Generate the token

Scroll to the bottom and click Generate token.

The bottom of the token form, with the Generate token button highlighted.

๐Ÿ”‘ Step 25: Copy it now

Click the copy icon next to your token, and save it somewhere safe, like a password manager or a note on your own laptop.
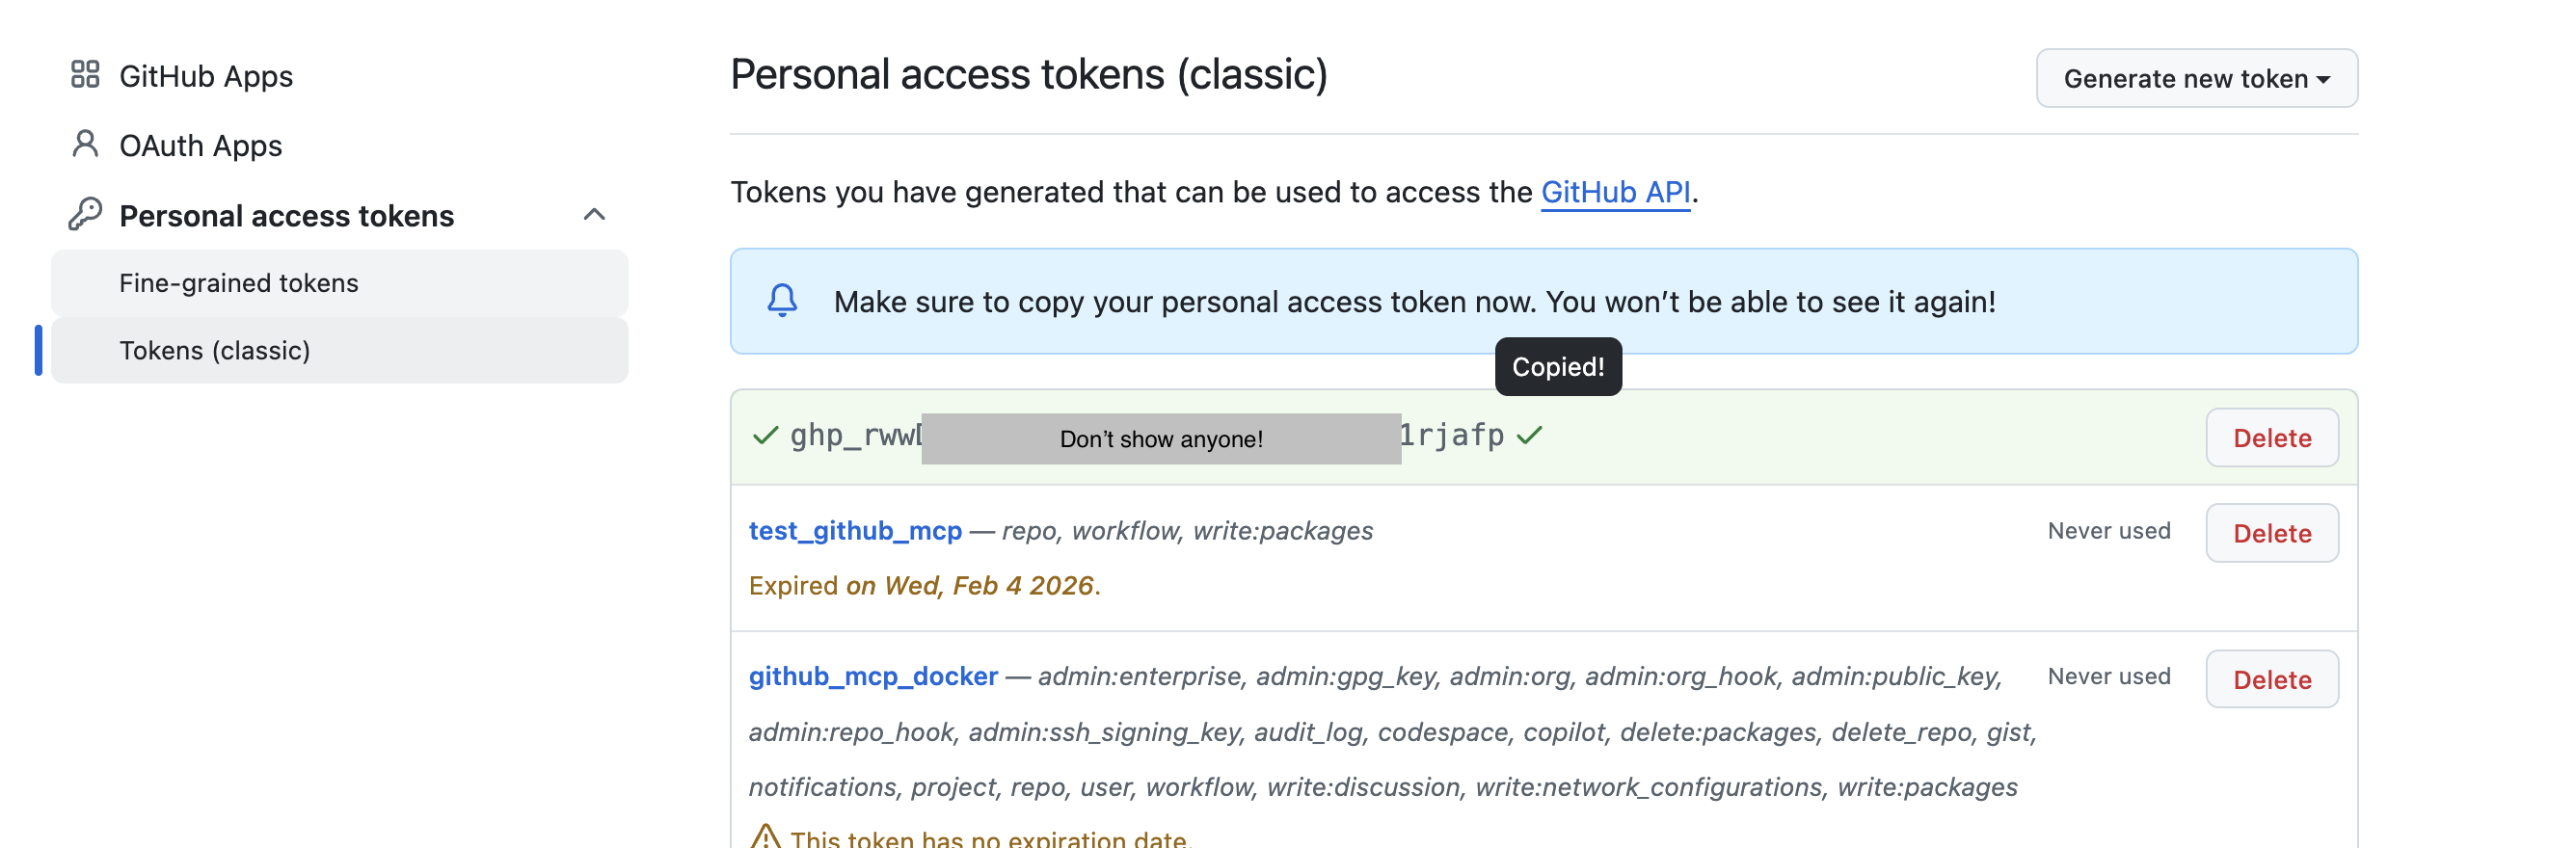
The new token shown once on GitHub, blurred here, with the message Make sure to copy your personal access token now.

Important

  • GitHub shows the token only once. If you lose it, generate a new one and delete the old one.
  • Never share it with anyone, and never paste it in your notebook. Your repository is public, so the whole world would see it.

Part 7: Push again

๐Ÿ“‹ Step 26: Push with your token

Back in JupyterHub, click push again. Type your GitHub username, paste your token, tick Save my login temporarily, and click Ok.
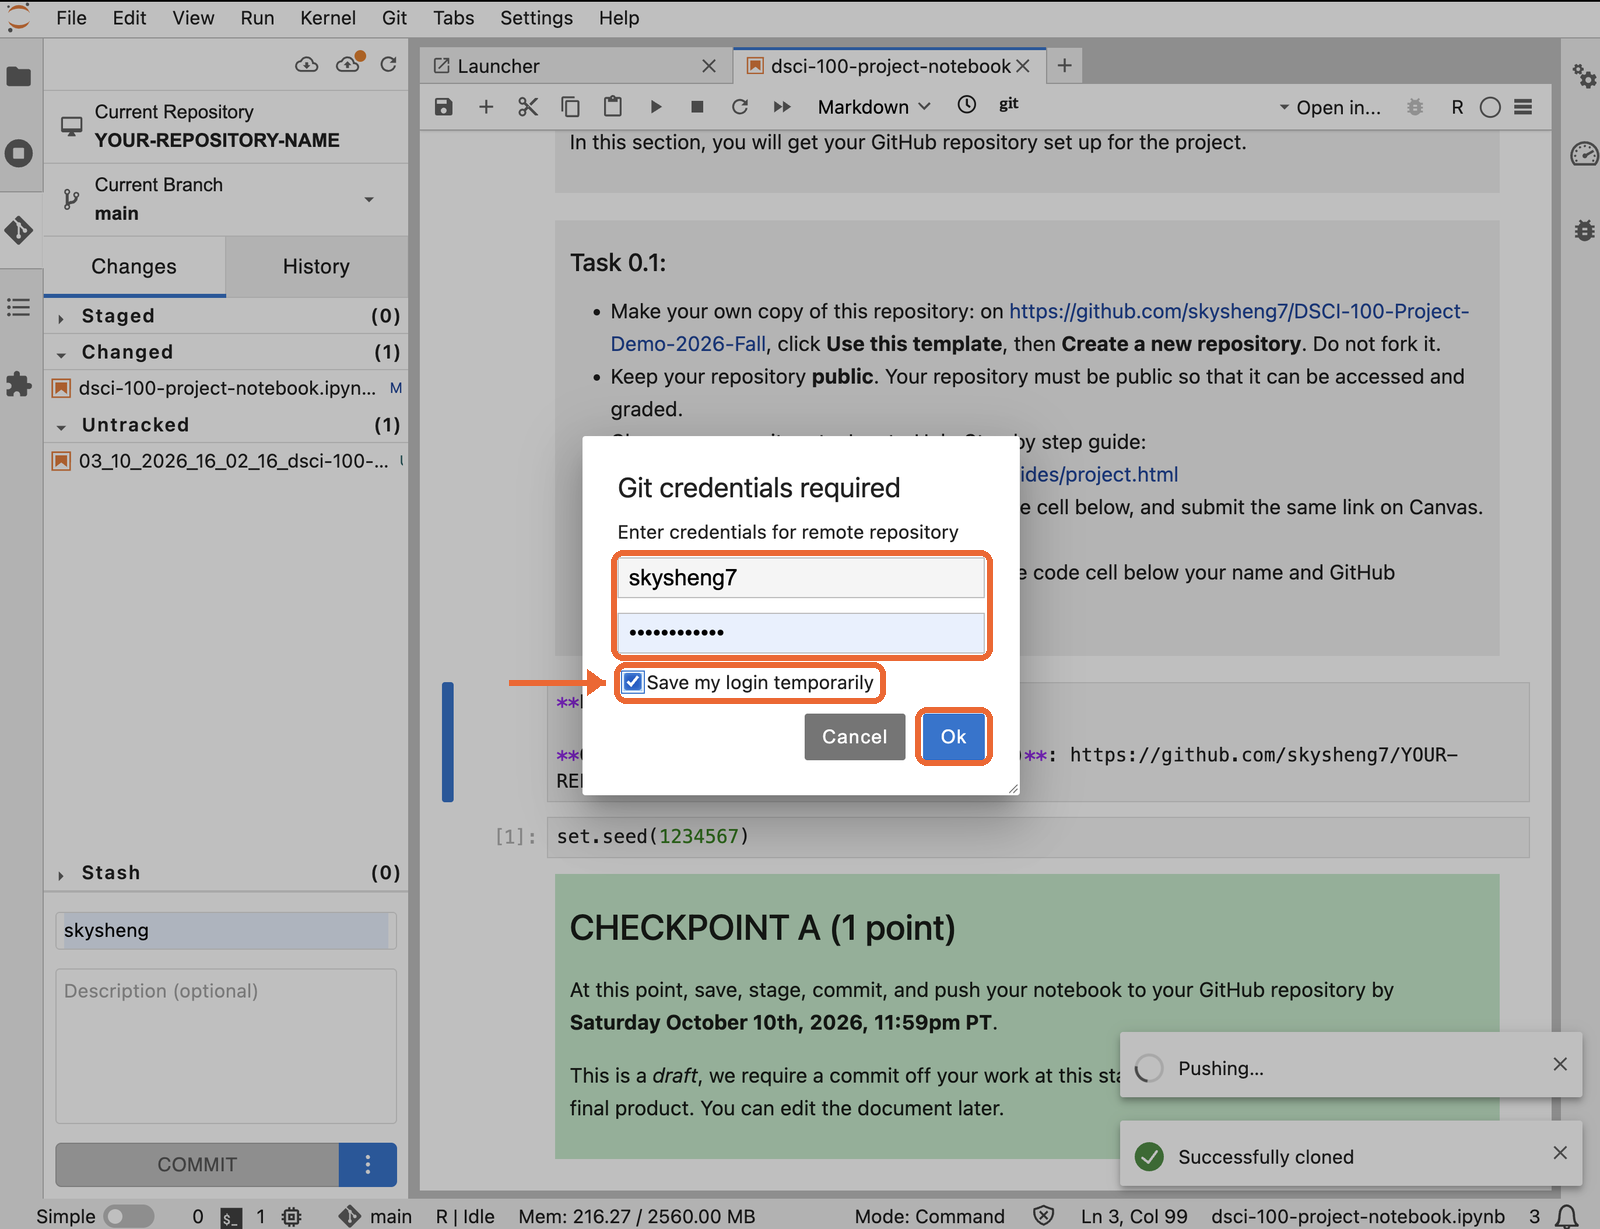
The Git credentials window filled in with the GitHub username skysheng7 and a hidden token, with Save my login temporarily ticked and the Ok button highlighted.

With the box ticked, JupyterHub remembers your token for a while, so you donโ€™t paste it on every push. When it asks again, paste the same token.

๐Ÿ“‹ Step 27: Pushed

You see Successfully pushed.
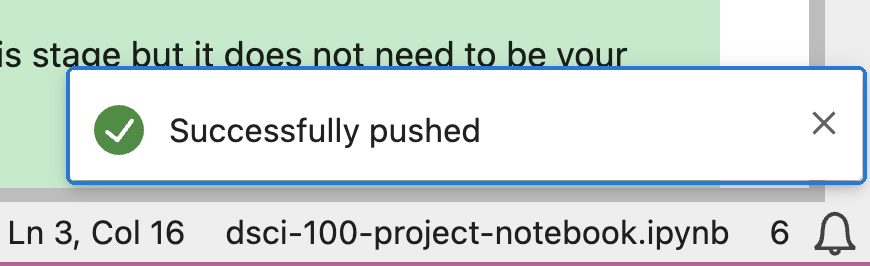
A Successfully pushed message in JupyterHub.

๐Ÿ“‹ Step 28: Check GitHub again

Refresh your repository on GitHub. It now shows 2 Commits, with your message at the top.
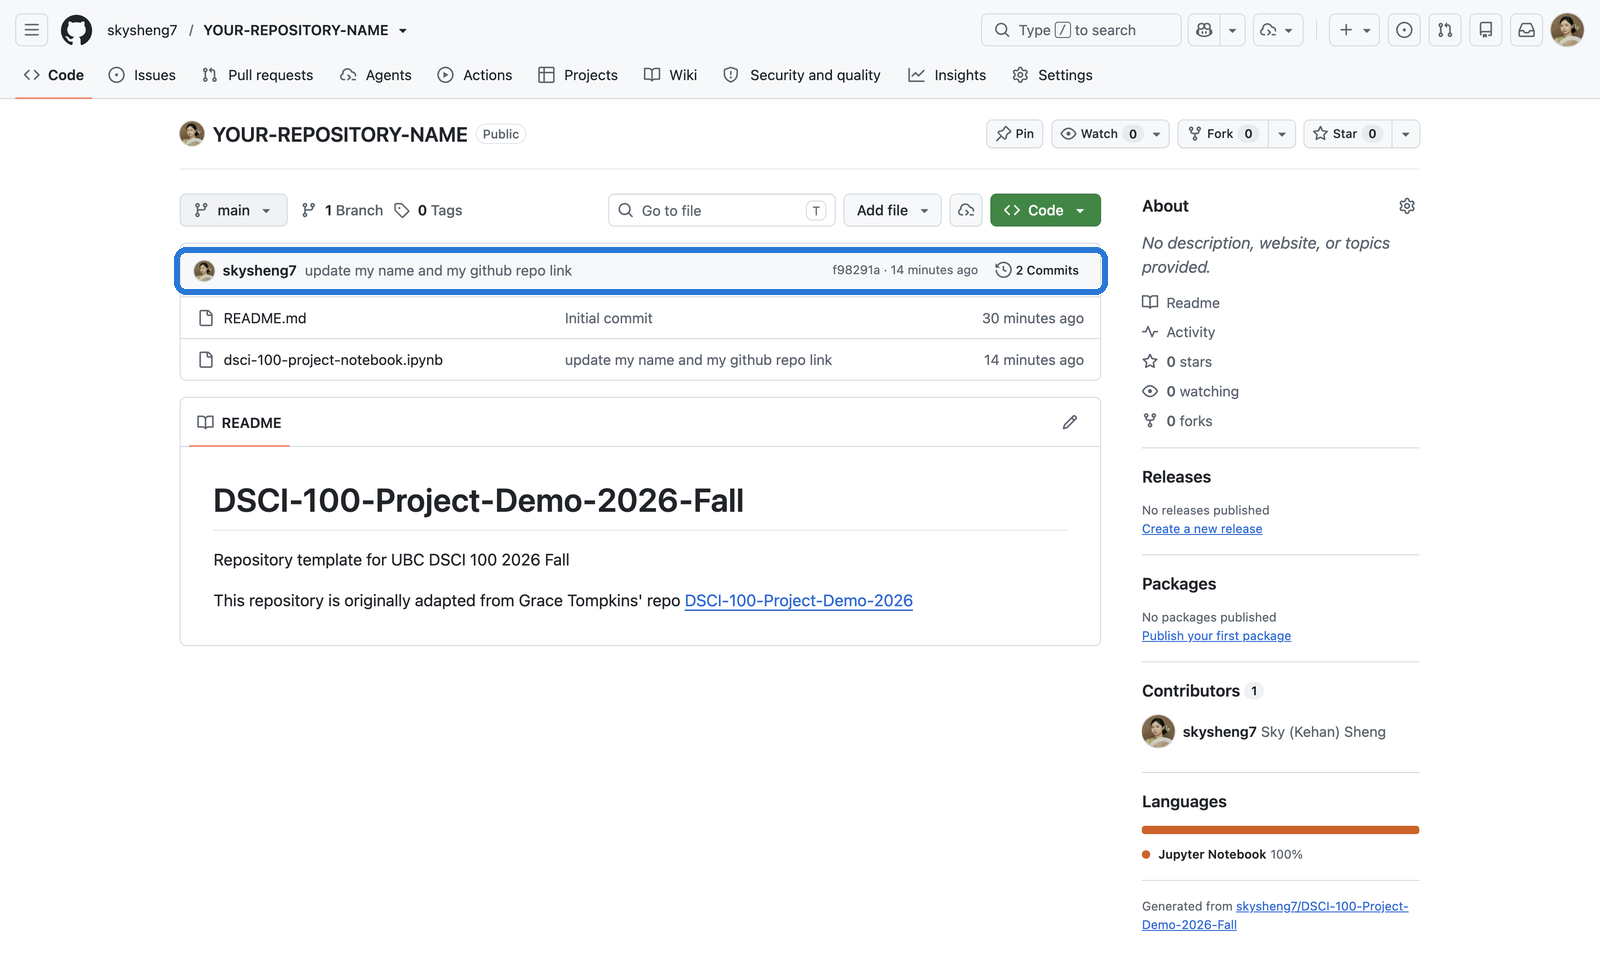
The repository on GitHub showing two commits, with the latest commit message at the top.

The time shown is when you committed in JupyterHub, not when you pushed.

๐Ÿ“‹ Step 29: Your changes are on GitHub

Click the notebook on GitHub. Your name, link and seed are there.
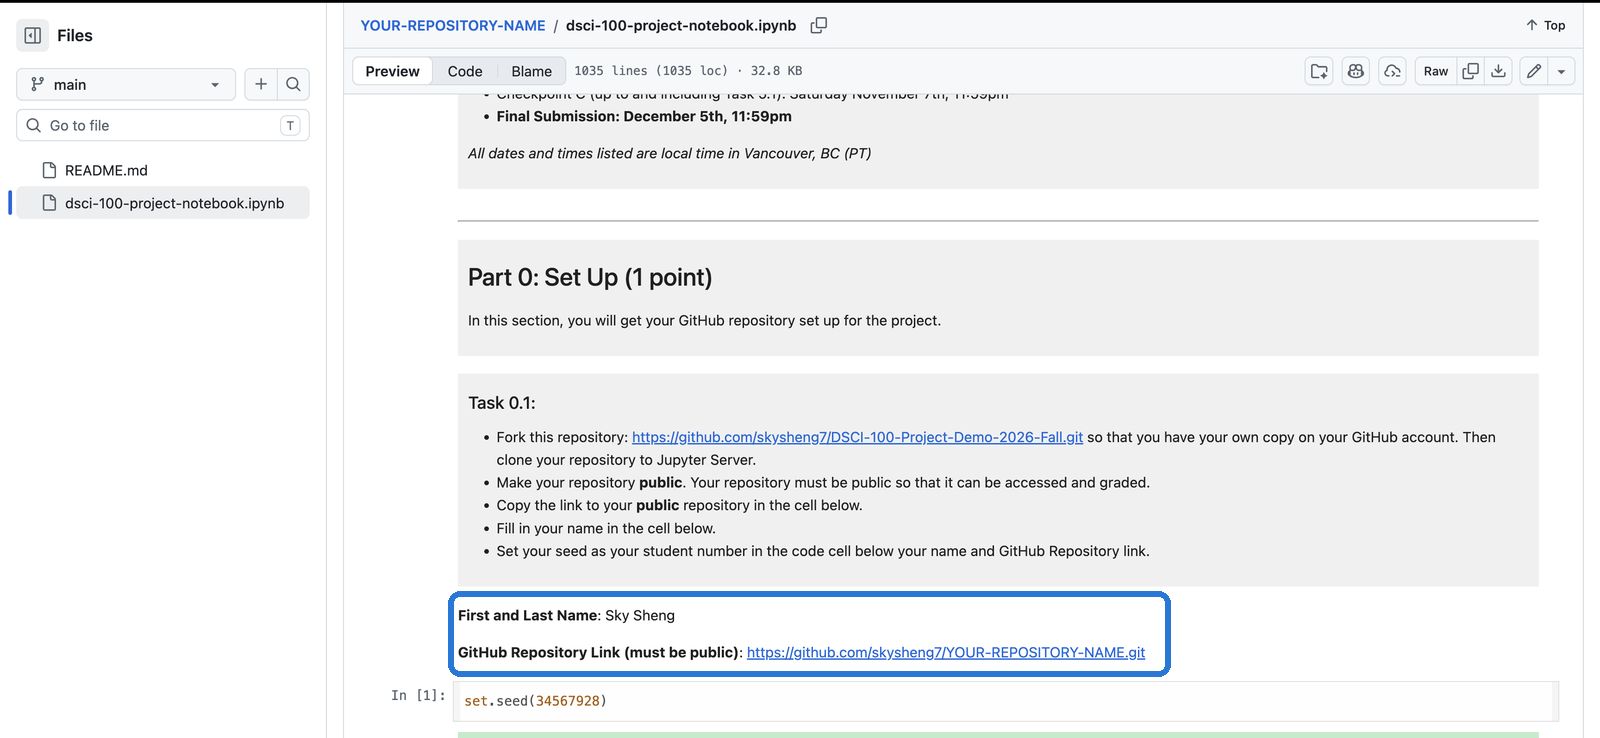
The notebook on GitHub, with the filled in name and repository link highlighted.

That is Checkpoint A done. ๐ŸŽ‰

Part 8: Bring changes back with pull

๐Ÿ“‹ Step 30: Edit a file on GitHub

Sometimes you change a file on GitHub instead of JupyterHub. Letโ€™s try it. On your repository, click the pencil next to README.
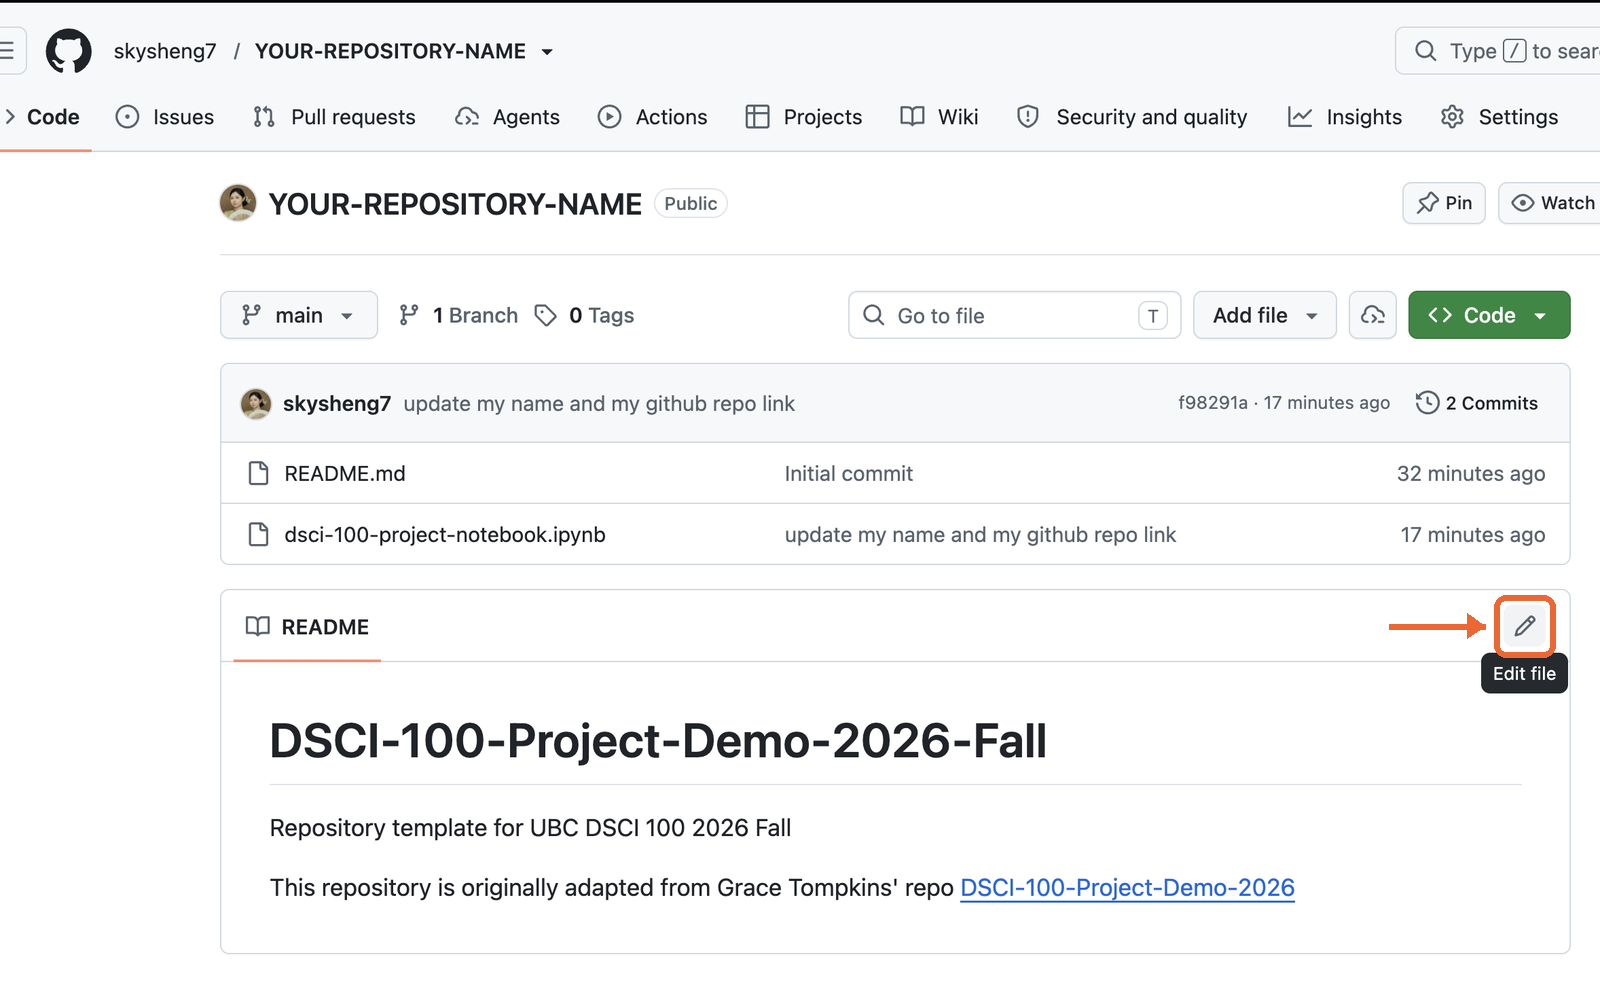
The repository's README on GitHub, with the pencil Edit file button highlighted.

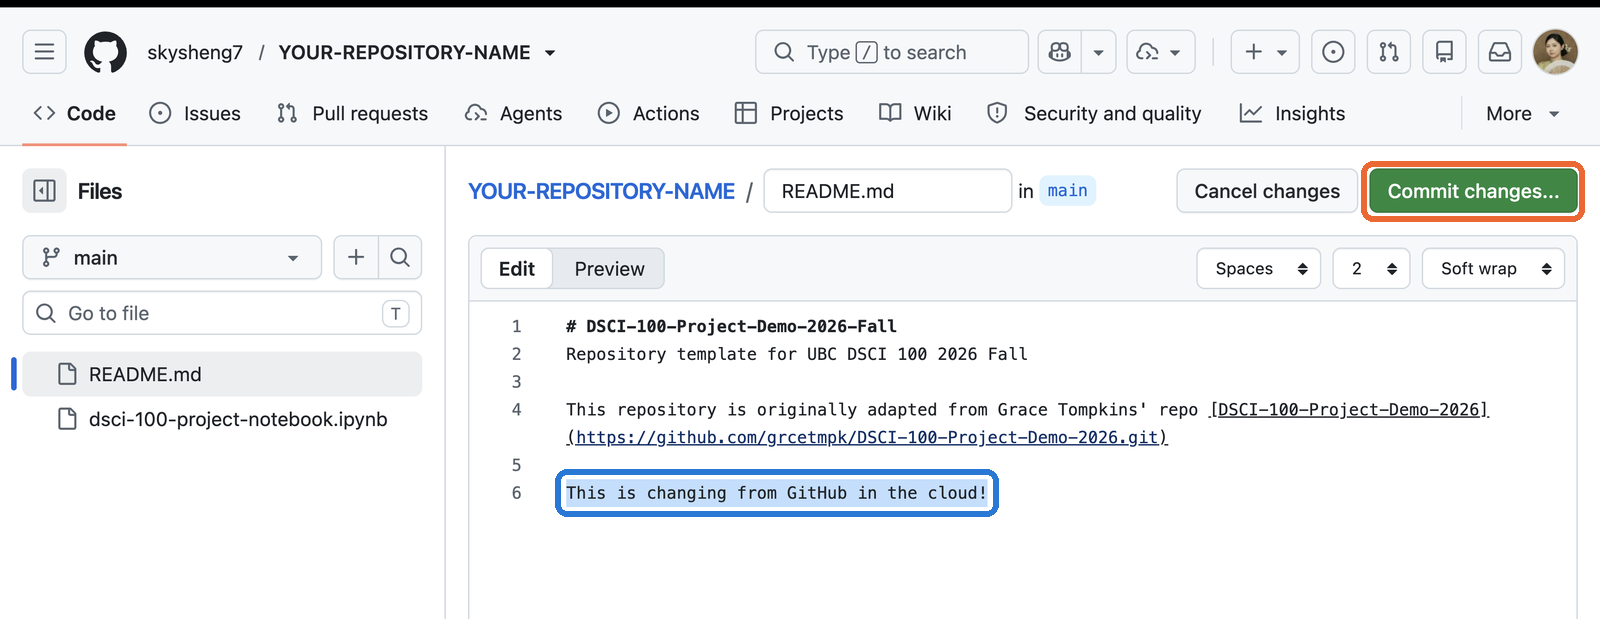
๐Ÿ“‹ Step 31: Add a sentence

Type a new sentence at the bottom. Click Commit changesโ€ฆ.

The README open for editing on GitHub, with a new sentence and the Commit changes button highlighted.

๐Ÿ“‹ Step 32: Commit on GitHub

Write a commit message, then click Commit changes. This snapshot is made on GitHub, so there is nothing to push.
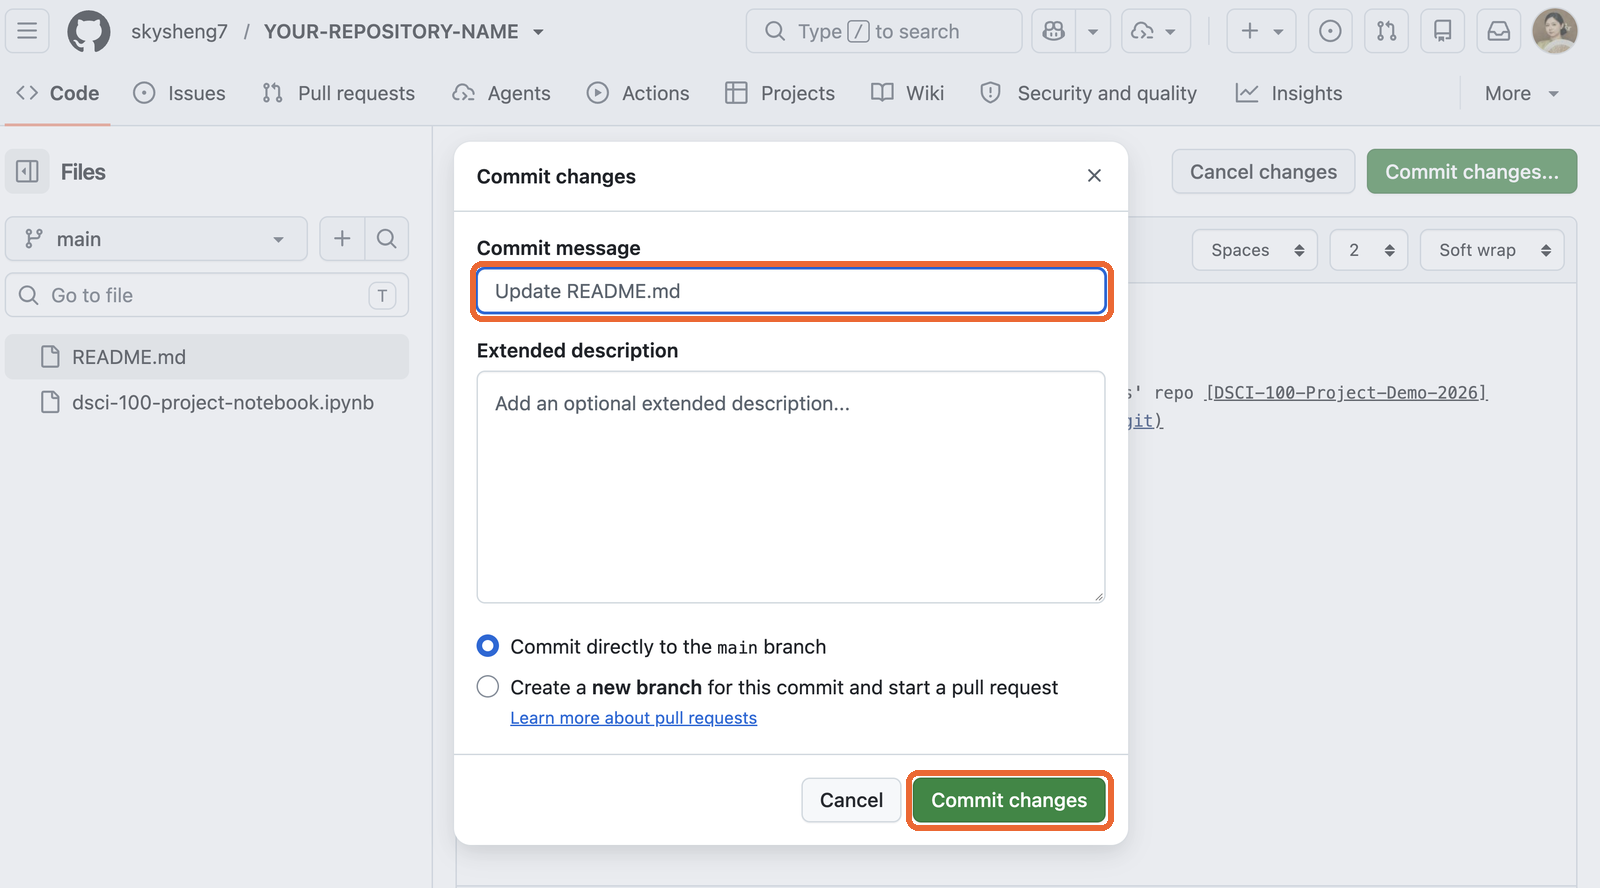
The Commit changes window on GitHub, with the message box and the Commit changes button highlighted.

๐Ÿ“‹ Step 33: JupyterHub doesnโ€™t know yet

Open README.md in JupyterHub. Your new sentence is not there.
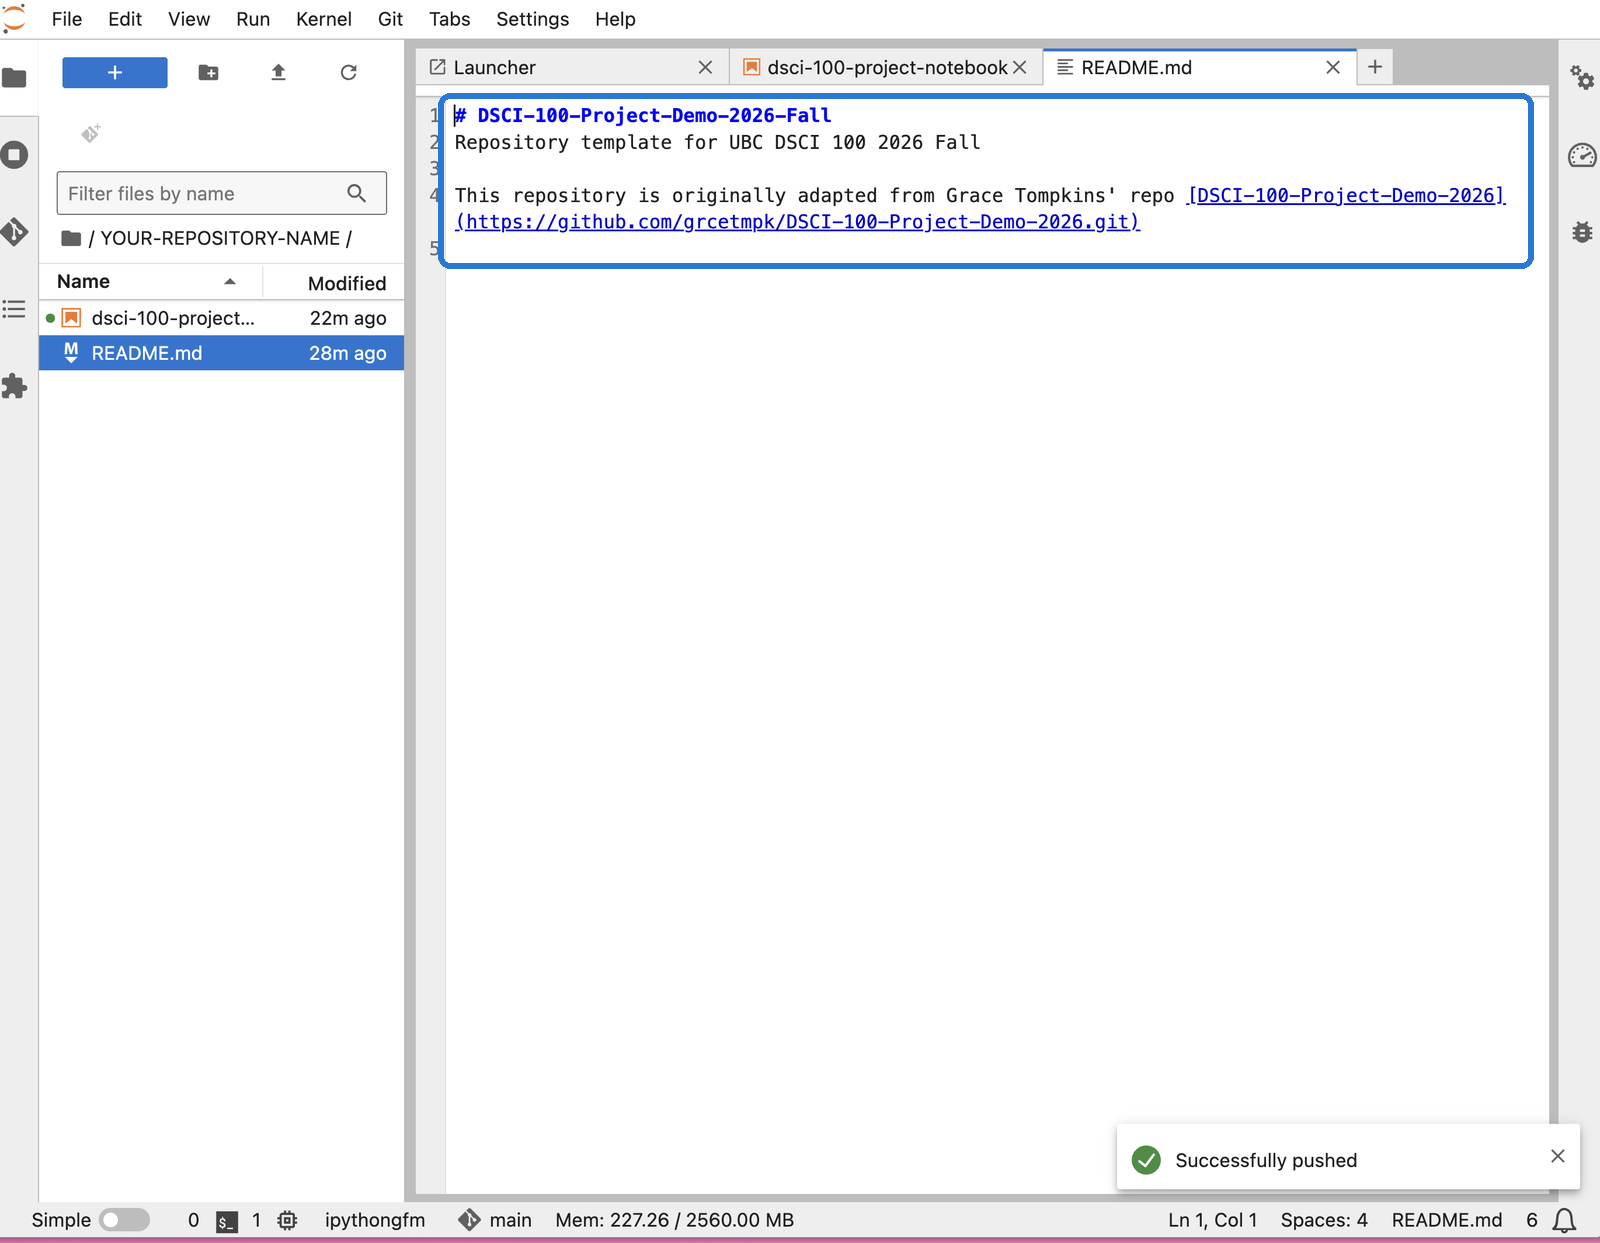
README.md open in JupyterHub without the new sentence.

๐Ÿ“‹ Step 34: Pull

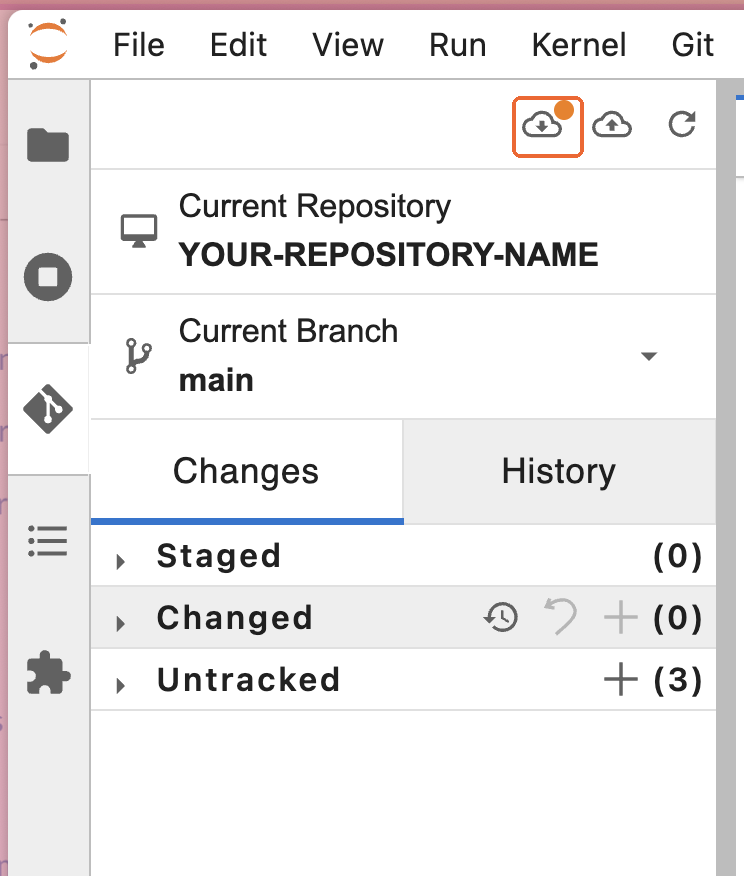
In the Git tab, the cloud with the down arrow has an orange dot: GitHub has a snapshot you donโ€™t. Click it. That is pull.

The Git tab in JupyterHub, with the pull button highlighted and an orange dot on it.

๐Ÿ“‹ Step 35: Pulled

You see Successfully pulled.
A Successfully pulled message in JupyterHub.

๐Ÿ“‹ Step 36: In sync again

Open README.md again. Your sentence is there.
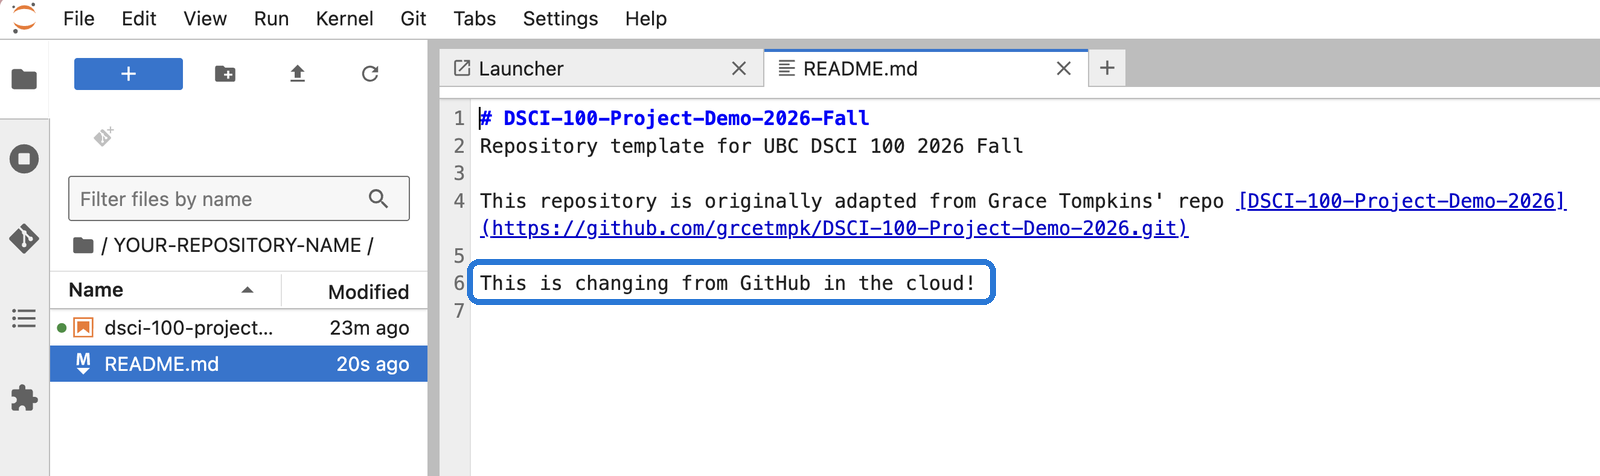
README.md in JupyterHub, now with the new sentence from GitHub.

โš ๏ธ If you ever edit on GitHub, pull in JupyterHub before you start working. Otherwise your next push gets rejected.

Part 9: Add a new file of your own

๐Ÿ“‹ Step 37: Make a new file

Check you are inside your repositoryโ€™s folder (see the path at the top). Right click on the empty space below your files, then New File.
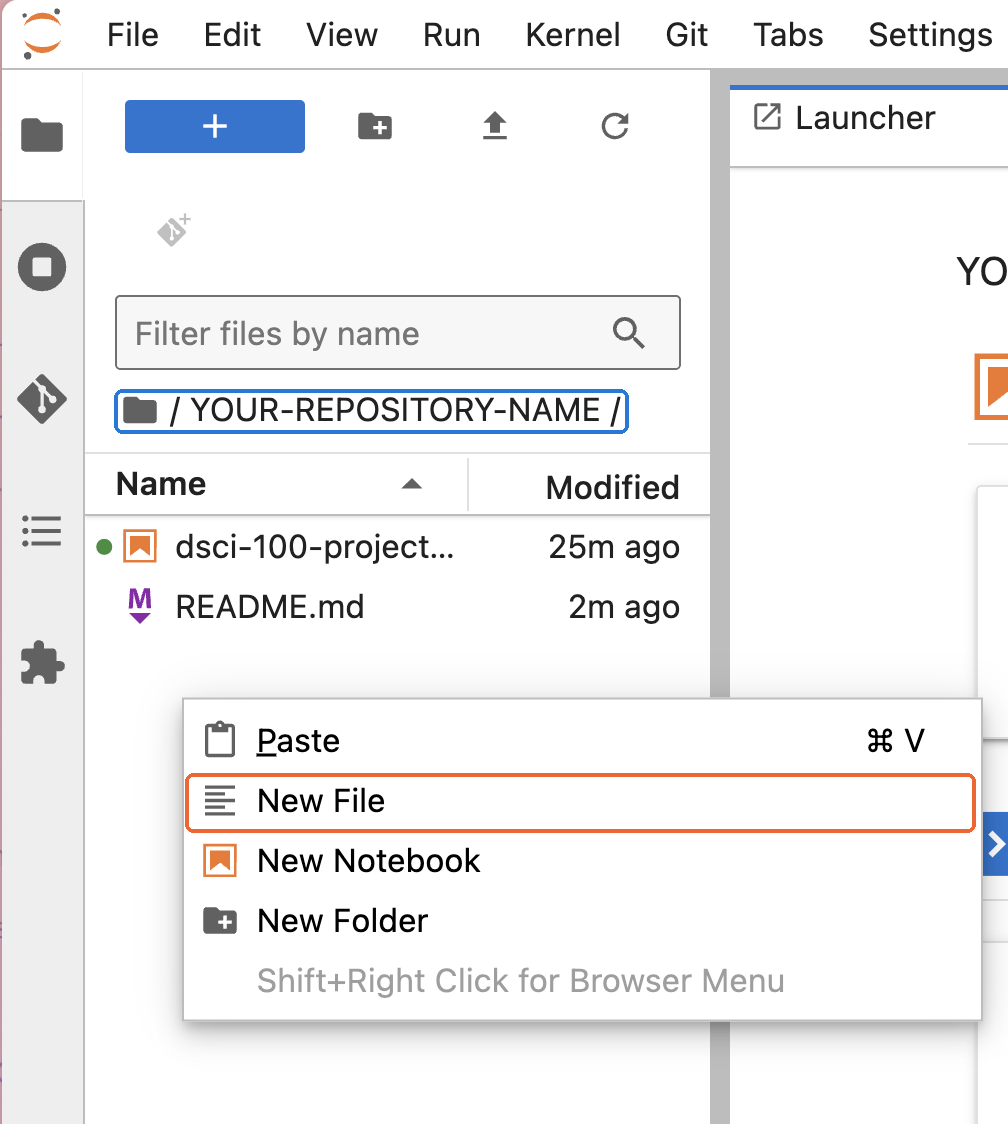
JupyterHub's file browser inside the repository folder, with a right click menu open and New File highlighted.

๐Ÿ“‹ Step 38: Name it

Type a name, e.g. my_note.txt, and press Enter. Double click it to open it.
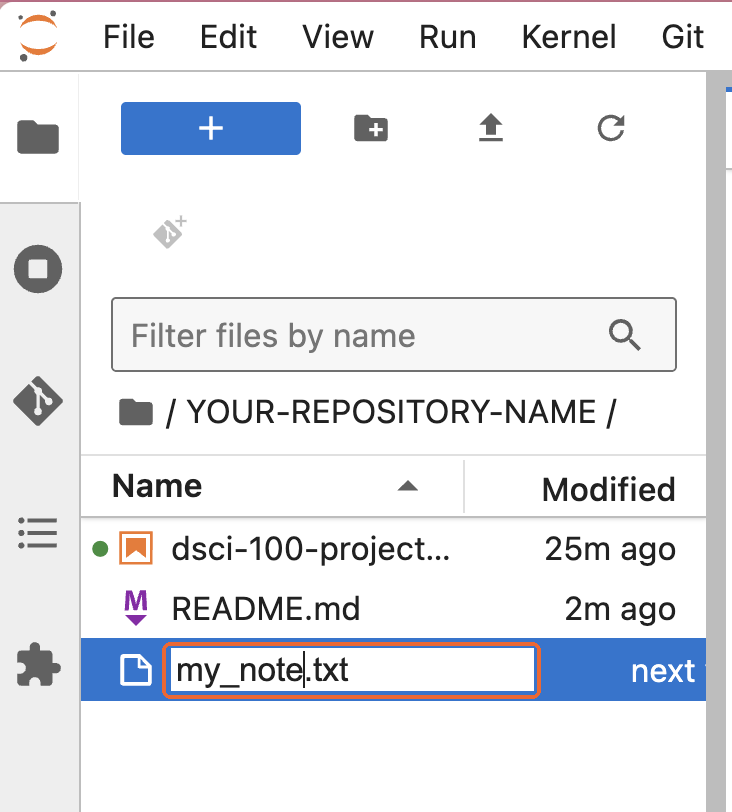
A new file in the repository folder being renamed to my_note.txt.

๐Ÿ“‹ Step 39: Write something and save

Type a sentence. Then File โ†’ Save Text, or Cmd+S (Mac) / Ctrl+S (Windows).
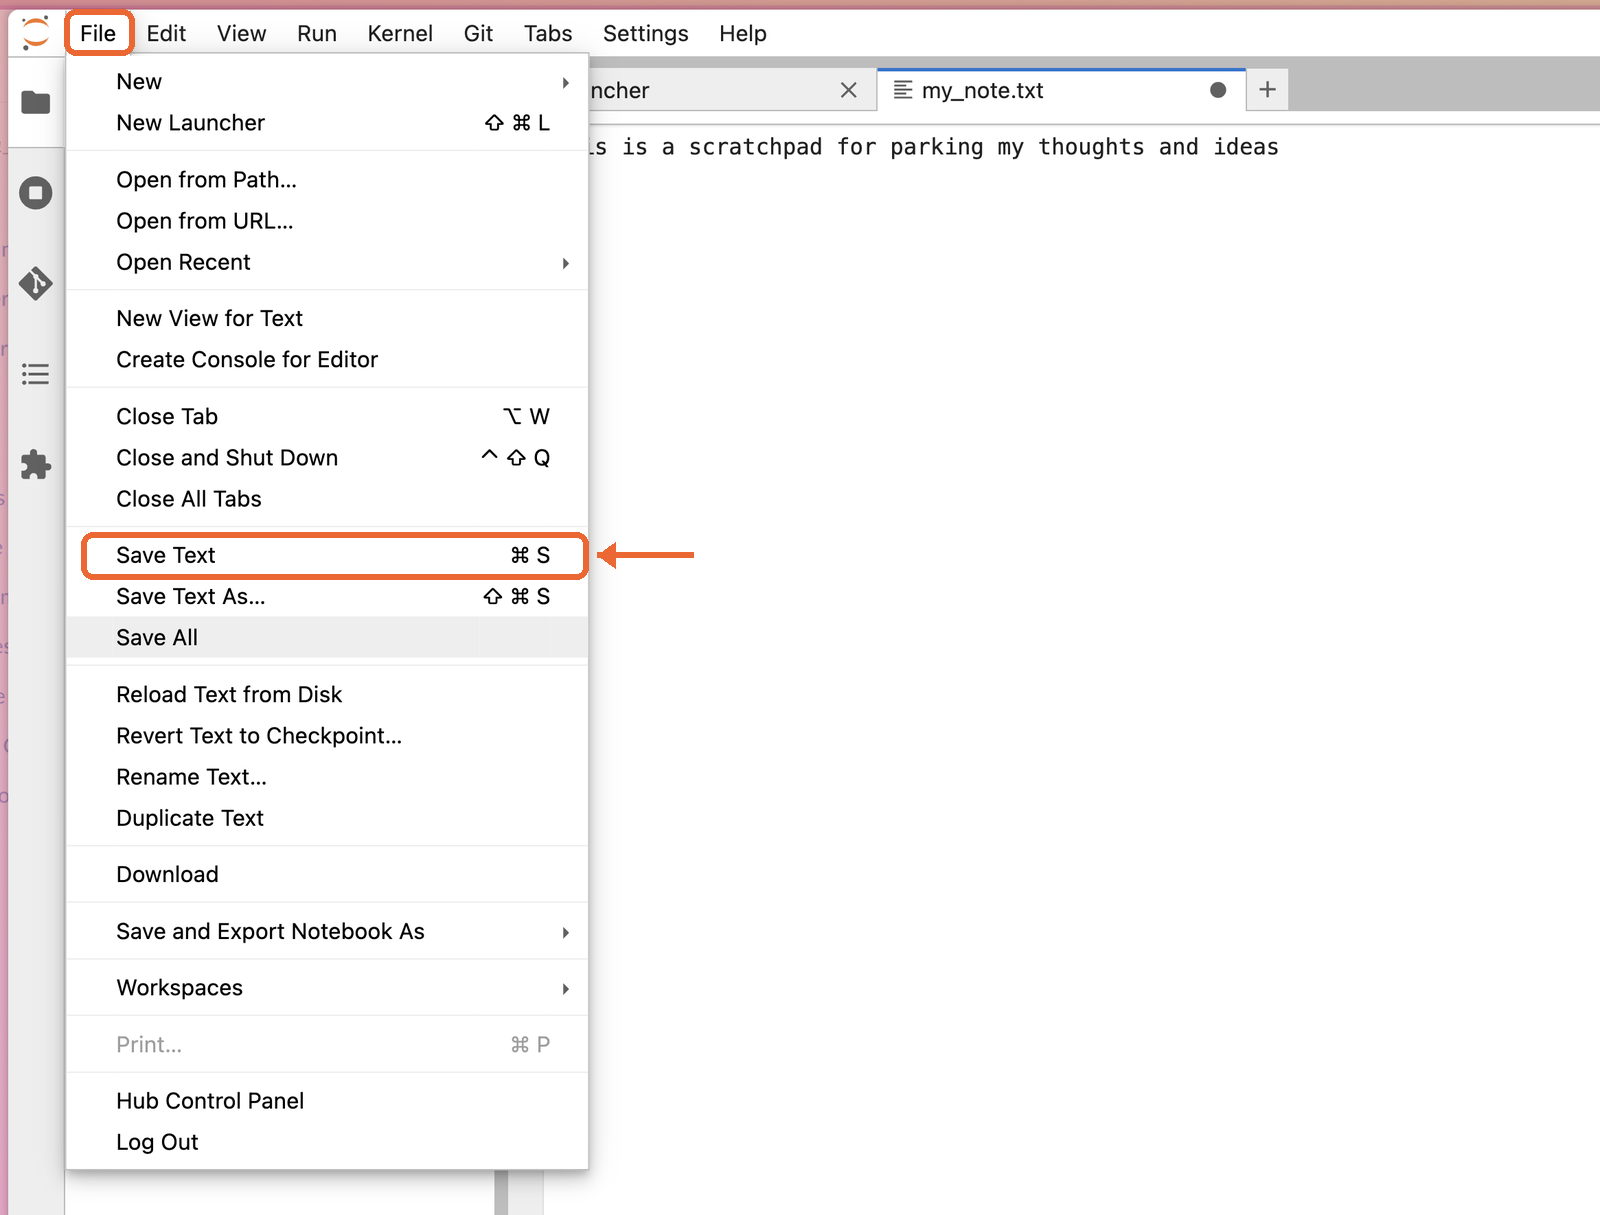
my_note.txt open with one sentence, and the File menu open with Save Text highlighted.

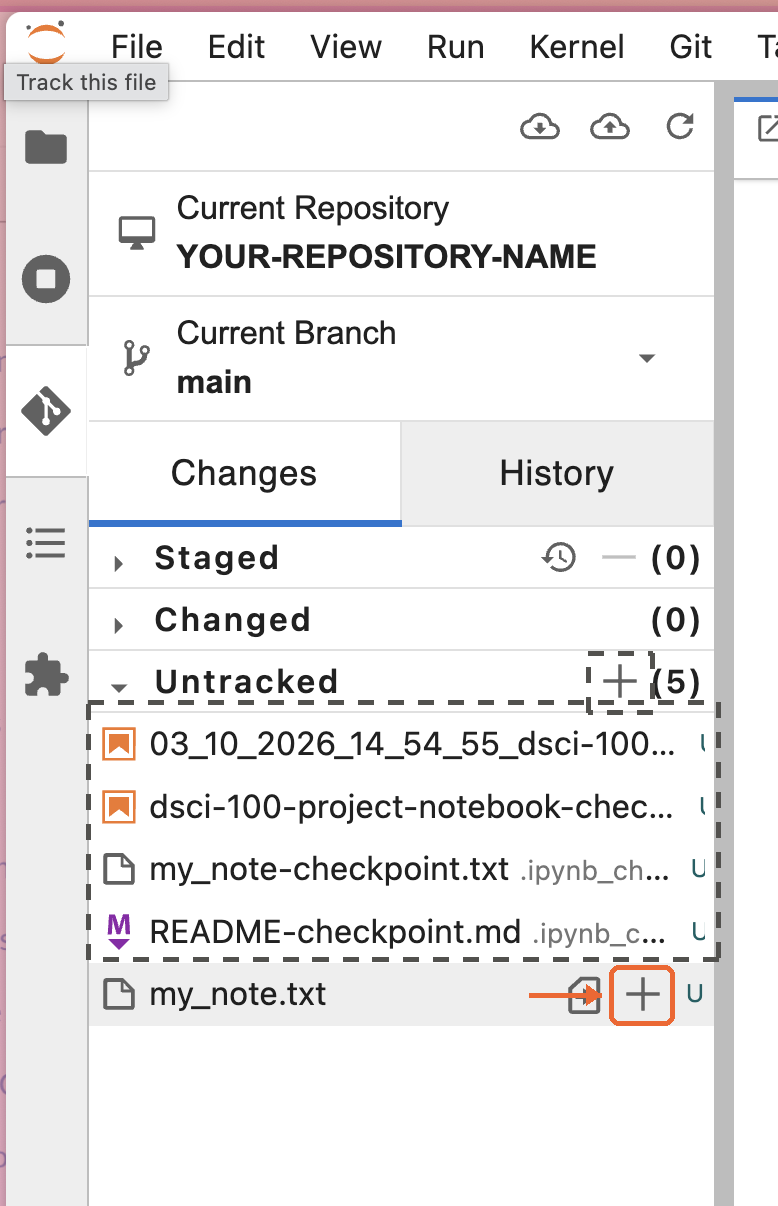
๐Ÿ“‹ Step 40: Add only your file

The Git tab with five untracked files. The + next to my_note.txt is highlighted. The + on the Untracked heading and the four backup files are marked to ignore.

Open the Git tab. my_note.txt is under Untracked: Git has never seen it before. Hover over it and click its own +.

  • โœ… The + next to one file adds just that file.
  • โŒ The + on the Untracked heading adds every untracked file, including JupyterHubโ€™s backups.

The files with checkpoint in their name are backups JupyterHub saves on its own, so you can go back to an earlier version. They are not part of your project, so they stay untracked.

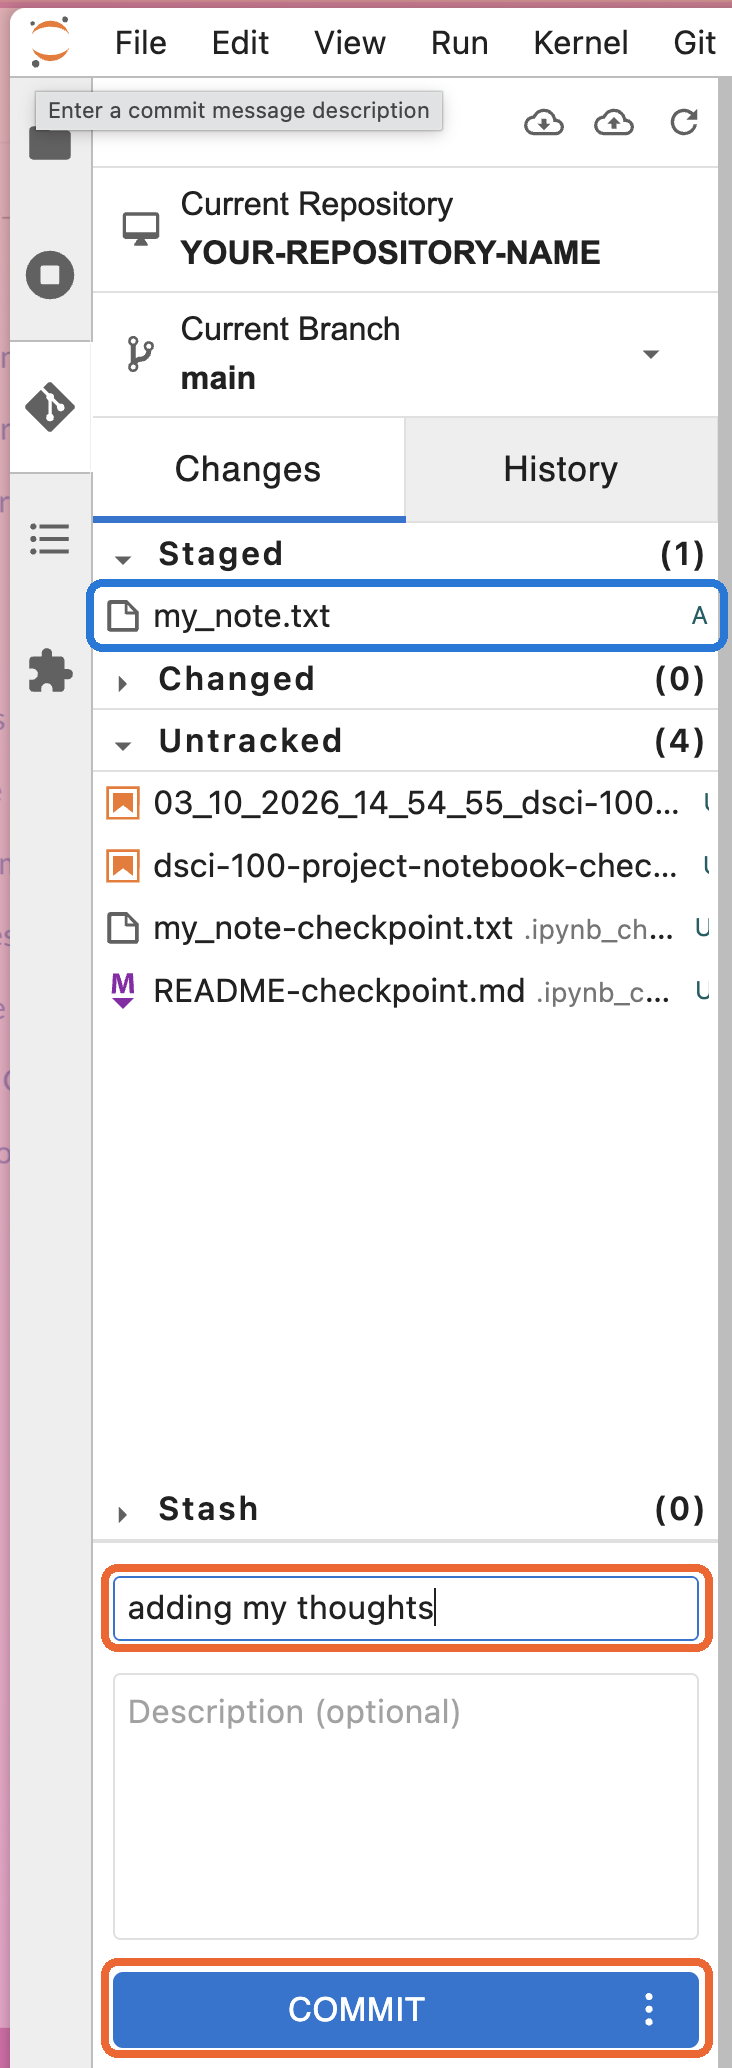
๐Ÿ“‹ Step 41: Commit it

The Git tab with my_note.txt under Staged, the message adding my thoughts, and the Commit button highlighted.

my_note.txt is now under Staged. The A next to it means a new file is being added.

Write a message and click Commit.

๐Ÿ“‹ Step 42: Push

The push button has an orange dot again: 1 commit GitHub doesnโ€™t have. Click it.

The Git tab with the push button highlighted, and a tooltip saying ahead by 1 commits.

You ticked Save my login temporarily in step 26, so JupyterHub pushes without asking. Refresh your repository on GitHub: my_note.txt is there.

Hand in your work

๐Ÿ“‹ Every checkpoint: the same loop

  1. Save your notebook.
  2. Git tab: click + next to your notebook to stage it. Never the + on the Untracked heading.
  3. Write a message, click Commit.
  4. Click push (cloud, up arrow).
  5. Open your repository on GitHub and check your commit is there.

If it is not on GitHub, I canโ€™t see it.

๐Ÿ†˜ FAQ: common errors

You see What it means Fix
Authentication failed, or the sign in box keeps coming back Wrong username, or a password instead of a token GitHub username, then paste the token. Expired? Make a new one.
Repository not found when cloning Typo in the address, or the repository is private Copy the address again from the green Code button. Check it is public.
Updates were rejected because the remote contains work that you do not have locally GitHub has a snapshot you donโ€™t, e.g. an edit made on GitHub Pull, then push.
nothing to commit, working tree clean Nothing new to save Save your notebook first, then stage it with +.

โ“ Questions?

  • Ask on Piazza, or come to office hours. Bring a screenshot of the error.
  • Want to save these slides? Right click โ†’ Print โ†’ Save to PDF.